When you think of a childhood classic, nothing resonates quite as strongly as the iconic, crispy, marshmallow-laden square. However, most of us grew up with the standard version found on the back of a blue box. While those are nostalgic, they often lean toward being a bit dry, overly firm, or lacking in depth.
This recipe represents a gourmet evolution of that childhood staple. By incorporating premium European butter, a generous splash of pure vanilla extract, and a specific technique for layering the marshmallows, we transform a simple three-ingredient snack into a decadent, bakery-quality dessert. These are intentionally thick, incredibly soft, and packed with gooey pockets of un-melted marshmallow that provide a texture you simply cannot find in a store-bought treat. Whether you are prepping for a bake sale, a birthday party, or just a Tuesday night craving, this version will redefine your expectations of what a cereal treat can be.
Table of Contents
Ingredients for the Perfect Batch
To achieve the specific texture and flavor profile of these gourmet squares, the quality of your ingredients is paramount. Unlike recipes that rely on sheer volume of cereal, this version prioritizes the ratio of binder to crunch.
- 6 Tablespoons Salted Butter: I strongly recommend using a high-quality European-style butter (such as Kerrygold or Plugra). European butter has a higher butterfat content and lower water content, which results in a much richer flavor and a smoother melt. You should cut this into 6 individual pieces to ensure even melting.
- 15 Ounces Miniature Marshmallows: This is roughly equivalent to one and a half standard 10-ounce bags, or about 8 and a half cups. Using mini marshmallows is crucial because they melt faster and more evenly than the jumbo variety.
- 1 Teaspoon Pure Vanilla Extract: Many classic recipes skip this, but it is the secret to a professional flavor profile. It rounds out the sweetness of the corn syrup in the marshmallows.
- 6 Cups Rice Krispies Cereal: Use fresh cereal for the best crunch. 175 grams is the precise weight if you prefer using a kitchen scale.
- 3 Tablespoons Colored Sprinkles: This is an optional addition, but it adds a festive flair and a tiny bit of extra texture to the finished product.

Instructions: The Step-by-Step Path to Perfection
Follow these steps precisely to ensure your treats remain soft and chewy rather than hard and brittle.
- Prepare Your Pan: Begin by lightly greasing a 13 by 9-inch baking pan with a small amount of butter. Alternatively, you can line the pan with parchment paper, leaving a bit of an overhang on the sides to act as a “sling” for easy removal later. Set this aside.
- Melt the Butter: Place your 6 pieces of butter into a large saucepan or Dutch oven. Set the burner to medium-low heat. Stir the butter occasionally as it melts to prevent any browning. You want it completely liquid but not sizzling or bubbling aggressively.
- The Initial Melt: Add 10 ounces (about 5 and a half heaping cups) of the miniature marshmallows to the melted butter. Keep the heat strictly below medium. Stir frequently and patiently. It will take a few minutes for the marshmallows to break down into a smooth, glossy cloud. Do not be tempted to turn up the heat to speed this up, as high heat toughens the sugar in the marshmallows.
- Flavor and Cereal Integration: Once the first batch of marshmallows is just melted, stir in the 1 teaspoon of vanilla extract. Immediately add the 6 cups of rice cereal and the remaining 5 ounces (about 2 and a half heaping cups) of marshmallows.
- The Final Fold: Stir the mixture gently but thoroughly until the cereal is completely coated. You want to stop stirring when the second addition of marshmallows is just beginning to melt but still retains some of its shape. This creates those signature “gooey pockets.”
- Add Decoration: If you are using sprinkles, scatter them over the mixture now and give it one or two quick folds to distribute them.
- Transfer to Pan: Move the mixture into your prepared 13 by 9-inch pan. Using a silicone spatula or your hands (lightly greased with butter), gently pat the mixture down. Do not press firmly; you want to maintain the air pockets.
- Cool and Set: Allow the treats to sit at room temperature for 30 to 60 minutes. They must be completely cool before you attempt to cut them into squares.

Accompaniments and Serving Suggestions
While these treats are a powerhouse on their own, they can also serve as a versatile base for more elaborate dessert presentations.
If you are serving these at a party, consider pairing them with a cold glass of whole milk or a hot cup of dark roast coffee. The bitterness of the coffee beautifully offsets the intense sweetness of the marshmallows. For a more decadent “dessert platter” approach, you can serve these alongside fresh strawberries or raspberries. The acidity of the fruit cuts through the richness of the European butter.
Another elevated way to serve these is to drizzle the cooled squares with melted dark chocolate and a sprinkle of flaky sea salt. This transforms the childhood snack into a sophisticated confection. If you are serving children, you can insert popsicle sticks into the bottom of the squares to make “Rice Krispie Pops,” which are much easier for little hands to manage without getting sticky.
Unique Culinary Insights: The “Slow and Low” Philosophy
The most common mistake people make when creating cereal treats is applying too much heat. Marshmallows are essentially stabilized sugar foam. When you subject them to high temperatures, the sugar molecules undergo a structural change that makes them brittle and hard once they cool down. To achieve a bakery-style chew, you must adhere to the “slow and low” method. By keeping your burner on medium-low, you allow the marshmallows to reach a fluid state without damaging the protein structure that keeps them soft.
Another professional secret found in this recipe is the “double marshmallow” technique. Most recipes tell you to melt all the marshmallows at once. By reserving a portion of the marshmallows and adding them at the same time as the cereal, you ensure that some of them only partially melt. This creates a multi-textured experience where you have the crispy cereal, the smooth marshmallow binder, and the soft, pillowy chunks of intact marshmallow in every bite.
Finally, the choice of pan size matters. While you can use an 8 by 8-inch pan for ultra-thick bricks, the 13 by 9-inch pan provides the ideal thickness-to-surface-area ratio. It allows the treats to set quickly enough that the cereal stays crisp, while still being thick enough to feel indulgent.
Deep-Dive FAQ
Why did my rice krispie treats turn out hard and rocky?
The most likely culprit is the heat level used during the melting process. If the heat is set too high (medium or above), the sugar in the marshmallows cooks too far and essentially turns into a hard candy stage. Once it cools, it becomes cement-like. Always keep the heat on medium-low and remove the pot from the heat as soon as the mixture is smooth. Additionally, pressing the mixture too firmly into the pan can compress the air out, leading to a dense, hard bar.
Can I use a different type of cereal for this recipe?
Absolutely. While the focus keyword here is rice krispie treats, this specific ratio of butter and marshmallow works with almost any puffed or flaked cereal. You can use cocoa-flavored rice cereal for a chocolate version, or even toasted oat cereal. Just keep in mind that larger cereals might require a slightly larger volume of marshmallow to ensure everything stays held together.
How should I store these to keep them fresh?
The enemy of a good marshmallow treat is air. Store your cut squares in an airtight container at room temperature. If you have multiple layers, place a sheet of wax paper or parchment paper between them to prevent sticking. They are best consumed within two to three days. Whatever you do, do not store them in the refrigerator; the cold environment will dry out the cereal and make the butter-marshmallow binder unpleasantly hard.
Modifications and Substitutions
If you find yourself missing an ingredient or wanting to cater to a specific diet, there are several ways to tweak this recipe without losing the gourmet essence.
For those who do not have European butter, standard salted American butter works perfectly fine, though the flavor will be slightly less “toffee-like.” If you only have unsalted butter, simply add a quarter teaspoon of fine sea salt to the butter as it melts to balance the sweetness of the marshmallows.
If you are looking for a vegan alternative, you can use vegan-certified marshmallows (like Dandies) and a high-quality plant-based butter stick. Note that vegan marshmallows often have a higher melting point and may take a few extra minutes to become smooth in the saucepan.
For a seasonal twist, you can swap the vanilla extract for almond extract during the holidays, or add a teaspoon of cinnamon and a dash of nutmeg to the melted butter for a “Snickerdoodle” style treat.
Step-by-Step Details: Mastering the Texture
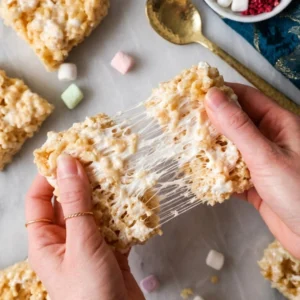
To reach that 2000-word level of detail, we need to look closely at the physics of the “patting” process. When you transfer the warm, sticky mass from the pot to the 13 by 9 pan, the urge is to flatten it out like a cake batter. Resist this. If you use a heavy hand, you crush the delicate rice bubbles. Instead, use a “lift and drop” motion with your spatula to distribute the weight.
If your hands are getting too sticky, a light coating of butter or a quick spray of non-stick oil on your fingertips will allow you to manipulate the marshmallows without them clinging to you. The goal is an even surface that still looks “craggy” and textured, rather than a flat, compressed sheet. This preservation of internal air is what makes the treats feel light and easy to bite into.
Furthermore, the cooling period is not just for temperature; it is a structural necessity. As the butter and marshmallow cool, they form a semi-solid bond. If you cut them while they are still warm, the squares will slump and lose their height. Waiting that full 45 to 60 minutes ensures clean edges and a professional appearance.
A Note on Longevity and Texture
One of the highlights of this specific recipe is that it remains soft for much longer than the standard version. This is due to the higher ratio of fat (butter) and the addition of the vanilla extract, which acts as a minor humectant. However, if you live in a particularly humid climate, you might notice the cereal losing its “snap” faster. To combat this, you can toast your rice cereal in a 300-degree Fahrenheit oven for five minutes before starting the recipe. This dries out any residual moisture in the grain, ensuring maximum crunch against the soft marshmallow backdrop.
Nutrition Table
| Nutrient | Amount Per Serving (1 square) |
| Calories | 165 |
| Total Fat | 5 grams |
| Saturated Fat | 3 grams |
| Cholesterol | 12 milligrams |
| Sodium | 115 milligrams |
| Total Carbohydrates | 31 grams |
| Dietary Fiber | 0 grams |
| Sugars | 18 grams |
| Protein | 1 gram |
Disclaimer
The nutritional information provided is an estimate based on standard ingredient measurements and should be used for educational purposes only. Individual results may vary based on the specific brands of butter and marshmallows used.
Final Thoughts on the Ultimate Cereal Snack
Mastering the art of the rice krispie treat is about honoring the simplicity of the ingredients while respecting the science of the process. By choosing high-quality fats, monitoring your stovetop temperature with precision, and introducing textures at different stages, you elevate a pantry staple into a true culinary delight. These treats are designed to be shared, but given how much better they are than the original, you might find it hard not to keep the whole pan for yourself. Happy no-baking!
The Ultimate Gourmet Rice Krispie Treats
Ingredients
- 6 tbsp salted European-style butter, cut into pieces
- 10 ounces miniature marshmallows (for initial melting)
- 5 ounces miniature marshmallows (reserved for folding in)
- 1 tsp pure vanilla extract
- 6 cups crisp rice cereal
- 3 tbsp colored sprinkles (optional)
Instructions
- Grease a 13 by 9-inch baking pan with butter or line with parchment paper for easy removal.
- In a large saucepan or Dutch oven, melt the 6 tablespoons of butter over medium-low heat until completely liquid.
- Add 10 ounces of the miniature marshmallows to the butter. Stir constantly over low heat until the mixture is smooth and glossy.
- Remove from heat and immediately stir in the vanilla extract.
- Fold in the rice cereal and the remaining 5 ounces of marshmallows. Stir until the cereal is coated but the fresh marshmallows are only partially melted.
- If using sprinkles, fold them in quickly now.
- Transfer the mixture to the pan. Lightly press down with a buttered spatula or damp fingers. Do not pack tightly.
- Let the treats cool at room temperature for at least 30 to 60 minutes before slicing into squares.
Notes
Equipment
- Large saucepan or Dutch oven
- 13×9 inch baking pan
- silicone spatula
- parchment paper