There is something deeply nostalgic about a centerpiece that doubles as a dessert, especially during the spring season. This Easter Bunny Cake is a quintessential holiday tradition that brings a sense of whimsy and joy to any dessert table. Unlike complex tiered cakes that require professional pastry skills, this charming rabbit-shaped creation is surprisingly accessible, relying on clever geometry and simple decorations rather than intricate sculpting. Whether you are hosting a large family brunch or looking for a fun kitchen project to do with the kids, this cake offers a delightful way to celebrate the season with sweetness and creativity.
Table of Contents
Essential Ingredients for Your Easter Bunny Cake
To ensure your cake has the structural integrity to be moved and shaped, while remaining moist and delicious, you will need the following components. This recipe utilizes the classic method of transforming two round cakes into a full bunny figure.
- 1 package (18.25 ounces) of white cake mix
- Water, vegetable oil, and eggs as required by the specific cake mix package instructions
- 1 cup of flaked coconut
- 2 drops of red food coloring
- 1 container (16 ounces) of fluffy vanilla frosting
- 10 jelly beans
- 1 tube of red decorative gel frosting

Step-by-Step Assembly and Baking Instructions
- Preparation and Baking: Begin by preheating your oven to 350 degrees Fahrenheit (or the temperature specified on your cake mix box). Generously grease and flour two 9-inch round cake pans. Prepare the cake batter according to the package directions using the water, oil, and eggs. Divide the batter evenly between the two pans and bake for the duration suggested on the box, usually 30 to 35 minutes, or until a toothpick inserted into the center comes out clean.
- The Cooling Phase: Allow the cakes to cool in the pans for at least 10 minutes before inverting them onto wire racks. It is vital that the cakes reach room temperature before you attempt to cut or frost them; otherwise, the structure may crumble or the frosting will melt.
- The Geometry of the Bunny: Leave one 9-inch round cake whole—this will serve as the bunny’s head. Take the second 9-inch round cake and make two convex cuts from the sides to create two ear shapes. The remaining center piece, which will look somewhat like a bow tie or a butterfly, will be used as the bunny’s neck decoration.
- Arranging the Pieces: On a large serving platter or a foil-covered sturdy cardboard base, place the whole round cake in the center. Arrange the two ear pieces at the top of the head. Position the bow-tie shaped piece at the bottom of the head.
- The Frosting Process: Use about half of the vanilla frosting to apply a “crumb coat” to the entire assembly. Once set, apply the remaining frosting generously over the head, ears, and bow tie.
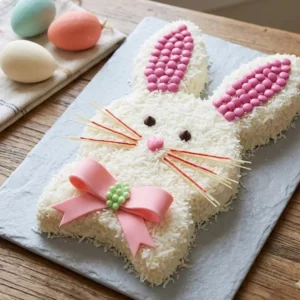
- Adding the Fur and Details: Place the coconut in a small bowl. Add two drops of red food coloring to a small portion of the coconut and toss with a fork until it turns a soft pink. Sprinkle the white coconut over the head and the outer edges of the ears. Use the pink coconut for the inner part of the ears and the center of the bow tie.
- The Final Face: Use jelly beans to create eyes and a nose. Use the red decorative gel frosting to draw on whiskers and a mouth to complete the bunny’s expression.

Achieving the Ultimate Creamy Consistency
The secret to a professional-looking Easter Bunny Cake lies in the texture of the frosting. Even if you are using a store-bought container, you can elevate the quality by whipping it in a stand mixer for two to three minutes before use. This aeration process makes the frosting lighter, more voluminous, and significantly easier to spread over the curved edges of the cake pieces.
When applying the frosting to the cut edges of the ears and the bow tie, you may encounter loose crumbs. To solve this, always use a “crumb coat”—a thin initial layer of frosting that acts as a sealant. After applying this thin layer, refrigerate the cake for 20 minutes. This locks the crumbs in place, allowing your final thick layer of white frosting to remain pristine and bright.
Unique Culinary Insights for Holiday Baking
When crafting a shaped cake, the density of the crumb is your best friend. While we all love a light, airy chiffon, a slightly denser white or yellow cake provides the “bones” necessary to hold the bunny shape without sagging. If you find your cake is too soft to cut cleanly, try wrapping the layers in plastic wrap and placing them in the freezer for 30 to 45 minutes. This firms up the fats in the cake, making it much easier to slice those convex ear shapes with a serrated knife without causing jagged edges.
Furthermore, the coconut serves a dual purpose. Not only does it provide the visual texture of rabbit fur, but it also acts as a “camouflage” for any imperfections in your frosting technique. If your edges aren’t perfectly smooth, the shredded coconut will hide those dips and bumps, resulting in a charmingly rustic and professional finish every time.
Accompaniments and Serving Suggestions
This cake is a star on its own, but you can enhance the presentation by creating a “garden” around the base. Many bakers use additional coconut tinted with green food coloring to mimic grass. Simply place the bunny on a large green platter or surround it with green-tinted coconut flakes.
To round out the dessert course, serve slices of the bunny cake alongside fresh spring berries like strawberries or raspberries. The acidity of the fruit cuts through the sweetness of the vanilla frosting and the tropical notes of the coconut. For a festive beverage pairing, a light sparkling cider or a glass of cold milk for the children complements the classic vanilla flavors perfectly.
Modifications and Creative Substitutions
While the classic version uses white cake and vanilla frosting, you can easily customize this recipe to suit your flavor preferences:
- Flavor Profiles: Swap the white cake mix for a lemon cake mix to add a bright, citrusy spring flavor. Carrot cake is also a thematic choice, though you may need a thicker cream cheese frosting to support the heavier crumb.
- The Coconut Alternative: If you have family members who dislike the texture of coconut, you can achieve a “fur” look using a piping bag and a small “grass tip” (Ateco 133 or Wilton 233). Pipe small strands of white frosting over the entire surface to create a shaggy, woolen appearance.
- Decoration Swaps: Instead of jelly beans, consider using chocolate-covered sunflower seeds for eyes or a large marshmallow cut in half for the cheeks. For whiskers, thin strips of black licorice or even dry spaghetti noodles painted with food coloring can add a whimsical, 3D effect.
Massive Expansion: Step-by-Step Details
Creating the bunny’s silhouette is the most critical part of this project. When you are looking at your second round cake, imagine a “football” shape. You want to cut two of these football shapes from the left and right sides of the circle. What remains in the middle will naturally form a pinched-waist shape that serves perfectly as a bow tie.
When you move these pieces to your serving board, ensure you have enough space. A standard 9-inch cake head with ears can span over 15 inches in length. If you don’t have a platter that large, a clean cutting board covered in festive wrapping paper or aluminum foil works beautifully.
For the pink coconut, precision is key. Do not dump the food coloring directly onto the cake. Always mix it in a separate bowl first. If the color is too dark, add more white coconut to dilute it. When applying the pink coconut to the ears, use a small spoon to guide the flakes into the center, leaving a white border on the outside to give the ears depth and dimension.
Deep-Dive FAQ for Perfect Results
How can I prevent the cake from sliding on the platter?
Before placing your first cake round, “glue” it to the platter using a tablespoon of frosting. Spread the frosting in the center of the board and press the cake down. This acts as an edible adhesive, ensuring that your bunny doesn’t shift if you have to transport the cake to a different location.
What is the best way to cut the cake without it crumbling?
Use a long, serrated bread knife. Instead of pressing down hard, use a gentle sawing motion. This allows the teeth of the knife to catch the cake fibers without compressing the sponge. If the cake feels very fragile, remember the freezer tip: a chilled cake is a stable cake.
Can I make this Easter Bunny Cake 24 hours in advance?
Yes, you can. In fact, the flavors often meld better after a day. However, if you are using coconut, it can occasionally dry out in the refrigerator. To keep it fresh, store the cake in a very large airtight container or tent it loosely with plastic wrap, using toothpicks to keep the wrap from touching the frosting.
How do I get the red gel frosting to look neat for the whiskers?
Practice on a paper towel first to get a feel for the pressure required. To get straight, thin whiskers, start from the nose and pull the tube outward in one quick, steady motion. If you hesitate, the gel may come out in clumps.
Celebrating a Sweet Spring Tradition
This Easter Bunny Cake is more than just a dessert; it is a centerpiece of holiday memories. By taking simple ingredients and using a bit of kitchen “math” to reshape them, you create a treat that delights both the eyes and the palate. The combination of moist cake, creamy frosting, and the textural crunch of coconut makes for a timeless flavor profile that appeals to all ages. As you gather around the table this Easter, this handmade rabbit will surely be the highlight of the celebration, proving that the best traditions are often the ones we bake ourselves.
Nutrition Information
| Category | Amount per Serving |
| Servings | 12 |
| Calories | 415 kcal |
| Total Fat | 18 grams |
| Saturated Fat | 8 grams |
| Cholesterol | 45 milligrams |
| Sodium | 310 milligrams |
| Total Carbohydrates | 62 grams |
| Dietary Fiber | 1 gram |
| Sugars | 48 grams |
| Protein | 3 grams |
Disclaimer
Nutritional values are estimates based on standard ingredients. Actual nutritional content may vary depending on the specific brands of cake mix and frosting utilized.
Classic Easter Bunny Cake
Ingredients
- 1 package white cake mix (18.25 ounces)
- Water, vegetable oil, and eggs as required by cake mix package
- 1 cup flaked coconut
- 2 drops red food coloring
- 1 container fluffy vanilla frosting (16 ounces)
- 10 jelly beans
- 1 tube red decorative gel frosting
Instructions
- Preheat oven to 350 degrees Fahrenheit. Grease and flour two 9-inch round cake pans. Prepare batter according to package directions and bake 30 to 35 minutes.
- Cool cakes in pans for 10 minutes, then move to wire racks to cool completely to room temperature.
- Leave one cake whole for the head. Cut two convex ear shapes from the sides of the second cake, leaving a bow-tie shape in the center.
- Arrange the head, ears, and bow tie on a large serving platter or sturdy board.
- Apply a thin crumb coat of frosting, let set, then cover the entire cake with the remaining vanilla frosting.
- In a small bowl, toss a small portion of coconut with red food coloring until pink. Leave the rest white.
- Sprinkle white coconut over the head and ear edges. Use pink coconut for the inner ears and bow tie center.
- Use jelly beans for eyes and a nose. Draw whiskers and a mouth with the red decorative gel.
Notes
Equipment
- Two 9-inch round cake pans
- Wire cooling racks
- Serrated bread knife
- Large serving platter or cake board At least 15 inches long
- small mixing bowl
- offset spatula For smooth frosting