

There is a distinct joy in building a meal from the ground up, and when it comes to pizza, everything hinges on the foundation. Forget the lengthy, overnight ferments or the tricky, temperamental starters; this recipe for Super Easy Pizza Dough delivers a high-quality, pliable base in under an hour, making homemade pizza an accessible weeknight reality. It results in a crust that strikes the ideal balance—tender and chewy on the inside, with enough structural integrity to hold a generous layering of sauce and toppings. This is a robust, reliable recipe designed for speed and spectacular results, perfect for when the craving hits and patience is in short supply. You get to skip the bulk of the waiting time without compromising on that satisfying, yeasted flavor.
Table of Contents
The Essential Pantry Lineup
The beauty of a great pizza crust lies in its simplicity. With just six core ingredients, the key is the quality of the components and the precision of their measurement.
For the Dough:
- Warm Water: 1 cup (237 milliliters), maintained between one hundred five and one hundred fifteen Fahrenheit.
- Active Dry Yeast: 1 packet (one-quarter ounce or 7 grams), which equals approximately two and one-quarter teaspoons.
- Granulated White Sugar: 1 teaspoon.
- Bread Flour: 2 and one-half cups (300 grams), plus extra for dusting.
- Olive Oil: 2 tablespoons, plus more for coating the bowl.
- Fine Sea Salt: 1 teaspoon.

Foundational Techniques: Getting Started with Yeast
This rapid-rise dough depends on quickly activating the yeast to eliminate the long first proofing. The goal here is to wake the yeast up gently and give it a head start on fermentation before it interacts with the heavier flour.
- Activate the Yeast: Pour the measured warm water into a medium bowl or the bowl of a stand mixer. The temperature is crucial; too cold and the yeast will stall; too hot and you will kill the microorganisms. Sprinkle the active dry yeast and the sugar over the water’s surface. Do not stir initially.
- Monitor the Bloom: Let this mixture sit undisturbed for five to ten minutes. The yeast should begin to foam and swell, forming a creamy, frothy layer on the water’s surface. This is confirmation that your yeast is alive and ready to work. If you do not see significant activity after ten minutes, discard the mixture and start again with fresh yeast and properly tempered water.
- Introduce the Oil: Once the yeast has fully bloomed, gently whisk in the 2 tablespoons of olive oil. The oil adds flavor and keeps the dough tender, preventing a tough crust.

Mixing and Kneading: Building the Dough’s Structure
Building gluten strength is essential for a chewy, airy crust. Bread flour helps immensely here due to its higher protein content, but the mixing process is what truly organizes that protein structure.
- Combine Dry Ingredients: In a separate large bowl, whisk together the measured bread flour and the salt. Keeping the salt separate until this stage is intentional, as direct contact with the yeast can sometimes inhibit its activity.
- Form the Dough: Gradually add the flour mixture to the wet yeast mixture. If using a stand mixer, use the dough hook attachment and mix on low speed until a shaggy, cohesive dough mass forms, scraping down the sides as necessary. If mixing by hand, use a sturdy wooden spoon until the dough comes together.
- Kneading Phase: Continue kneading the dough in the mixer for approximately four to six minutes on medium-low speed. If kneading by hand, turn the dough out onto a lightly floured surface and knead vigorously for eight to ten minutes. The dough is ready when it is smooth, elastic, and snaps back quickly when poked with a finger, meaning the gluten has developed sufficiently. The finished dough should feel tacky but not overly sticky.
- The Short Rest: Form the dough into a ball. Lightly coat a separate bowl with a little olive oil, place the dough ball inside, and turn it to coat completely. Cover the bowl loosely with plastic wrap or a clean kitchen towel. Allow the dough to rest at room temperature for a brief five minutes. This short repose allows the gluten strands to relax, which is the key to making the dough effortless to stretch and shape in the next stage.
Shaping the Disc: From Ball to Base
The most common mistake when working with quick-rise dough is attempting to shape it too soon. The five-minute rest is non-negotiable, as it prevents the dough from fighting against your efforts.
- Preparation: While the dough is resting, preheat your oven to four hundred fifty Fahrenheit. If using a standard baking sheet or pizza pan, lightly grease it or line it with parchment paper. If you have a pizza stone, place it on the center rack of the oven to preheat alongside the appliance.
- Dough Transfer: Gently turn the rested dough out onto a clean, lightly floured or oiled work surface. Avoid punching the dough down aggressively; remember, the goal is retention of the gas bubbles created by the yeast.
- Stretching the Dough: You can use a rolling pin for a thin, even crust, but for the classic rustic texture, use your hands. Start by pressing the ball into a disc shape. Then, begin gently pulling and stretching the edges outward, rotating the dough frequently. If the dough snaps back aggressively, let it rest for another minute or two before continuing—this is a sign the gluten needs more time to relax.
- Target Dimension: Aim for a circle roughly twelve to fourteen inches in diameter, depending on your pan size. The thickness should be even across the center, perhaps one-eighth to one-quarter inch thick, with slightly thicker edges reserved for the classic crust border. The goal is structural uniformity; a thin center can tear under heavy toppings.
- Final Placement: Carefully transfer the shaped dough to your prepared pan or baking sheet. If using a pizza stone, transfer the dough onto a pizza peel dusted heavily with cornmeal or semolina, which acts as a barrier and helps the raw dough slide onto the hot stone smoothly.
Achieving Excellence: Baking Best Practices
A perfect bake requires high heat and constant vigilance. Since this dough is designed for speed, it performs best when cooked quickly and evenly.
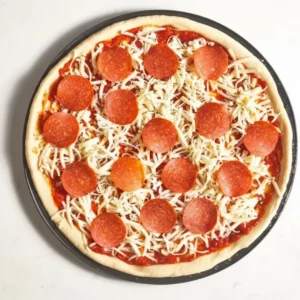
- Sauce and Toppings Application: Once the dough is in the pan, quickly add your sauce and toppings. Be careful not to use excessive liquid, especially near the center, which can lead to a soggy crust. Keep the topping layer relatively light to ensure the dough fully cooks beneath it.
- The High-Heat Bake: Slide the prepared pizza into the oven, ideally onto the preheated stone or pan. Baking at four hundred fifty Fahrenheit encourages a fast, crisping cook. The intense heat immediately sets the dough, creating air pockets and giving you that desirable rise on the edges.
- Doneness Checks: Bake for fifteen to twenty minutes. The crust is done when the edges are deep golden brown and the cheese is bubbly and lightly caramelized. For an extra crisp bottom, use a spatula to lift a corner of the pizza five minutes before the end of the cooking time; if it looks pale, cook for a few more minutes or carefully slide the pizza directly onto the oven rack for the final minute.
- Cooling and Serving: Remove the pizza from the oven and let it rest on a wire rack or cutting board for five minutes before slicing. This resting period allows the cheese to set slightly, preventing the toppings from sliding off the moment you cut into it, and helps maintain a crisp undercarriage.
Mastering the Crust: Advanced Tips for Dough Success
While this recipe is straightforward, these professional insights will take your results from good to exceptional.
- Mind the Flour Mass: The consistency of yeast dough is highly sensitive to the exact amount of flour used. If your kitchen is humid, you may need slightly less flour; if it is very dry, you may need a touch more. Always measure your flour using the spoon-and-level method (lightly spooning flour into the measuring cup then leveling off the top), or, ideally, weigh it in grams for precision.
- The Power of Semolina Dust: For stone baking, switch from standard flour to fine semolina or cornmeal to dust your peel and pan. These granules act like tiny ball bearings, making the pizza slide easily from the peel and lending a delightful, subtle crunch to the bottom of the finished crust.
- The Preheat is King: Whether using a pizza stone, a steel, or even a heavy baking sheet, make sure your baking vessel is in the oven while it preheats. This ensures the dough hits an intensely hot surface immediately, which is the single best way to prevent a flabby, pale crust. Allow the stone or steel to heat for at least forty-five minutes after the oven reaches the target temperature.
- Preventing Dough Stick: If you are hand-stretching and the dough seems too sticky, resist the urge to add cupfuls of flour. Instead, lightly oil your hands and the working surface. The oil aids in stretching and encourages a crisp, golden-brown edge during baking, while excess flour simply toughens the finished crust.
- The Par-Bake Technique: For thin-crust pizzas with heavy, wet toppings (like fresh mozzarella or a generous layer of vegetables), consider a brief par-bake. Bake the naked, shaped crust for five minutes before adding any toppings. This sets the base, ensuring it can handle the moisture without becoming gummy.
- Salt Placement: Always ensure your salt is fully incorporated with the flour before adding it to the yeast mixture. Salt is essential for flavor and gluten strength, but it slows the yeast process. In this quick recipe, controlling its introduction helps optimize the short rise time.
Adapting the Recipe: Flour and Flavor Swaps
One of the best things about a foundational recipe like this is its versatility. You can easily tweak the components to adjust the flavor profile and texture.
- Whole Wheat Inclusion: For a heartier, nuttier flavor and added fiber, substitute twenty-five percent of the bread flour with whole wheat flour. Note that whole wheat absorbs liquid differently, so you may need to add an extra tablespoon or two of water to maintain the correct dough hydration. The dough will also be slightly denser.
- Gluten-Free Flour: While not a perfect one-to-one swap, many quality cup-for-cup gluten-free flour blends can be used here. Be sure the blend includes xanthan gum (or add one half teaspoon separately). Gluten-free dough usually cannot be kneaded in the same way; instead, mix until fully combined, then allow it to rest for ten minutes before shaping.
- Herbal Infusion: To give the crust an immediate flavor boost, add one teaspoon of dried Italian seasoning or half a teaspoon of dried oregano and a quarter teaspoon of garlic powder to the dry ingredients before mixing. This works exceptionally well for thick-crust or deep-dish applications.
- Sweetener Switch: You can substitute the white sugar with one teaspoon of honey or agave nectar to feed the yeast. Honey adds a pleasant, subtle floral note to the final crust.
- Oil Swap: While olive oil is traditional, if you prefer a very neutral flavor, you can swap it for an equal amount of grapeseed or canola oil.

What to Serve Alongside Your Pie
Pizza is often a meal unto itself, but the right accompaniment can turn a casual evening into a full culinary event. Complementary side dishes should be bright, light, and contrasting in texture.
- A Simple Arugula Salad: The sharp, peppery bite of fresh arugula tossed with a light vinaigrette made of lemon juice, olive oil, and a dusting of Parmesan provides a perfect counterpoint to the rich cheese and savory toppings of the pizza.
- Roasted Bell Peppers and Onion: Instead of a complex vegetable dish, lightly toss sliced red bell peppers and red onion with a touch of balsamic vinegar and olive oil, then roast them until slightly caramelized. This adds a sweetness and smoky dimension that pairs beautifully with the yeasted dough.
- Crisp Caesar Spears: Serving the core elements of a Caesar salad (romaine lettuce, dressing, shaved cheese) as separate components—known as spears—allows guests to enjoy a fresh, garlicky palate cleanser without the weight of a full tossed salad.
Quick Answers for the Home Pizzaiolo
How should I store leftover pizza dough?
If you have extra dough, coat it lightly with olive oil and place it in an airtight container or a zipper-top bag, allowing room for expansion. It will last for up to five days in the refrigerator. Before using, remove it from the fridge and let it warm up on the counter for thirty minutes to an hour to ease shaping.
Can I make this dough ahead of time and freeze it?
Absolutely. After the kneading and five-minute rest, lightly coat the dough ball with oil, wrap it tightly in plastic wrap, and place it in a freezer bag. It will keep well for up to three months. Thaw it overnight in the refrigerator, then let it come to room temperature for one hour before shaping and baking.
Why is my crust coming out tough and not chewy?
Toughness is usually a result of using too much flour or overworking the dough during the kneading or shaping process. If you continuously add flour while kneading because the dough is sticky, you increase the flour-to-liquid ratio, resulting in a dry, dense dough. Ensure your flour measurements are accurate, and remember to let the dough rest briefly to relax the gluten before attempting to stretch it.
What is the ideal temperature for the water?
The sweet spot for water temperature is between one hundred five and one hundred fifteen Fahrenheit. Temperatures below one hundred Fahrenheit can cause the yeast activation to take too long, while temperatures above one hundred twenty Fahrenheit risk killing the active dry yeast, leading to a dough that will not rise at all.
Estimated Nutritional Breakdown
This information is for the dough base only (not including toppings or sauce), based on eight servings.
| Nutrient | Amount per Serving |
| Calories | 175 kcal |
| Protein | 5 g |
| Carbs | 28 g |
| Fat | 4 g |
| Fiber | 1 g |
| Sugar | 1 g |
| Sodium | 295 mg |
Disclaimer
Nutrition information is an estimate and may vary based on preparation and ingredients used.
Super Easy Pizza Dough
Ingredients
- 1 cup warm water (one hundred five to one hundred fifteen Fahrenheit)
- 1 packet active dry yeast (one-quarter ounce)
- 1 tsp granulated white sugar
- 2.5 cups bread flour (300 grams), plus extra for dusting
- 2 tbsp olive oil, plus more for coating the bowl
- 1 tsp fine sea salt
Instructions
- Pour the warm water into a mixing bowl. Sprinkle the yeast and sugar over the water’s surface. Let stand undisturbed for five to ten minutes until a foamy, frothy layer forms.
- Whisk in the 2 tablespoons of olive oil. In a separate bowl, whisk the bread flour and salt together. Gradually add the dry ingredients to the wet mixture, mixing until a shaggy dough forms.
- Knead the dough by hand for eight to ten minutes, or using a stand mixer with a dough hook for four to six minutes, until smooth and elastic. Form into a ball, coat lightly with oil, and cover. Let rest for five minutes.
- Preheat your oven to four hundred fifty Fahrenheit. Prepare your pan or pizza stone during the resting period, ensuring the stone is heated for at least thirty minutes.
- Turn the dough onto a lightly floured or oiled surface. Gently stretch and pull the dough into a twelve- to fourteen-inch circle, ensuring even thickness. Transfer to the prepared pan or a pizza peel dusted with semolina.
- Top the dough with sauce and toppings. Bake in the preheated oven at four hundred fifty Fahrenheit for fifteen to twenty minutes, or until the crust is deep golden brown and crispy.
Notes
Equipment
- mixing bowls
- Stand mixer (optional, with dough hook)
- measuring cups and spoons
- Pizza pan or pizza stone A preheated pizza stone yields the best crust.


