
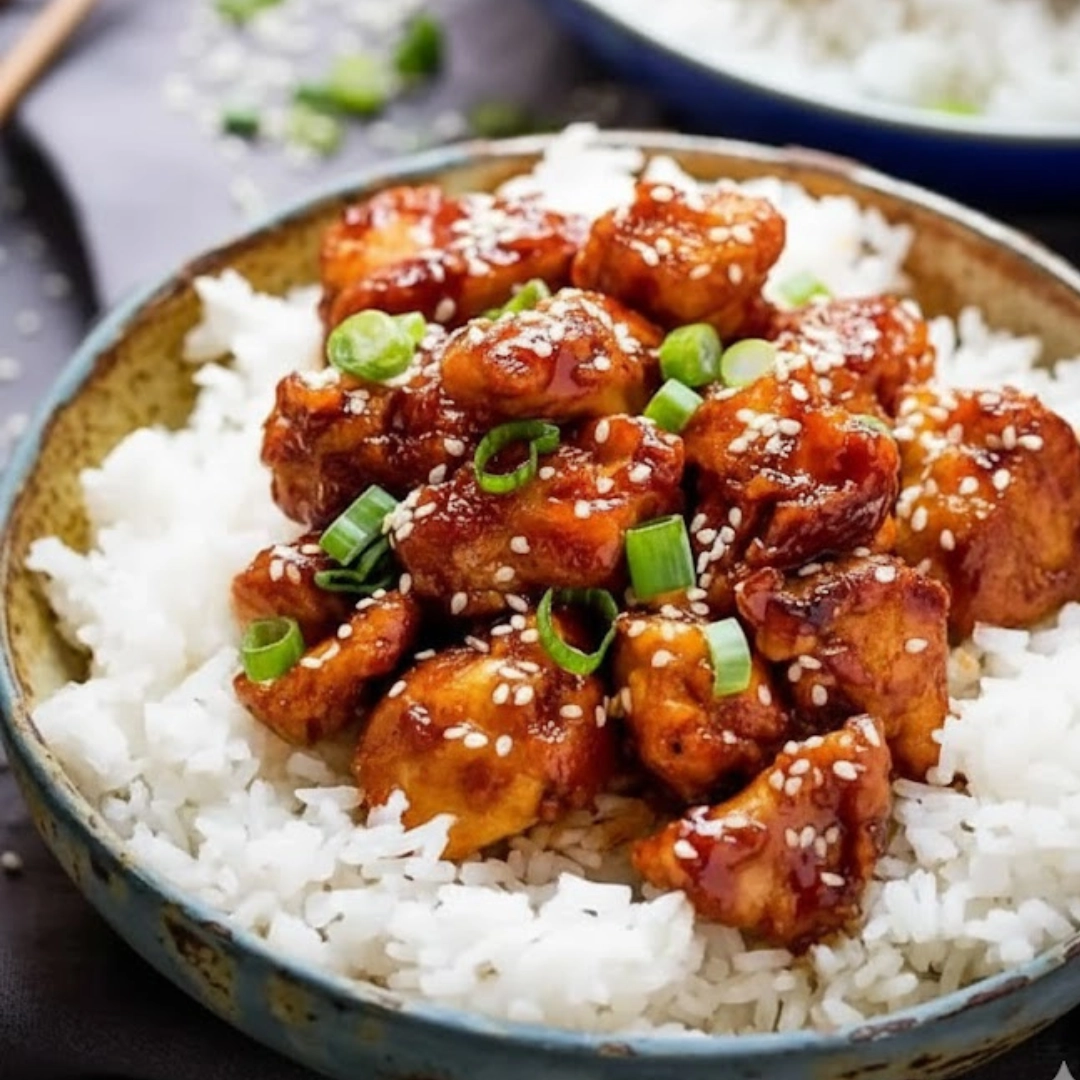
There is a unique pleasure in successfully recreating a beloved takeout staple in your own kitchen. This dish is the perfect blend of texture and flavor, offering tender pieces of chicken encased in a crisp, golden shell, all coated in a complex, syrupy glaze. The appeal lies in the contrast: the satisfying crunch of the exterior gives way to juicy meat, while the sauce hits notes of sweetness, umami, and a subtle tang. Far from the one-dimensional sweetness often found in restaurant versions, this particular Sticky Sesame Chicken recipe achieves a deep, caramelized finish that elevates it from a simple weeknight meal to a show-stopping plate. It is a savory, craveable classic that is essential for any home cook looking to master Asian-inspired fare.
Table of Contents
The Essential Components
This recipe relies on fresh, quality poultry and specific pantry staples to create the authentic texture and deep flavor profile.
For the Crispy Chicken
- One and one half pounds boneless, skinless chicken thighs or breasts, cut into one-inch pieces
- One half teaspoon fine sea salt
- One quarter teaspoon freshly ground black pepper
- One half cup all-purpose flour
- One half cup cornstarch
- Two large eggs, lightly beaten
- Three cups neutral cooking oil (such as canola or peanut), for frying
For the Sticky Glaze
- One quarter cup soy sauce (low sodium preferred)
- Three tablespoons rice vinegar
- One half cup granulated white sugar
- One quarter cup honey
- One half cup chicken broth
- One tablespoon toasted sesame oil
- Four cloves garlic, minced
- One teaspoon fresh ginger, grated
- One teaspoon Sriracha or chili garlic sauce (adjust to heat preference)
- One tablespoon cornstarch mixed with two tablespoons cold water (slurry)
For Garnish
- Two tablespoons toasted sesame seeds
- Four green onions (scallions), thinly sliced

Crafting the Ultimate Crisp
Achieving the perfect crunchy crust is paramount for this dish. Follow these steps meticulously, focusing on temperature and consistency to set the foundation for success.
- Prepare the Chicken and Coatings: Pat the chicken pieces completely dry. Season lightly with salt and pepper. Set up a dredging station: Place the flour in one shallow bowl, the beaten eggs in a second, and the cornstarch in a third.
- Dredge the Chicken: Working in batches, toss the seasoned chicken in the flour first, shaking off any excess. Dip the floured chicken into the beaten egg mixture, ensuring complete coverage. Finally, coat the pieces thoroughly in the cornstarch, pressing gently to adhere. Set the coated pieces aside on a wire rack—not a plate—to rest.
- Prepare the Frying Oil: Pour the neutral oil into a heavy-bottomed pot or wok until it reaches a depth of about one and one half inches. Heat the oil over medium-high heat until it reaches three hundred fifty Fahrenheit. Use a thermometer to verify the temperature.
- Cook the Glaze Base: While the oil heats, combine all glaze ingredients except the cornstarch slurry in a small saucepan. Bring the mixture to a simmer over medium heat, stirring until the sugar is dissolved. Remove from heat and set aside.
- Fry the Chicken (First Pass): Carefully lower half of the coated chicken pieces into the hot oil. Fry for approximately three to four minutes, or until the coating is set and lightly golden. The internal temperature of the chicken should reach about one hundred fifty-five Fahrenheit. Remove the chicken and place it back on the wire rack. Repeat with the second batch.
- Develop the Sauce: Return the saucepan containing the glaze to medium-high heat. Once simmering vigorously, whisk in the cornstarch slurry. Stir constantly until the sauce visibly thickens and coats the back of a spoon. This should take about one minute.
- Fry the Chicken (Second Pass): Increase the oil temperature to three hundred seventy-five Fahrenheit. Return all the partially cooked chicken to the hot oil. Fry for ninety seconds to two minutes, until deeply golden brown and very crisp. Remove and drain briefly on fresh paper towels.
- Toss and Serve: Transfer the extra-crispy chicken to a large bowl. Pour the thickened, hot glaze over the pieces and toss quickly to coat every piece evenly. Garnish immediately with sesame seeds and green onions and serve.

Mastering the Wok: Frying and Finishing
The difference between soggy, lackluster chicken and a truly phenomenal plate of Sticky Sesame Chicken lies in the detailed execution of the cooking process.
When you are preparing the chicken, the step of setting it on a wire rack after dredging is crucial. This is not simply a storage method; it is a rest period that allows the moist egg wash to penetrate the coating and create a paste-like layer. When this layer hits the hot oil, it instantly solidifies, trapping the moisture within the chicken while achieving maximum crunch. If you skip this, or if you place the dredged pieces on a plate, the coating on the bottom side will inevitably become gummy and detach during frying.
The initial frying stage is deliberately performed at a lower temperature—three hundred fifty Fahrenheit—to ensure the chicken cooks through without burning the exterior. You are looking for a gentle cook-through, a process known as “setting the crust.” The chicken should be a light, pale gold. The sensory cue for doneness here is the sound; as the chicken cooks, the oil will bubble furiously, but as the pieces cook through and dry out slightly, the intensity of the bubbling will lessen.
The second frying pass is what defines the dish. Increasing the oil to three hundred seventy-five Fahrenheit creates a flash-fry environment. The higher heat expels any residual moisture near the crust instantly, making the exterior aggressively crisp and providing that deep, rich, golden-brown color. The goal is rapid, intense heat application for texture, not for internal cooking. The sound will be a rapid, sharp crackle as the chicken hits the oil. This quick step prevents the coating from absorbing oil, keeping it light and shatteringly crisp.
When thickening the glaze, pay attention to the viscosity. The cornstarch slurry should be whisked in off-heat or while stirring quickly over medium heat to prevent clumping. You are aiming for a consistency that is thick enough to cling to the chicken but still pourable. It should leave a visible trail when you run a spoon through it. Once the sauce thickens, remove it from the heat immediately. If you overcook a cornstarch-thickened sauce, it can sometimes “break” or lose some of its glossy sheen. The final, rapid toss of the hot chicken in the hot sauce is key; it caramelizes the sugars slightly and sets the glaze into that signature sticky finish.
Expert Frying Techniques for Home Cooks
Frying at home can be intimidating, but following a few key principles can guarantee restaurant-quality results and a safe cooking environment.
- Monitor Oil Temperature Constantly: The most common mistake in frying is fluctuating oil temperature. If the temperature drops too low (below three hundred twenty-five Fahrenheit), the coating becomes greasy and soggy. If it is too high (above three hundred ninety Fahrenheit), the outside burns before the chicken cooks. Use a reliable clip-on thermometer and adjust your burner heat constantly to maintain the prescribed temperature window.
- Prioritize Batch Size: Never overcrowd the frying vessel. Adding too much chicken at once will drastically lower the oil temperature, leading to undercooked, soggy results. Cook in small, equal-sized batches, ensuring the chicken pieces are swimming comfortably in the oil. This allows the temperature to recover quickly between batches.
- Use a Wire Rack, Not Paper Towels (Initial Rest): After the initial fry, place the chicken on a wire rack set over a baking sheet. This allows air to circulate around the entire piece, preventing steam from building up and softening the crust. While paper towels are necessary after the second, final fry to quickly soak up surface oil, they should be avoided during the intermediate rest.
- The Double-Fry is Non-Negotiable: As noted in the instructions, the double-fry method is essential for takeout-style crispness. The first fry cooks the interior; the second, hotter fry seals the deal on the texture. Do not attempt to achieve both goals in one step.
- Cooling and Disposing of Oil: After frying, turn off the heat and allow the oil to cool completely in the pot. Once cool, you can strain the oil through cheesecloth or a coffee filter to remove debris and reuse it for another fry. Never pour hot oil, or any oil, down the drain.
Sauce Secrets and Ingredient Swaps
The glaze is highly customizable, allowing you to tailor the final product to your specific preferences or dietary needs.
- Sweetener Switch: The combination of granulated sugar and honey provides a complex sweetness and superior stickiness. However, you can substitute the white sugar entirely with brown sugar for a deeper, more molasses-like flavor. For a slightly healthier alternative, you can replace up to half of the honey/sugar content with pure maple syrup, though the resulting glaze will be marginally thinner and less aggressively sticky.
- Gluten-Free Coating: To make this recipe suitable for those avoiding gluten, simply replace the all-purpose flour with a high-quality gluten-free all-purpose blend. The cornstarch is naturally gluten-free and acts as a primary crisping agent, so it remains. Ensure your soy sauce is replaced with tamari or coconut aminos.
- Spice Level Adjustment: The one teaspoon of Sriracha offers a gentle background heat. To increase the spice, double the Sriracha or, for a cleaner heat, add one half teaspoon of crushed red pepper flakes to the sauce base while it simmers, allowing the heat to infuse. For a smoky kick, a splash of liquid smoke or a pinch of smoked paprika can be surprisingly effective.
- Vegetable Inclusion: While this recipe focuses on the chicken, you can easily add vegetables. Quickly blanch broccoli florets, snap peas, or carrot coins and toss them into the sauce after the chicken is coated. This heats them through without overcooking, maintaining their bright color and snap.

Pairing the Sweet and Savory
The rich, sweet, and sticky nature of this chicken requires simple, slightly acidic, or neutral pairings to balance the palate.
- Classic White Rice: The absolute best pairing is simple steamed white rice, such as Jasmine or Basmati. The plain, neutral starch provides the perfect vehicle to soak up the residual glaze and offers a soft texture that contrasts the chicken’s crunch.
- Quick Veggie Stir-Fry: Instead of a complex side, opt for a lightning-fast stir-fry of baby bok choy and shredded carrots, lightly seasoned with just sesame oil and a touch of salt. This adds a clean, fresh green note and a textural crunch without competing with the main dish’s flavor.
- A Simple Slaw: A vinegary cabbage slaw with a light dressing—think rice vinegar, a pinch of sugar, and a dash of Dijon—cuts through the richness of the fried chicken perfectly. The acidity cleanses the palate, preparing you for the next bite.
Your Sticky Sesame Chicken Questions Answered
Can I bake or air fry the chicken instead of deep frying?
While baking or air frying will yield a healthier result, it is nearly impossible to achieve the same intensity of crispness and textural integrity as deep frying. If you choose to air fry, toss the dredged chicken with one tablespoon of oil before cooking at three hundred eighty Fahrenheit for about fifteen minutes, flipping halfway, until golden and crisp. The result will still be delicious but will have a less robust crust.
What is the best way to store and reheat leftovers?
Store any leftovers in an airtight container in the refrigerator for up to three days. To reheat, the best method is to use an air fryer or a conventional oven. Place the chicken on a baking sheet and heat at three hundred twenty-five Fahrenheit for about eight to ten minutes. Avoid the microwave, which will turn the crispy coating immediately soft and mushy.
Why do you use both flour and cornstarch in the coating?
The combination is used for textural layering. The all-purpose flour provides the initial adhesion and a softer layer, while the cornstarch is the secret to the famous “velveting” technique, contributing significant structural integrity and a light, dry, shatteringly crisp crust that holds up well even after being tossed in the sticky sauce.
Can I use pre-minced jarred garlic and ginger?
For the absolute best flavor, freshly minced garlic and grated ginger are highly recommended, as the oils are volatile and dissipate quickly once processed. However, if time is a critical factor, you can use jarred or paste versions. Use slightly more than the recipe calls for, as the intensity of the flavor is usually lower.
My sauce didn’t thicken. What went wrong?
If your sauce remains thin, it usually means the cornstarch slurry was not fully activated. Return the sauce to a low simmer and make a new, smaller slurry (one teaspoon cornstarch mixed with two teaspoons cold water). Slowly whisk this new slurry into the simmering sauce until the desired thickness is achieved. Ensure the sauce comes to a boil after the cornstarch is added to guarantee thickening.
Nutritional Snapshot
| Nutrient | Amount per Serving |
| Calories | 560 kcal |
| Protein | 35 g |
| Carbs | 55 g |
| Fat | 20 g |
| Fiber | 3 g |
| Sugar | 28 g |
| Sodium | 750 mg |
Disclaimer
Nutrition information is an estimate and may vary based on preparation and ingredients used.

Sticky Sesame Chicken
Ingredients
- 1.5 pounds boneless, skinless chicken thighs or breasts, cut into 1-inch pieces
- 0.5 tsp fine sea salt
- 0.25 tsp freshly ground black pepper
- 0.5 cup all-purpose flour
- 0.5 cup cornstarch
- 2 large eggs, lightly beaten
- 3 cups neutral cooking oil (such as canola or peanut), for frying
- 0.25 cup low sodium soy sauce
- 3 tbsp rice vinegar
- 0.5 cup granulated white sugar
- 0.25 cup honey
- 0.5 cup chicken broth
- 1 tbsp toasted sesame oil
- 4 cloves garlic, minced
- 1 tsp fresh ginger, grated
- 1 tsp Sriracha or chili garlic sauce
- 1 tbsp cornstarch mixed with 2 tbsp cold water (slurry)
- 2 tbsp toasted sesame seeds
- 4 green onions (scallions), thinly sliced
Instructions
- Pat chicken dry and season with salt and pepper. Set up dredging bowls with flour, egg, and cornstarch.
- Dredge chicken in flour, then egg, then cornstarch. Place on a wire rack to rest.
- Heat oil in a heavy pot to 350°F (1.5-inch depth).
- In a small saucepan, combine glaze ingredients (except slurry) and simmer until sugar dissolves. Set aside.
- Fry chicken in two batches for 3–4 minutes until lightly golden and internal temp is 155°F. Rest on rack.
- Return glaze to heat and whisk in slurry. Simmer until thick, about 1 minute. Remove from heat.
- Increase oil to 375°F. Flash fry all chicken for 1.5–2 minutes until deep golden brown and crispy. Drain.
- Toss hot chicken in hot glaze in a large bowl until fully coated. Garnish with sesame seeds and scallions.
Notes
Equipment
- Heavy-bottomed pot or wok
- tongs or slotted spoon
- wire rack
- mixing bowls
- small saucepan
- thermometer


