
If you have spent your life avoiding the breakfast aisle because of memories of gummy, flavorless mush, it is time for a culinary intervention. Steel cut oats are the sophisticated, texture-rich answer to the lackluster instant packets of the past. Unlike their processed counterparts, these oats offer a satisfying chew and a nutty depth that transforms a simple grain into a gourmet experience. This guide will walk you through the precise method for achieving a bowl that is consistently creamy, wholesome, and perfectly tailored to your palate.
Table of Contents
Ingredients
- 2 1/2 cups water (plus additional as needed)
- 1 cup milk of any kind (such as unsweetened almond milk or dairy milk)
- 1 cup steel cut oats
- 1/4 teaspoon kosher salt
- Toppings and mix-ins of choice (such as fresh fruit, nuts, or sweeteners)

Instructions
- Place 2 1/2 cups of water and the milk in a medium to large saucepan. Bring the liquid to a boil over high heat.
- As soon as the liquid reaches a boil, stir in the steel cut oats and the kosher salt. Return the mixture to a steady boil, then immediately reduce the heat to low so the oats remain at a gentle simmer.
- Let the oats gently simmer for 20 minutes, stirring occasionally and scraping along the bottom of the pan to prevent any sticking.
- After 20 minutes, evaluate the texture. For softer and creamier oats, continue cooking for 5 to 10 additional minutes, stirring every few minutes. If the mixture becomes thicker than you prefer, add a small splash of extra water or milk to reach your desired consistency.
- Remove the oatmeal from the heat and let it sit for a few minutes to finish thickening. Serve hot with your preferred toppings.

Step-by-Step Details and Kitchen Science
The journey to the perfect bowl of steel cut oats begins with understanding the hydration process. Unlike rolled oats, which have been steamed and flattened, steel cut oats are whole groats chopped into small pieces. This means they require significantly more time and liquid to soften. By using a combination of water and milk, you are creating a liquid base that provides both the necessary hydration and a rich, velvety mouthfeel.
When you first bring your water and milk to a boil, you are setting the stage for rapid heat transfer. However, the moment those oats hit the water, the starch begins to release. This is why it is crucial to move immediately to a low simmer. If you maintain a high heat, the starches can scorch on the bottom of the pan, or the liquid may foam up and boil over, creating a mess on your stovetop.
During the initial 20 minutes of simmering, the oats are undergoing a physical transformation. The outer edges soften while the centers retain a distinct “pop.” This is the signature texture of a steel cut grain. Stirring is not just about preventing sticking; it helps agitate the starches, which is what creates that natural creaminess without needing to add excessive amounts of fat.
In the final 5 to 10 minutes of cooking, you are the master of your breakfast’s destiny. This is the “reduction phase.” If you prefer a “toothsome” bite—similar to al dente pasta—you will want to pull the pot off the heat sooner. If you want a porridge that feels like a warm hug, let it go the full 30 minutes. Remember that residual heat is a powerful thing; as the oats sit for those final few minutes off the burner, they will continue to absorb the remaining liquid and set into a beautiful, cohesive consistency.
Unique Culinary Insights
One of the most overlooked aspects of making oatmeal is the role of salt. It might seem counterintuitive to add salt to a dish that is often served sweet, but kosher salt is a flavor enhancer, not just a seasoning. It cuts through the natural blandness of the grain and allows the nuttiness of the oat to shine. Without that 1/4 teaspoon, your oatmeal will always taste like it is “missing something,” no matter how much sugar you add later.
Another professional secret is the pot choice. Always use a larger saucepan than you think you need. Steel cut oats are notorious for “growing” in the pot, and the starchy bubbles that form during the simmer need vertical space to rise and fall. Using a cramped pot increases the risk of a boil-over, which ruins the ratio of liquid to grain.
Finally, consider the “resting” period. Much like a steak, oatmeal benefits from sitting for three to five minutes after it leaves the heat. This allows the temperature to even out and the last bit of moisture to be distributed through the grains, ensuring the first bite is just as perfect as the last.
Accompaniments and Serving Suggestions
The beauty of a base recipe like this is that it acts as a blank canvas for your creativity. For those who enjoy a classic profile, a combination of sliced bananas, toasted walnuts, and a drizzle of pure maple syrup is unbeatable. The warmth of the oats slightly softens the fruit, creating a natural sauce.
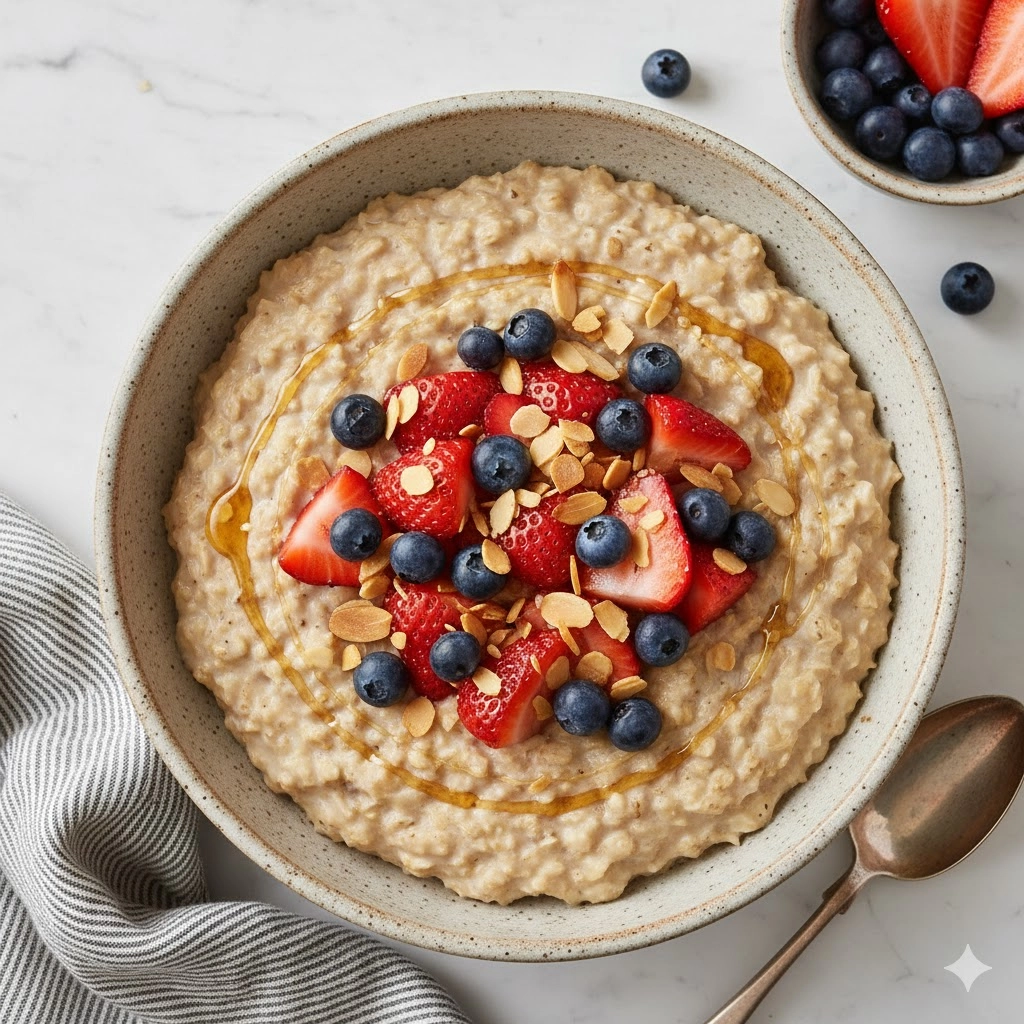
If you are looking for something more vibrant, consider a “berry burst” bowl. Fresh blueberries or strawberries added right at the end of cooking will slightly macerate, bleeding their juices into the creamy oats. A dollop of Greek yogurt on top provides a cool, tangy contrast to the hot porridge, along with a boost of protein.
For the adventurous palate, savory oats are a rising trend. Instead of sugar, top your steel cut oats with a soft-boiled egg, a swirl of pesto, or even some sautéed spinach and crumbled feta. The nutty texture of the steel cut oat lends itself remarkably well to savory profiles, reminiscent of a quick risotto.
Modifications and Substitutions
This recipe is inherently flexible to accommodate various dietary needs. If you are following a vegan or dairy-free lifestyle, the milk can be swapped for any plant-based alternative. Unsweetened almond milk provides a neutral, nutty base, while canned coconut milk will result in an incredibly rich, dessert-like consistency.
For those who need to increase their protein intake, you can stir in a scoop of your favorite protein powder during the final few minutes of simmering. Be sure to add an extra splash of liquid if you do this, as the powder will absorb moisture quickly.
If you find yourself in a rush during the week, you can actually prepare these oats ahead of time. Steel cut oats hold up significantly better than rolled oats when reheated. You can make a large batch on Sunday, store it in the refrigerator, and simply add a splash of water or milk before microwaving a portion each morning.
Deep-Dive FAQ
Why are my steel cut oats still crunchy after 20 minutes?
The “crunch” is usually a sign that the oats haven’t had enough time or that the heat was a bit too low to penetrate the heart of the grain. Every stove is different, and factors like altitude can affect cooking times. Simply add another 1/4 cup of liquid and continue to simmer for another 5 to 10 minutes until the desired tenderness is reached.
Can I use a slow cooker or Instant Pot for this recipe?
While this specific guide focuses on the stovetop method for maximum control over texture, steel cut oats are very well-suited for pressure cookers and slow cookers. In a pressure cooker, they typically require about 4 minutes on high pressure followed by a natural release. In a slow cooker, you can cook them on low for 7 to 8 hours, which is perfect for waking up to a hot meal.
What is the difference between “quick” steel cut oats and regular ones?
Quick-cooking steel cut oats have been cut into even smaller pieces than the standard variety. This allows them to hydrate and soften in about 5 to 7 minutes. While convenient, they do lose some of that iconic “chewy” texture that makes traditional steel cut oats so special. If you have the 30 minutes to spare, the regular version is almost always superior in flavor and mouthfeel.
A Wholesome Start to Your Day
Transitioning from instant packets to stovetop steel cut oats is a true culinary upgrade that honors the integrity of the grain. By following this method, you are not just making a meal; you are mastering a technique that guarantees a satisfying, nutrient-dense breakfast every time. Whether you prefer your oats swimming in cream and brown sugar or topped with fresh greens and seeds, the foundation remains the same: a perfectly simmered, creamy, and nutty bowl of gold.
Nutrition Table
| Nutrient | Amount Per Serving |
| Calories | 158 calories |
| Total Fat | 3 grams |
| Saturated Fat | 1 gram |
| Carbohydrates | 27 grams |
| Fiber | 4 grams |
| Sugar | 1 gram |
| Protein | 5 grams |
Nutrition Disclaimer
The nutritional information provided is an estimate based on specific ingredients and should be used for informational purposes only. Actual nutritional content may vary depending on the brands of ingredients used and any additional toppings added.

Steel Cut Oats | How to Cook the Perfect Bowl
Ingredients
- 2.5 cups water (plus additional as needed)
- 1 cup milk of choice (such as unsweetened almond milk)
- 1 cup steel cut oats
- 0.25 tsp kosher salt
- Toppings: fresh fruit, nuts, honey, or maple syrup
Instructions
- Place 2.5 cups water and the milk in a medium or large saucepan. Bring the liquid to a boil over high heat.
- As soon as the liquid boils, stir in the oats and salt. Return the mixture to a steady boil, then immediately reduce heat to low.
- Let the oats gently simmer for 20 minutes, stirring occasionally and scraping the bottom of the pan to prevent sticking.
- Judge the texture. For softer oats, cook for 5 to 10 additional minutes. Add a splash of extra liquid if they become too thick.
- Remove from heat and let sit for a few minutes to finish thickening. Serve hot with your favorite toppings.
Notes
Equipment
- Medium or Large Saucepan
- wooden spoon or spatula For stirring and scraping the bottom.
- measuring cups and spoons


