

The allure of a red velvet cake is undeniable, but sometimes the intensive labor of layering sponges and smoothing out mounds of frosting feels like a daunting task for a casual weeknight craving. That is where this Red Velvet Cookies Recipe steps in to save the day. These cookies capture every essential element of the classic Southern dessert—the hint of cocoa, the striking crimson hue, and that unmistakable tangy richness—but in a convenient, hand-held format. By incorporating real cream cheese directly into the dough, we achieve a texture that is remarkably soft and pillowy, while white chocolate chips provide the perfect sweet contrast. Whether you are prepping for a holiday celebration or simply want to brighten a gloomy afternoon, these cookies deliver pure joy in every bite.
Table of Contents
Ingredients
- 3/4 cup unsalted butter, at room temperature (170 grams)
- 4 ounces cream cheese, at room temperature (115 grams)
- 1 cup white sugar (200 grams)
- 1 cup packed dark brown sugar (220 grams)
- 1 teaspoon baking soda
- 1 teaspoon kosher salt
- 2 teaspoons vanilla extract
- 1 large egg
- 1 large egg yolk
- 1 tablespoon red food coloring, preferably McCormick brand
- 2 3/4 cups all-purpose flour (385 grams)
- 1/4 cup natural cocoa powder, not Dutch process (25 grams)
- 2 cups white chocolate baking chips, divided (340 grams)

Instructions
- Preheat your oven to 350 degrees Fahrenheit. Prepare your workspace by lining two large baking sheets with silicone baking mats or sheets of parchment paper to ensure the cookies do not stick.
- In the bowl of a stand mixer fitted with the paddle attachment, combine the room temperature unsalted butter, cream cheese, white sugar, dark brown sugar, baking soda, salt, and vanilla extract.
- Mix the ingredients on medium speed for approximately 1 to 2 minutes. Continue until the mixture is completely creamy, uniform in color, and begins to cling to the sides of the bowl.
- Stop the mixer and use a rubber spatula to scrape down the sides of the bowl. Add the whole large egg and mix on medium speed until fully incorporated.
- Add the large egg yolk followed by the red food coloring. To prevent the red dye from splattering across your kitchen, start the mixer on a very slow speed and gradually increase until the dough is a vibrant, even red.
- Sift in the all-purpose flour and the natural cocoa powder. Mix on low speed just until the white streaks of flour and the brown cocoa powder have disappeared into the dough. Avoid overmixing at this stage.
- Measure out 1 1/2 cups of the white chocolate chips and fold them into the dough. Reserve the remaining 1/2 cup of chips for the finishing touch later. Mix slowly until the chips are distributed evenly.
- Moisten your hands with water and lightly pat them dry with a paper towel. With slightly damp palms, roll the dough into 1 inch balls (about a heaping tablespoon each). Place the balls on the prepared baking sheets, leaving enough space for slight spreading.
- Bake the cookies one sheet at a time. Slide a tray into the center of the oven and bake for 11 to 13 minutes. You are looking for the edges to appear dry and set, while the centers remain slightly puffy and plump.
- Immediately after removing the tray from the oven, while the cookies are still hot, press several of the reserved white chocolate chips into the tops of the cookies.
- Allow the cookies to rest and cool on the baking sheet for at least 5 minutes. This allows them to set their structure. Transfer them to a wire cooling rack to cool completely. Repeat the process with the remaining dough.

Mastering the Texture and Color Chemistry
When you embark on the journey of making the perfect Red Velvet Cookies Recipe, you are participating in a unique bit of culinary science. The traditional “red velvet” flavor profile is actually quite subtle. It is not a chocolate cookie, nor is it a plain vanilla one. It sits comfortably in the middle, utilizing a small amount of natural cocoa powder. We specify natural cocoa powder rather than Dutch-process because the acidity in natural cocoa reacts with the baking soda to create a specific crumb structure. While the red food coloring provides the visual punch, the cocoa provides the soul of the cookie.
The inclusion of cream cheese is perhaps the most critical component of this specific recipe. Unlike a standard chocolate chip cookie that relies solely on butter for fat, the cream cheese introduces moisture and a slight acidity. This ensures that even after the cookies have cooled, they maintain a “fudgy” quality rather than becoming crisp or crunchy. When you are creaming the butter and cream cheese together with the sugars, you are creating a stable emulsion that holds air. This air expands in the 350 degree Fahrenheit oven, giving you that characteristic “puffy” look mentioned in the instructions.
For the most vibrant results, the choice of food coloring matters. Liquid food coloring is the most accessible and works perfectly here. If you prefer a deep, moody burgundy, sticking to the single tablespoon is sufficient. However, if you want a cookie that looks like it stepped out of a high-end professional bakery, do not be afraid to nudge that measurement closer to two tablespoons. Because the dough contains dark brown sugar and cocoa, it needs a significant amount of pigment to overcome those darker base colors.
Deep Dive into Step-by-Step Success
The process of making these cookies is straightforward, but paying attention to the sensory details at each stage will elevate your results from good to spectacular.
The Creaming Phase
When you start mixing the butter, cream cheese, and sugars, you should notice a physical transformation. Initially, the mixture will look grainy and separated. After about 90 seconds of mixing at medium speed, it will transition into a smooth, pale paste. This is the foundation of your cookie. If the butter is too cold, it will form lumps; if it is too melted, the cookies will spread too much. Aim for “room temperature,” which usually means you can leave a slight indentation with your finger without it sliding through the fat.
Handling the Dye
Red food coloring is notoriously messy. A pro tip is to add the dye alongside the egg yolk. The fat in the yolk helps the dye distribute more evenly through the creamed mixture. Always start your mixer on the lowest possible setting. Red splatters on a white countertop or a favorite apron can be permanent. Once the dye is incorporated, the dough should look like a thick, red frosting before the dry ingredients are added.
The Rolling Technique
You might wonder why the instructions suggest dampening your hands. This dough is particularly tacky because of the cream cheese and the high sugar content. If you try to roll it with dry hands, the dough will stick to your palms, making it impossible to get a smooth, spherical shape. By keeping your hands slightly moist, the dough glides against your skin, allowing you to form perfect 1 inch rounds that will bake into beautiful, uniform circles.
The Post-Bake Decoration
One of the secrets to “Instagram-ready” cookies is the double-chip method. By folding most of the chips into the dough, you ensure every bite has sweetness. However, those chips often get covered by the red dough during the baking process. By pressing the reserved chips into the surface the moment the tray leaves the oven, you ensure the white pops against the red. The residual heat of the cookie will slightly melt the bottom of the chip, “gluing” it in place as it cools.
Modifications and Creative Substitutions
While the classic Red Velvet Cookies Recipe calls for white chocolate chips to mimic the flavor of cream cheese frosting, there is plenty of room for experimentation based on your pantry or personal preferences.
- The Chocolate Swap: If you find white chocolate too sweet, you can easily substitute dark chocolate chips or semi-sweet chunks. While this loses the classic “red and white” aesthetic, the bitterness of dark chocolate pairs beautifully with the tangy cream cheese dough.
- Nutty Additions: For those who enjoy a bit of crunch, toasted pecans or walnuts are a traditional accompaniment to red velvet cake. Finely chop 1/2 cup of nuts and fold them in along with the white chocolate chips.
- The “Yogurt” Alternative: If you can find them, yogurt chips offer a fantastic tang that mimics the cream cheese even more aggressively than white chocolate. They can be substituted one-for-one.
- Dairy-Free Notes: While this specific recipe relies heavily on the structural properties of real cream cheese and butter, some bakers have had success using high-quality plant-based butter sticks and vegan cream cheese alternatives. Just be aware that the spread of the cookie may vary.
Accompaniments and Optimal Serving Suggestions
These cookies are rich and flavorful enough to stand on their own, but they also play well with others.
- The Classic Pairing: Nothing beats a tall, cold glass of whole milk. The creaminess of the milk cuts through the sugar and highlights the cocoa notes in the dough.
- Coffee and Tea: Serve these alongside a bitter espresso or a dark roast coffee. The acidity of the coffee complements the cream cheese in the cookie. For tea drinkers, a robust Earl Grey with its citrusy bergamot notes is a surprising but delicious match.
- The Ice Cream Sandwich: Because these cookies remain soft even after cooling, they make the ultimate base for ice cream sandwiches. Sandwich a scoop of high-quality vanilla bean or cheesecake-flavored ice cream between two cookies for a decadent dessert.
- Gift Packaging: These are excellent for gifting. Because of their striking color, they look beautiful in clear cellophane bags tied with a white or gold ribbon. They stay fresh for several days, making them ideal for shipping to loved ones or bringing to an office party.
Essential Insights for Perfect Results
Achieving the ultimate creamy consistency in the dough is the gatekeeper to a great cookie. If you notice your cookies are coming out too flat, check the temperature of your kitchen. If it is very warm, the dough might benefit from a 30 minute chill in the refrigerator before rolling. This firms up the butter and cream cheese, ensuring the cookies maintain their “puffy and plump” shape during the initial minutes of baking.
Furthermore, do not overbake. This is the golden rule of the Red Velvet Cookies Recipe. Because the dough is dark red, it is difficult to see the traditional “golden brown” edges that signify a finished cookie. You must rely on the texture of the surface. As soon as the edges look matte and firm, pull them out. They will continue to cook on the hot baking sheet for those five minutes of resting time. If you wait until the centers look completely firm, the cookies will be dry and tough once they cool.
Common Culinary Questions
Why did my red velvet cookies turn brown instead of staying bright red?
The most common reason for browning is the type of cocoa powder used or the oven temperature. Ensure you are using natural cocoa powder, as the pH balance is crucial. Additionally, if your oven runs hot, the sugars on the surface may caramelize too quickly, masking the red color. Using a dedicated oven thermometer can help you ensure you are baking at exactly 350 degrees Fahrenheit.
Can I make the dough in advance and bake it later?
Absolutely. This dough handles refrigeration very well. You can store the raw dough in an airtight container for up to three days. When you are ready to bake, let it sit on the counter for about 20 minutes so it is soft enough to roll. You can also freeze the pre-rolled balls. Place them on a tray to freeze solid, then transfer them to a freezer bag. Bake directly from frozen, adding an extra 1 to 2 minutes to the total baking time.
Is it possible to make these without a stand mixer?
While a stand mixer makes the creaming process much easier and more efficient, you can certainly use a hand mixer. You will need to be diligent about scraping the bowl to ensure the cream cheese is fully integrated without leaving tiny white lumps. Making these entirely by hand with a wooden spoon is possible but will require significant “elbow grease” to achieve the necessary creamy consistency.
Estimated Nutrition Facts
| Nutrient | Amount Per Serving |
| Calories | 189 |
| Total Fat | 9 grams |
| Saturated Fat | 5 grams |
| Cholesterol | 24 milligrams |
| Sodium | 135 milligrams |
| Total Carbohydrates | 26 grams |
| Dietary Fiber | 0 grams |
| Sugars | 18 grams |
| Protein | 2 grams |
Disclaimer
The nutrition information provided is an estimate based on standard ingredient databases. Actual nutritional values may vary depending on specific brands used and slight variations in portion sizes. For those with specific dietary restrictions, please calculate values using your exact ingredients.
Final Thoughts on This Classic Treat
Baking a batch of these cookies is more than just a kitchen task; it is an act of creating something visually stunning and deeply comforting. The Red Velvet Cookies Recipe bridges the gap between a sophisticated cake and a nostalgic snack. Their soft, chewy texture and the pop of white chocolate make them an instant favorite for anyone who tries them. Once you master the simple balance of creaming the fats and timing the bake, you will find yourself returning to this recipe year-round, not just for special holidays. Enjoy the process, enjoy the vibrant colors, and most importantly, enjoy that first warm, chocolatey bite.
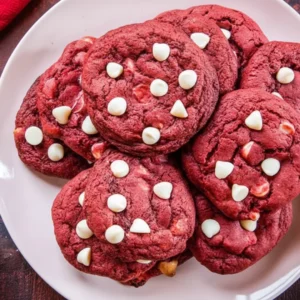
Soft and Chewy Red Velvet Cookies
Ingredients
- 0.75 cup unsalted butter, at room temperature
- 4 ounces cream cheese, at room temperature
- 1 cup white sugar
- 1 cup dark brown sugar, packed
- 1 tsp baking soda
- 1 tsp kosher salt
- 2 tsp vanilla extract
- 1 large egg
- 1 large egg yolk
- 1 tbsp red food coloring
- 2.75 cups all-purpose flour
- 0.25 cup natural cocoa powder (not Dutch process)
- 2 cups white chocolate baking chips, divided
Instructions
- Preheat the oven to 350 Fahrenheit. Line two large baking sheets with silicone mats or parchment paper.
- In a stand mixer, cream together the butter, cream cheese, white sugar, brown sugar, baking soda, salt, and vanilla for 1-2 minutes until smooth.
- Add the egg and mix until incorporated. Add the egg yolk and red food coloring, mixing on low speed to prevent splattering.
- Add the flour and cocoa powder. Mix on low speed until the dry ingredients are just absorbed.
- Fold in 1.5 cups of the white chocolate chips, reserving the remaining 0.5 cup for later.
- Roll the dough into 1-inch balls with slightly moist hands. Place them on the prepared baking sheets.
- Bake for 11-13 minutes until edges are set. Immediately press reserved chips into the tops of the warm cookies.
- Cool on the sheet for 5 minutes before transferring to a wire rack to finish cooling completely.
Notes
Equipment
- Stand mixer with paddle attachment
- Baking sheets Two large sheets
- Silicone baking mats or parchment paper
- wire cooling rack
- rubber spatula


