

It is truly fascinating how a few humble pantry staples can transform into a culinary masterpiece that defines an entire region’s comfort food. These Perfect Gluten-Free Hushpuppies are the epitome of Southern hospitality, offering a satisfying crunch on the outside and a tender, pillow-soft interior that carries a hint of sweetness and the savory punch of fresh onion. Whether you are hosting a summer fish fry, a backyard barbecue, or simply looking for a nostalgic snack that fits a gluten-free lifestyle, this recipe delivers on every front. The beauty of these golden nuggets lies in their simplicity and the way they invite everyone to the table, regardless of dietary restrictions.
Table of Contents
Ingredients for Success
To embark on your gluten-free hushpuppy adventure, gather these simple yet essential ingredients. Each component plays a vital role in creating the perfect balance of flavor and texture. Using high-quality ingredients will always elevate the final dish to restaurant-quality standards.
- 2 Large Eggs: Eggs act as the primary binding agent in this batter, providing the necessary structure to keep the hushpuppies from falling apart in the hot oil. They also lend moisture and a certain richness to the crumb. For the best results, ensure your eggs are at room temperature so they emulsify easily with the other wet ingredients.
- One Half Cup Granulated Sugar: While hushpuppies are a savory side, sugar is the secret to that classic Southern profile. It balances the sharp notes of the onion and encourages the Maillard reaction, which is the scientific process that gives the exterior its deep, mahogany-brown color and complex flavor.
- 1 Medium Onion, Finely Chopped: The onion is the soul of the dish. It provides the aromatic depth that distinguishes a hushpuppy from a simple piece of fried dough. Yellow or white onions are preferred for their balance of sweetness and sulfurous bite.
- One Half Cup Gluten-Free Cornmeal (or Corn Flour Alternative): This is the backbone of the recipe. If you can find certified gluten-free cornmeal, it provides the traditional gritty texture we all love. If unavailable, masa harina or a coarse corn flour blend can serve as a suitable replacement to maintain that signature corn flavor.
- One Half Cup Gluten-Free All-Purpose Flour Blend: Since we are avoiding wheat, a high-quality all-purpose blend is necessary to provide the “lift” and softness. Look for a blend that already includes xanthan gum to ensure the batter has the elasticity required to hold air bubbles.
- Salt and Pepper to Taste: Never underestimate the power of seasoning. Salt wakes up the corn and onion flavors, while black pepper adds a subtle, warming back-note that cuts through the richness of the fried exterior.
- Vegetable Oil or Canola Oil, for Deep Frying: You will need enough oil to reach a depth of at least two inches in your pot. These neutral oils have a high smoke point, which is essential for frying at the required temperatures without the oil breaking down or imparting a burnt taste.
- Optional: Hushpuppy Dipping Sauce (for Serving): A creamy remoulade, a zesty tartar sauce, or even a simple honey mustard can turn these bites into a complete appetizer experience.

Step-by-Step Instructions
Follow these directions carefully to ensure your hushpuppies are light, airy, and perfectly cooked through.
Step 1: Combine Wet Ingredients
Begin by cracking the two large eggs into a clean, large mixing bowl. Add the one half cup of granulated sugar directly to the eggs. Using a whisk or a hand mixer, beat the two together vigorously. You are looking for a frothy, pale yellow consistency. This aeration is what makes the hushpuppies light rather than dense and heavy.
Step 2: Incorporate Onions
Take your finely chopped medium onion and fold it into the egg and sugar mixture. Stir until the onion pieces are fully coated. You may notice the mixture becomes a bit more liquid as the salt in the batter (added in the next step) or the mechanical action of stirring draws out some onion juice; this is encouraged as it flavors the entire base.
Step 3: Combine Dry Ingredients
In a separate, smaller mixing bowl, whisk together the one half cup of gluten-free cornmeal and the one half cup of gluten-free all-purpose flour blend. Add your salt and pepper here—usually about one half teaspoon of salt and one quarter teaspoon of pepper. Whisking the dry ingredients separately prevents “hot spots” of seasoning and ensures the leavening agents in your flour blend are evenly distributed.
Step 4: Combine Wet and Dry Ingredients
Slowly pour the dry flour mixture into the bowl with the wet ingredients. Using a spatula or a wooden spoon, gently fold the two together. Do not overwork the batter; stop as soon as no large streaks of dry flour remain. Let the batter rest for 5 to 10 minutes. This is a critical step in gluten-free cooking, as it allows the starches to fully hydrate, resulting in a better “snap” and texture.
Step 5: Heat Oil for Deep Frying
Pour your oil into a heavy-bottomed pot or a deep fryer. Heat it over medium-high heat until it reaches a temperature between 350 and 375 degrees Fahrenheit. It is highly recommended to use a thermometer here. If the oil is too cool, the dough will soak up grease; if it is too hot, the outside will burn before the middle is cooked.
Step 6: Fry the Hushpuppies
Using a heaping teaspoon or a small cookie scoop, carefully drop rounds of batter into the hot oil. Work in batches of 6 to 8 to avoid dropping the oil temperature. The hushpuppies will initially sink, then bob to the surface. Fry for about 2 to 3 minutes per side, or 4 to 6 minutes total, until they are a rich golden brown.
Step 7: Drain Excess Oil
Use a slotted spoon to lift the hushpuppies out of the oil. Transfer them immediately to a plate lined with thick paper towels. This allows the surface oil to be wicked away, preserving the crunch of the crust.
Step 8: Serve and Enjoy
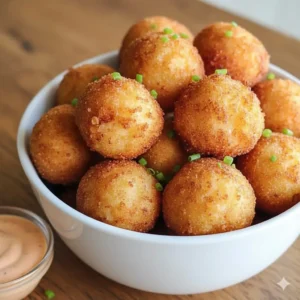
Transfer the warm hushpuppies to a serving bowl. They are at their absolute peak of flavor within the first ten minutes of leaving the fryer. Serve with your dipping sauce of choice and enjoy the fruits of your labor.

Achieving the Ultimate Creamy and Crispy Consistency
The secret to a world-class hushpuppy lies in the duality of its texture. You want a shell that shatters slightly when you bite into it, followed by a center that feels almost like a savory corn cake. In the world of gluten-free baking, this can be a challenge because gluten-free flours tend to be either too gritty or too gummy.
To master this consistency, pay close attention to the resting period of the batter. Because gluten-free grains take longer to absorb liquid than wheat, a batter that looks thin at first will often thicken significantly after five minutes. If your batter is still too runny to hold a round shape on a spoon, add a single tablespoon of cornmeal. Conversely, if it feels like a stiff dough, a tiny splash of water can loosen it. The ideal texture is like a thick cake batter—it should drop off the spoon in a heavy “plop” rather than a stream.
Furthermore, the temperature of your ingredients matters. If you use ice-cold eggs and then drop the batter into hot oil, the temperature shock can cause the exterior to seize too quickly. Using room-temperature eggs ensures a more even expansion of the air bubbles you whisked in during the first step, leading to that sought-after “cloud-like” interior.
Accompaniments and Creative Serving Suggestions
While these gluten-free hushpuppies are a powerhouse on their own, they truly shine when paired with the right partners. Traditionally, you will find them served alongside fried catfish or shrimp, but their versatility goes much further.
For a modern twist, try serving them as a “Southern Panzanella” base. You can lightly crush a few hushpuppies and toss them with fresh heirloom tomatoes, cucumbers, and a vinaigrette; the crispy bits soak up the tomato juices beautifully. If you are serving a crowd at a barbecue, they are the perfect vessel for mopping up extra brisket drippings or pulled pork sauce.
When it comes to dipping, don’t feel limited to the classics. A spicy hot honey drizzle is a fantastic way to play up the sugar in the batter. Alternatively, a whipped goat cheese dip with fresh chives provides a tangy contrast to the sweet corn flavor. If you are looking for a dairy-free option, a charred lemon aioli adds a bright, citrusy acidity that cuts through the richness of the fried dough.
Modifications and Dietary Substitutions
This recipe is designed to be inclusive, but there is always room for further customization based on what is in your pantry or your specific dietary needs.
- The Onion Element: If you find raw chopped onions too intense, you can sauté them in a teaspoon of oil before adding them to the batter. This mellows the flavor and adds a caramelized sweetness. Alternatively, for a milder profile, use the white parts of green onions or even shallots.
- The Flour Choice: If you do not have a pre-mixed gluten-free all-purpose flour, you can make a quick version using two parts rice flour, one part potato starch, and one part tapioca starch. Just ensure you add a pinch of xanthan gum if your mix doesn’t have it.
- Cornmeal Alternatives: For those who cannot find gluten-free cornmeal, certified gluten-free oat flour can provide a similar hearty texture, though the flavor will shift toward a more “nutty” profile rather than the distinct corn taste.
- Dairy-Free Needs: This recipe is naturally dairy-free! Just ensure that any dipping sauce you serve alongside it, like a tartar sauce, uses a vegan mayonnaise if you are avoiding eggs or dairy entirely.
Massive Expansion of Step-by-Step Details
Frying can be intimidating, but understanding the “why” behind each step makes it much easier. When you are beating the eggs and sugar in Step 1, you are creating a foam. This foam is the primary leavening agent. Unlike bread, which uses yeast, or some biscuits that use heavy doses of baking powder, these hushpuppies rely on the air trapped in the egg protein to expand when they hit the 350-degree oil.
When you move to Step 6, the “drop” technique is vital. You want to use a “wet-to-dry” spoon method. Dip your spoon into the hot oil for a second before scooping the batter. This creates a thin barrier of oil on the spoon, allowing the batter to slide off effortlessly into the fryer. This prevents the hushpuppies from having long “tails” and helps them form into those classic, rounded shapes.
Monitoring the color is also a skill. Gluten-free flours don’t always brown at the same rate as wheat flour. Because this recipe contains a half cup of sugar, it will brown faster than a sugar-free version. Do not be alarmed by a dark golden-brown color; this is the caramelization of the sugar and the natural sugars in the onion. It provides the deep, toasted flavor that makes a hushpuppy truly “perfect.”
Unique Culinary Insights and Kitchen Science
One of the most interesting aspects of this recipe is the use of sugar as a structural component. In gluten-free frying, sugar helps to “set” the crust quickly. As soon as the batter hits the oil, the sugar on the surface dehydrates and forms a crystalline structure that prevents the oil from penetrating deep into the center. This is why these hushpuppies feel light and not greasy.
Another insight involves the moisture content of the onion. If you find your batter is getting thinner the longer it sits, it is because the salt is macerating the onions. To prevent this, you can chop your onions and let them sit on a paper towel for ten minutes before adding them to the bowl. This removes excess surface moisture and keeps your batter consistency stable from the first batch to the last.
Finally, consider the “float” test. A perfectly aerated hushpuppy will sink for only two or three seconds before popping back up to the surface. If they stay at the bottom too long, your batter might be too dense, and you should whisk a bit more air into the remaining mixture before continuing.
Deep-Dive FAQ
How do I store and reheat leftover hushpuppies without them getting soggy?
Leftovers can be stored in an airtight container in the refrigerator for up to three days. To regain their original crunch, avoid the microwave at all costs, as it will make the cornmeal tough and rubbery. Instead, place them on a baking sheet in a 350-degree Fahrenheit oven for about 8 to 10 minutes. This dries out any moisture they absorbed in the fridge and recrisps the outer shell.
Can I use an air fryer for this gluten-free recipe?
While this specific batter is a “wet” batter designed for deep frying, you can use an air fryer if you make a slight modification. To make them air-fryer friendly, you would need to add about one quarter cup more flour to make the dough stiff enough to roll into balls. Spray them generously with oil before air frying at 375 degrees Fahrenheit for 12 to 15 minutes. Note that the texture will be more like a savory donut hole than a traditional hushpuppy.
My hushpuppies are raw in the middle but burnt on the outside; what happened?
This is almost always a result of oil temperature. If your oil is above 375 degrees Fahrenheit, the outside cooks in seconds, but the heat hasn’t had time to penetrate the center. Use a thermometer to ensure you stay in the 350 to 375 range. Also, ensure your “scoops” aren’t too large; a heaping teaspoon is the ideal size for even cooking.
Is it possible to freeze the batter for later use?
It is not recommended to freeze the raw batter because the eggs will lose their ability to hold air once thawed, and the onions will release too much water, ruining the consistency. However, you can freeze the fully cooked hushpuppies. Once they have cooled completely, flash-freeze them on a tray and then transfer them to a freezer bag. They can be reheated directly from frozen in a 375-degree oven for about 15 minutes.
The Joy of the Golden Crunch
There is a specific kind of satisfaction that comes from mastering a classic dish like the hushpuppy, especially when you’ve successfully navigated the complexities of gluten-free cooking. These golden, onion-scented gems are more than just a side dish; they are a bridge to a long-standing culinary tradition that values flavor, texture, and the warmth of a shared meal. By following these steps and leaning into the science of the ingredients, you can serve a plate of hushpuppies that will have everyone reaching for seconds, regardless of whether they follow a gluten-free diet or not.
Nutrition Table
| Nutrient | Amount per Serving (2-3 hushpuppies) |
| Calories | 200-250 kcal |
| Total Fat | 12-15 grams |
| Saturated Fat | 2-3 grams |
| Unsaturated Fat | 9-12 grams |
| Cholesterol | 40-50 milligrams |
| Sodium | 150-200 milligrams |
| Total Carbohydrates | 20-25 grams |
| Dietary Fiber | 1-2 grams |
| Total Sugars | 8-10 grams |
| Protein | 3-4 grams |
Nutritional Disclaimer
The nutritional information provided above is an estimate based on standard ingredient measurements and typical oil absorption during the deep-frying process. Actual nutritional values may vary depending on the specific brands of gluten-free flour and cornmeal used, the exact size of each hushpuppy, and the temperature of the oil during frying. For those with strict medical dietary requirements, please consult a professional or use a verified nutrition calculator with your specific brands.
Perfect Gluten-Free Hushpuppies
Ingredients
- 2 large eggs, room temperature
- 0.5 cup granulated sugar
- 1 medium onion, finely chopped
- 0.5 cup gluten-free cornmeal (or corn flour alternative)
- 0.5 cup gluten-free all-purpose flour blend
- 0.5 tsp fine sea salt (plus more to taste)
- 0.25 tsp black pepper
- 2 cups vegetable or canola oil for deep frying
Instructions
- In a large mixing bowl, beat the 2 large eggs and 1/2 cup sugar together until well combined and slightly frothy to incorporate air.
- Add the finely chopped onion to the egg mixture and stir until evenly distributed throughout the wet ingredients.
- In a separate bowl, whisk together the gluten-free cornmeal, gluten-free flour blend, salt, and pepper.
- Gently fold the dry ingredients into the wet ingredients until just combined. Let the batter rest for 5 to 10 minutes to hydrate the flours.
- Heat at least 2 inches of oil in a heavy pot to 350-375°F. Use a thermometer to ensure accuracy.
- Carefully drop heaping teaspoons of batter into the hot oil. Fry in batches of 6-8 to avoid overcrowding the pot.
- Fry for 2-3 minutes per side (4-6 minutes total) until the hushpuppies are golden brown and cooked through.
- Remove with a slotted spoon and drain on paper towels. Serve immediately while hot and crispy.
Notes
Equipment
- large mixing bowl
- Deep-fry thermometer Essential for temperature control
- Heavy-bottomed pot or kettle
- Slotted spoon or tongs
- paper towels For draining excess oil


