
The quest for the perfect, slightly sticky, sweet-and-sour glaze enveloping shatteringly crisp fried chicken is a lifelong culinary pursuit for many. When done right, homemade orange chicken recipe can easily eclipse the takeout version, offering a depth of flavor and texture that is simply unattainable in a box. This isn’t just about frying chicken; it’s about crafting a complex sauce that manages to be bright, savory, and rich all at once, then ensuring that the coating remains light, airy, and audibly crunchy when it meets the glaze. This recipe is designed to deliver that golden standard, perfect for a casual weekend meal or a surprisingly elegant weeknight dinner.
The Essential Components of this Orange Chicken Dish
For the Crispy Chicken Coating
- 1.5 pounds boneless, skinless chicken thighs or breasts, cut into 1-inch pieces
- 1 teaspoon fine sea salt
- 1/2 teaspoon freshly ground black pepper
- 1 large egg
- 1/4 cup plus 2 tablespoons cornstarch
- 1/4 cup plus 2 tablespoons all-purpose flour
- 1/2 teaspoon baking soda
- Vegetable or peanut oil, for deep frying (about 4 cups)
For the Signature Orange Glaze
- 1 cup fresh orange juice
- 1/4 cup rice vinegar (unseasoned)
- 3 tablespoons light soy sauce
- 1/4 cup granulated sugar
- 2 tablespoons packed light brown sugar
- 1 tablespoon fresh ginger, minced
- 2 cloves garlic, minced
- 1 teaspoon orange zest, finely grated
- 1 tablespoon cornstarch, dissolved in 2 tablespoons cold water (cornstarch slurry)
- 1/2 teaspoon crushed red pepper flakes (optional)
Garnish and Presentation
- 1 teaspoon toasted sesame seeds
- 2 green onions, thinly sliced

Crafting the Chicken and Glaze: A Sequence of Steps
- Prep the Chicken and Set Up the Fryer: Cut the chicken and season it with salt and pepper. In a wide bowl, whisk the egg. In a separate, shallow bowl, combine the cornstarch, flour, and baking soda. Heat the oil in a large, deep pot or Dutch oven until it reaches three hundred fifty Fahrenheit.
- Bread and Fry the Chicken: Dip each piece of chicken first into the egg, allowing excess to drip off, and then thoroughly coat it in the flour-cornstarch mixture. Fry the chicken in batches, ensuring the oil temperature stays consistent.
- Achieve Golden Crispness: Fry the first batch until a light golden color, about three to four minutes. Remove the chicken to a wire rack. Repeat with remaining batches. Increase the oil heat slightly and return all the chicken to the pot for a second, quick fry until deeply golden brown and audibly crisp.
- Prepare the Orange Glaze Base: While the chicken cools slightly, combine the orange juice, rice vinegar, soy sauce, sugars, ginger, garlic, orange zest, and red pepper flakes (if using) in a medium saucepan. Bring this mixture to a rolling boil over medium-high heat, stirring until the sugars dissolve fully.
- Thicken the Sauce: Once boiling, reduce the heat to low. Slowly whisk in the cornstarch slurry. Continue to stir gently until the sauce thickens noticeably and achieves a glossy, translucent finish—this usually takes about one minute. Remove the saucepan from the heat immediately.
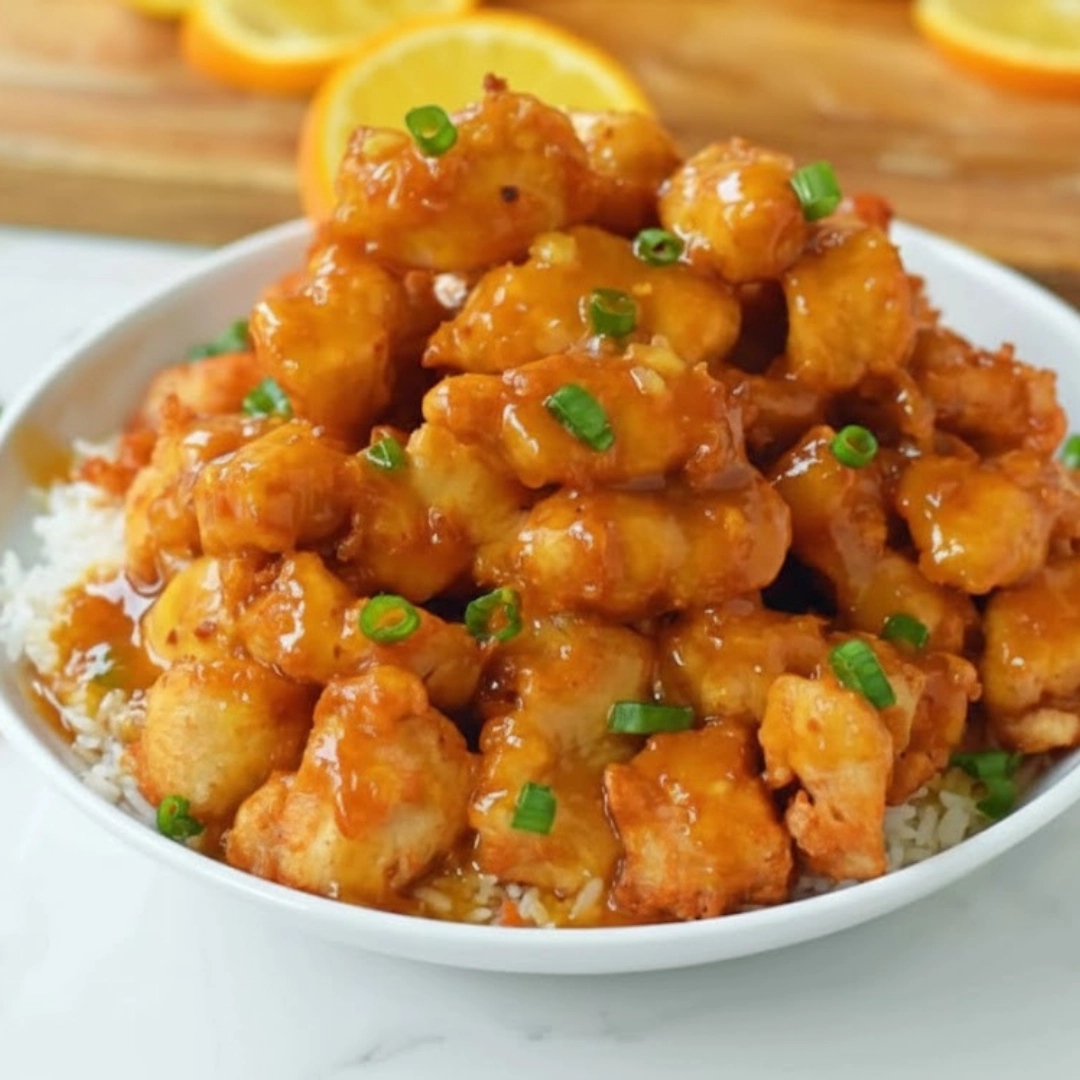
- Toss and Serve: Add the double-fried chicken to a very large mixing bowl. Pour the thickened orange glaze over the chicken and toss quickly and decisively until every piece is evenly coated and glistening. Garnish with sesame seeds and green onions and serve immediately.

Deep Dive into the Frying and Glazing Process
The success of this dish hinges on two crucial elements: the batter’s structural integrity and the glaze’s balance. Skipping over the minor details here can result in soggy chicken or a lackluster, thin sauce.
Building the Superior Coating
The choice of using both cornstarch and flour combined with a small amount of baking soda is intentional. The flour provides structure, but the cornstarch is the secret to a thin, brittle, and extra-crisp crust. The baking soda reacts with the oil to create tiny air pockets, making the coating lighter and less dense, which is key to avoiding that heavy, doughy texture sometimes found in poor quality fried chicken.
Before frying, always heat your oil to the target temperature of three hundred fifty Fahrenheit. Using a thermometer is non-negotiable here. If the oil is too cold, the chicken will absorb it and become greasy; too hot, and the exterior will burn before the inside cooks.
The Double-Fry Technique: Your Best Friend
The double-fry is absolutely essential for maximum crunch that holds up against the sauce.
- First Fry (Blanching): This cook time is lower and slower, cooking the chicken through internally and setting the crust. The chicken will look pale gold and should be immediately moved to a wire rack to allow residual moisture to evaporate.
- Second Fry (Crisping): The oil temperature is slightly higher for this short, high-heat blast. This step drives out any remaining moisture from the crust, sealing it and making it unbelievably crispy. The change from pale gold to deep, rich golden brown is your visual cue. The sound of the crust becoming rock-hard is your auditory signal.
Mastering the Orange Glaze
The goal of the sauce is to be vibrant and tangy, not merely sugary. The combination of fresh orange juice and zest provides a bright citrus element, while the rice vinegar adds necessary acidity to cut through the richness of the fried chicken.
Ensure the sugars are fully dissolved before adding the slurry. The cornstarch slurry should be made with cold water; adding cornstarch directly to hot liquid will cause it to clump instantly. Whisk the slurry in slowly while the liquid is simmering. The moment the sauce coats the back of a spoon and appears glossy, remove it from the heat. Overcooking the glaze once the slurry is added can cause it to break or become overly gluey.
The Final Toss
The critical moment is the toss. The chicken must be hot or warm, and the glaze must be fresh off the heat and thick. Use a large, clean bowl. Add the chicken, pour the glaze over, and use a silicone spatula to toss it quickly until coated. You want a thin, sticky layer of glaze, not a puddle. Serving immediately preserves the crunch.
Expert-Level Preparation Tips for Flawless Results
- The Power of Zest: Don’t skip the orange zest. The peel holds the essential oils that give the orange flavor its depth and aroma, far beyond what the juice alone provides. Use a microplane to get a fine zest without the bitter white pith.
- Pre-Dredging Chill: After coating the chicken pieces in the egg and flour mixture, arrange them on a baking sheet and chill them in the refrigerator for ten to fifteen minutes. This helps the coating adhere more firmly to the chicken, reducing the chance of it falling off during the frying process.
- Oil Maintenance: When frying in batches, the oil temperature will drop significantly each time you add cold chicken. Wait a few minutes between batches for the oil to recover its three hundred fifty Fahrenheit temperature. Use a thermometer to monitor this closely.
- Fresh Ginger and Garlic Only: Powdered alternatives simply won’t yield the same vibrant, aromatic base. Take the time to mince fresh ginger and garlic. They meld into the sauce during cooking, infusing it with unparalleled fragrance.
- Choosing Your Cut: While chicken breasts are leaner, using boneless, skinless chicken thighs guarantees a juicier, more forgiving interior that stands up better to the high heat of double-frying. If using breasts, make sure the pieces are uniform in size to ensure even cooking.
- Prep Ahead: You can cut the chicken and make the dry batter mix a day in advance. The glaze base (everything except the slurry) can also be made and refrigerated ahead of time. Simply heat it up and thicken it just before you are ready to fry the chicken.
- The Right Tool for Tossing: Use a non-reactive metal or glass bowl for the final toss. Pouring the hot sauce over the chicken in a metal bowl helps to keep the chicken warm slightly longer, aiding in the perfect glaze adhesion.

Creative Spins and Substitutions
Variations on the Glaze
- Spicy Mandarin: Add two tablespoons of chili garlic sauce (like Huy Fong) to the glaze base for a significant kick, and use mandarin juice instead of regular orange juice for a slightly different sweet-tart profile.
- Tangerine Honey: Replace the granulated sugar entirely with a quarter cup of honey and use fresh tangerine juice for a more floral and subtle citrus note. Reduce the cornstarch slurry by half, as honey naturally provides some thickening.
- Gluten-Free Coating: Substitute the all-purpose flour with a high-quality gluten-free flour blend and ensure your soy sauce is a certified gluten-free variety. The crispness will be maintained with the cornstarch.
Ingredient Swaps
- Vegetarian Swap: Tofu or mushrooms work beautifully. Use extra-firm tofu, pressed thoroughly, or shiitake mushroom caps, and fry them following the exact double-fry instructions.
- Soy Sauce Alternatives: Use tamari for a deeper, earthier umami flavor, or coconut aminos for a lighter, slightly sweeter taste with reduced sodium. Adjust the salt content of the dish accordingly.
Ideal Companions for Orange Chicken
Orange chicken is a showstopper, but it needs the right supporting cast to make the meal complete. The sweet, tangy, and savory notes require a balance of clean and simple sides.
- Classic Steamed White Rice: A bowl of fluffy, hot steamed jasmine or basmati rice is the essential canvas for soaking up the extra sauce. Its neutral flavor provides a perfect counterpoint to the powerful glaze.
- Garlic Stir-Fried Green Beans: A quick sauté of fresh green beans with a bit of garlic, a splash of soy sauce, and a drizzle of sesame oil adds a much-needed crunch and vegetable contrast. The slight bitterness of the beans cuts the sweetness of the dish.
- Simple Cabbage Salad: A light, finely shredded cabbage and carrot salad tossed with a bright, minimal dressing (like a teaspoon of vinegar and a pinch of salt) offers a refreshing palate cleanser between bites.
Answering Common Questions
Why does my sauce seem too thin and runny?
This usually means the cornstarch slurry was either measured incorrectly (too little cornstarch) or the sauce wasn’t allowed to simmer long enough after the slurry was added. Ensure the slurry is well mixed before adding, and always bring the sauce to a gentle simmer for sixty seconds after thickening to fully activate the starch.
Can I use store-bought orange juice?
You absolutely can, but fresh juice will give you the most authentic and vibrant flavor. If using store-bought, choose a hundred percent pure, pulp-free orange juice and add a little extra orange zest to compensate for any flavor loss.
Is it possible to bake or air-fry the chicken instead of deep-frying?
While technically possible, neither baking nor air-frying will give you the same shatteringly crisp texture that defines excellent orange chicken. If you must use one of these methods, lightly spray the battered pieces with oil before baking at four hundred twenty-five Fahrenheit or air-frying at four hundred Fahrenheit, flipping halfway, but expect a slightly less crisp exterior.
How do I store leftovers and reheat them?
Store leftovers in an airtight container in the refrigerator for up to three days. To reheat, the best method is to use an air fryer or convection oven set to three hundred fifty Fahrenheit for about five to seven minutes. This high, dry heat helps the sauce to re-adhere and the crust to re-crisp. Microwaving is not recommended as it will result in soggy chicken.
Nutritional Breakdown
| Nutrient | Amount per Serving |
| Calories | 480 kcal |
| Protein | 30 g |
| Carbs | 45 g |
| Fat | 20 g |
| Fiber | 2 g |
| Sugar | 25 g |
| Sodium | 450 mg |
Disclaimer
Nutrition information is an estimate and may vary based on preparation and ingredients used.

The Secret to Truly Crispy Homemade Orange Chicken
Ingredients
- 1.5 pounds boneless, skinless chicken thighs or breasts, cut into 1-inch pieces
- 1 teaspoon fine sea salt
- 0.5 teaspoon freshly ground black pepper
- 1 large egg
- 0.25 cup cornstarch
- 2 tablespoons cornstarch
- 0.25 cup all-purpose flour
- 2 tablespoons all-purpose flour
- 0.5 teaspoon baking soda
- 4 cups vegetable or peanut oil, for deep frying
- 1 cup fresh orange juice
- 0.25 cup rice vinegar (unseasoned)
- 3 tablespoons light soy sauce
- 0.25 cup granulated sugar
- 2 tablespoons packed light brown sugar
- 1 tablespoon fresh ginger, minced
- 2 cloves garlic, minced
- 1 teaspoon orange zest, finely grated
- 1 tablespoon cornstarch, dissolved in 2 tbsp cold water (slurry)
- 0.5 teaspoon crushed red pepper flakes (optional)
- 1 teaspoon toasted sesame seeds (for garnish)
- 2 green onions, thinly sliced (for garnish)
Instructions
- Cut the chicken into 1-inch pieces and season with salt and pepper. Whisk egg in a bowl. In a separate bowl, mix cornstarch, flour, and baking soda. Heat oil in a deep pot to 350°F.
- Dip each piece of chicken in egg, let excess drip off, then coat thoroughly in the flour-cornstarch mixture.
- Fry chicken in batches until pale golden, about 3–4 minutes. Transfer to wire rack. Repeat with remaining chicken.
- Raise oil heat slightly. Fry all chicken a second time until deeply golden and crispy. Drain on wire rack.
- In a saucepan, combine orange juice, rice vinegar, soy sauce, sugars, ginger, garlic, zest, and red pepper flakes. Bring to a rolling boil.
- Reduce heat and whisk in cornstarch slurry slowly. Stir until sauce thickens and becomes glossy (about 1 minute), then remove from heat.
- Place fried chicken in a large bowl. Pour glaze over and toss quickly to coat all pieces evenly.
- Garnish with toasted sesame seeds and sliced green onions. Serve immediately while hot and crispy.
Notes
Equipment
- deep pot or Dutch oven
- mixing bowls
- tongs or slotted spoon
- wire rack
- thermometer
- medium saucepan
- whisk
- large mixing bowl
- silicone spatula


