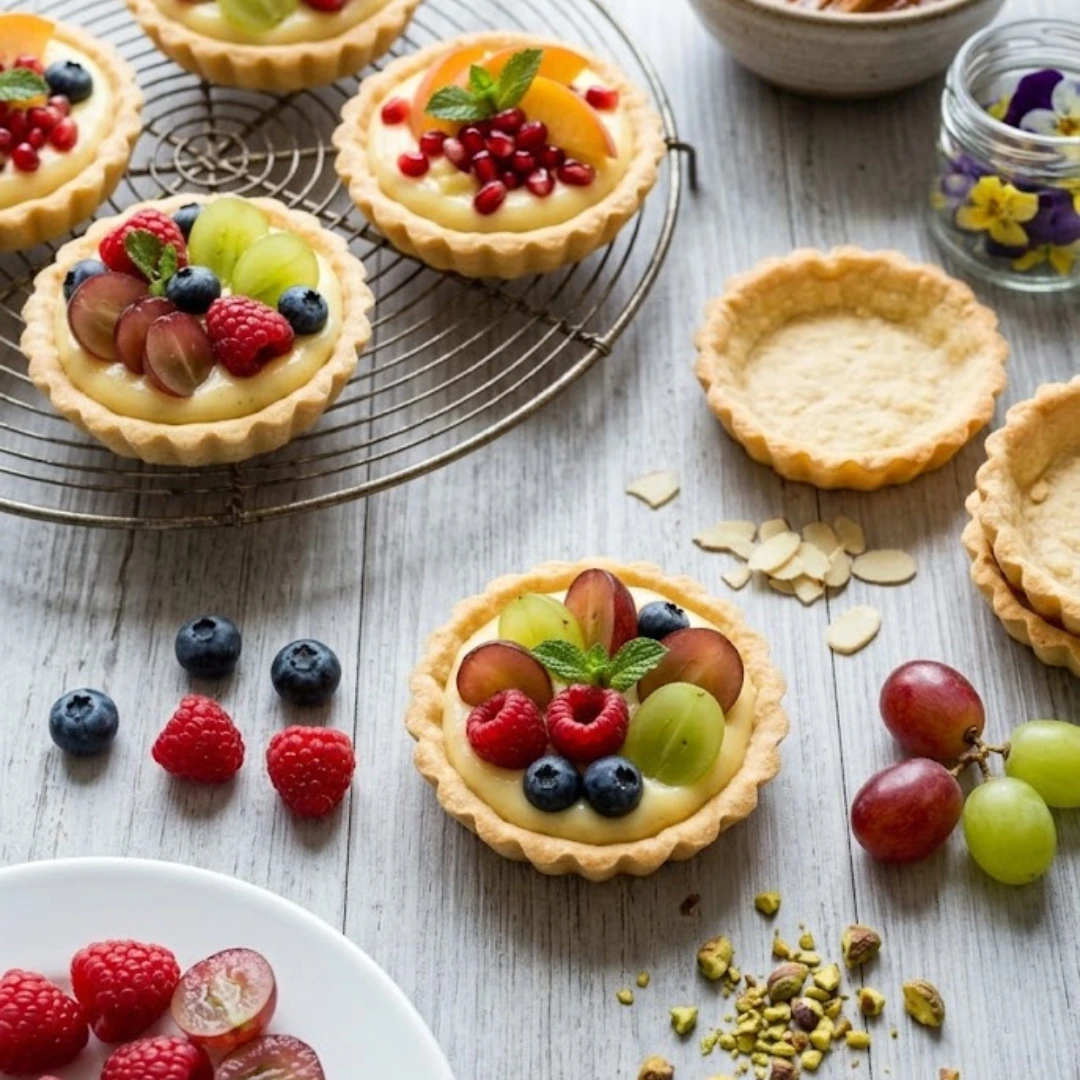
There is something inherently joyful about a miniature dessert that looks like a work of art but tastes like home. These mini fruit tarts are the quintessential crowd-pleaser, combining a buttery, crisp shortbread crust with a silky-smooth vanilla custard and a vibrant mosaic of fresh fruit. Whether you are hosting a festive garden party, a sophisticated baby shower, or simply want to elevate your Sunday brunch, these bite-sized treasures provide the perfect balance of sweetness and tang. In this guide, we will walk through the precise method to achieve professional-grade results in your own kitchen.
Table of Contents
Ingredients
The Buttery Shortbread Crust
- 225 grams (1 ½ cups plus 1 tablespoon) all purpose flour
- 1.5 grams (½ teaspoon) salt
- 80 grams (½ cup, 1 tablespoon, and 1 teaspoon) powdered sugar
- 115 grams (8 tablespoons) unsalted butter, cut into small cubes
- 2 egg yolks
- 2 milliliters (½ teaspoon) vanilla extract
- 12 milliliters (1 tablespoon) heavy cream (plus extra if needed)
The Silky Custard Filling
- 4 egg yolks
- 68 grams (5 ½ tablespoons) white sugar
- 24 grams (2 tablespoons and 2 teaspoons) all purpose flour
- 24 grams (2 tablespoons and 2 teaspoons) cornstarch
- 376 milliliters (13.28 ounces) whole milk
- 4 milliliters (1 teaspoon) vanilla extract
The Assembly and Garnish
- Assorted fresh fruit, such as strawberries, blackberries, and kiwi, sliced
- 2 tablespoons apricot jelly or another clear fruit jelly
- 7.5 milliliters (1 ½ tablespoons) water

Instructions
Preparing the Tart Shells
- Using a stand mixer equipped with the paddle attachment, combine the all purpose flour, salt, powdered sugar, and cubed unsalted butter.
- Mix on the lowest setting for approximately one minute until the butter breaks down into smaller, pea-sized pieces.
- Incorporate the egg yolks one at a time, followed by the heavy cream and vanilla extract.
- Increase the speed to medium (setting 4 or 6) and mix for about two minutes. The texture should eventually resemble crumbly, damp sand.
- Test the dough by pinching a small amount between your fingers; if it holds together, it is ready. If it remains too dry, add heavy cream one tablespoon at a time until the desired consistency is reached.
- Scoop approximately three tablespoons (60 grams) of dough for each four-inch tart mold. Use your fingers to press and flatten the dough directly into the molds, ensuring an even layer across the bottom and up the sides.
- Use a fork to prick (dock) the bottom of each tart shell multiple times to prevent air bubbles.
- Place the filled molds in the freezer for at least one hour. This step is vital to prevent the dough from shrinking or melting during the baking process.
- Preheat your oven to 375 degrees Fahrenheit.
- Transfer the tarts directly from the freezer to the oven and bake for 12 to 15 minutes, or until the edges are a light golden brown. Let them cool completely before removing them from the molds.

Crafting the Pastry Cream
- While the shells are chilling, begin the custard. In a medium mixing bowl, whisk together the egg yolks and white sugar until the mixture lightens in color.
- Sift the flour and cornstarch together, then whisk them into the egg yolk and sugar mixture until no lumps remain.
- Slowly pour the whole milk and vanilla extract into the bowl, whisking constantly to combine.
- Transfer the mixture into a saucepan and place it over medium heat.
- Whisk continuously for one to two minutes. You will notice thick specks forming on the bottom of the pan as the starch gelatinizes.
- Once the mixture reaches the consistency of a thick pudding, remove it from the heat immediately. If it thickens too quickly, lift the pan off the burner while continuing to whisk vigorously.
- Transfer the custard to a clean container and let it cool for at least 30 minutes. You may cover it with plastic wrap pressed directly onto the surface to prevent a skin from forming.
Final Assembly and Glazing
- Prepare your fresh fruit by washing, drying, and slicing into uniform pieces.
- Create the glaze by combining the apricot jelly and water in a small bowl. Microwave for 10 to 15 seconds until melted, then stir and strain to ensure a smooth liquid.
- To prevent the crust from becoming soggy, lightly brush the inside of each cooled tart shell with a thin layer of the apricot glaze before filling.
- Spoon the cooled custard into each shell, filling them about three-quarters of the way to the top.
- Arrange the sliced fruit on top of the custard in a decorative pattern.
- Gently brush the tops of the fruit with the remaining apricot glaze to provide a professional shine and preserve the freshness of the fruit.
Mastering the Delicate Shortcrust Dough
The foundation of any exceptional mini fruit tart is the crust. This particular recipe utilizes a method that sits somewhere between a traditional shortcrust and a sugar cookie, resulting in a “pâte sucrée” style that is both sturdy enough to hold the custard and tender enough to melt in your mouth. The secret to this texture lies in the handling of the fat. By using a stand mixer to break down the cold butter into the flour and powdered sugar, you are essentially coating the flour particles in fat. This inhibits gluten development, which is exactly what you want for a pastry that snaps cleanly rather than pulling like bread.
When you are mixing the dough, pay close attention to the “sandy” phase. Many home bakers become concerned when the dough doesn’t immediately form a cohesive ball in the mixer. However, for these mini tarts, the sandy texture is actually a sign of success. By pressing this “sand” directly into the molds, you avoid the stress of rolling out cold dough and the potential for overworking it. The freezer rest is the final, non-negotiable step for the crust. This cold shock ensures that the butter remains solid until the very moment the heat hits it, helping the tart maintain its beautiful scalloped shape without the need for pie weights.
Achieving the Perfect Custard Consistency
The custard, or crème pâtissière, is the heart of the dessert. Achieving that elusive balance between a flowable cream and a stable filling requires careful temperature management. The use of both flour and cornstarch in this recipe provides a dual-action thickening power. Cornstarch gives the custard a glossy, translucent finish and a clean “break,” while the flour adds a bit of structural integrity and a traditional mouthfeel.
One of the most common challenges when making custard is the fear of curdling the eggs. By whisking the sugar and yolks first, you create a protective buffer for the proteins. When the milk is added and the mixture is heated, you must be vigilant. The transition from liquid to thick pudding happens in a matter of seconds. Look for those “opaque specks” mentioned in the instructions; they are the first signs of the starch granules swelling and trapping the liquid. If the custard feels like it is getting away from you, do not be afraid to pull the pan off the heat entirely. The residual heat in the heavy bottom of the saucepan is often enough to finish the cooking process while you whisk out any potential lumps.
The Art of Fruit Selection and Presentation
While the crust and cream provide the structure, the fruit is the soul of the dish. For the best visual impact, aim for a “rainbow” of colors. Deep red strawberries, vibrant green kiwi, and dark, glossy blackberries or blueberries create a stunning contrast against the pale yellow custard.
When preparing the fruit, moisture is your enemy. After washing berries, ensure they are thoroughly dried on paper towels. Any excess water will bleed into the custard, causing the colors to run and the cream to thin out. If you are using larger fruits like peaches or mangoes, slice them into uniform wedges or small cubes that fit the scale of a four-inch tart. The goal is for a guest to be able to get a bit of everything in a single bite.
The apricot glaze is the final “chef’s touch.” Beyond the beautiful shine it provides, it serves a functional purpose. Fruit begins to oxidize and dehydrate as soon as it is sliced. The thin layer of jelly acts as a sealant, keeping the kiwi bright green and the strawberries juicy for hours. It also acts as a moisture barrier between the custard and the crust, ensuring that the tart remains crisp even if it is assembled slightly ahead of time.
Variations and Ingredient Substitutions
If you find yourself missing specific ingredients or want to cater to different tastes, there are several ways to adapt this recipe without losing the essential character of the mini fruit tarts.
Flour and Grains
For those who prefer a nuttier flavor, you can replace 15 percent of the all purpose flour with almond flour. This will result in a slightly more fragile crust but will add a wonderful depth of flavor that complements the vanilla custard beautifully.
Dairy Alternatives
While whole milk is recommended for the richest flavor, you can substitute it with a high-fat oat milk or coconut milk if you are looking for a different profile. Keep in mind that the fat content of the milk directly affects the creaminess of the finished custard. If you use a lower-fat milk, you might want to add an extra half-tablespoon of butter to the custard at the very end to maintain that luxurious mouthfeel.
Flavor Enhancements
The vanilla extract is a classic choice, but you can easily transform the profile of these tarts. Consider adding a teaspoon of lemon zest or orange zest to the pastry cream for a citrusy lift. Alternatively, a splash of almond extract in the crust can make the entire dessert feel more like a traditional French pastry.
Optimal Serving and Storage Practices
Mini fruit tarts are best enjoyed the day they are assembled. However, with a few strategic steps, you can prepare the components in advance to make hosting effortless.
- Make-Ahead Crusts: You can bake the tart shells up to two days in advance. Store them in an airtight container at room temperature. If they lose a bit of their crispness, a quick three-minute toast in a 300 degree Fahrenheit oven will revive them.
- The Custard: The pastry cream can be made 24 to 48 hours ahead of time. Keep it refrigerated in a sealed container with plastic wrap touching the surface. Before using, give it a vigorous whisk to loosen it up and restore its smooth texture.
- Assembled Tarts: Once the tarts are fully assembled, they should be kept in the refrigerator. They are best served within 4 to 6 hours. Beyond that, the moisture from the custard will eventually begin to soften the crust.
- Serving Temperature: For the best flavor, remove the tarts from the refrigerator about 15 to 20 minutes before serving. This allows the butter in the crust to soften slightly and the flavors of the fruit and vanilla to become more pronounced.
Deep-Dive Culinary Questions
Why did my tart shells shrink significantly during the baking process?
Shrinkage is almost always caused by two factors: undeveloped gluten or warm fat. If the dough was worked too much, the gluten strands act like rubber bands, pulling the dough back as they heat up. More commonly, if the dough is not cold enough when it enters the oven, the butter melts before the flour structure sets, causing the walls to slump. Ensure you follow the one-hour freezer rest strictly to avoid this issue.
Can I use frozen fruit instead of fresh fruit for the topping?
It is highly recommended to stick with fresh fruit for these tarts. Frozen fruit releases a significant amount of liquid as it thaws, which will turn your beautiful vanilla custard into a watery, discolored mess. If you must use frozen fruit, it is better to cook it down into a thick compote or jam first, but the classic “fruit tart” aesthetic relies on the structural integrity of fresh slices.
What is the purpose of “docking” the dough with a fork?
When the tart dough bakes, the moisture in the butter turns to steam. Without an escape route, this steam will create large bubbles in the bottom of your crust, causing the center to puff up and leaving no room for your custard. Pricking the dough with a fork creates tiny vents that allow the steam to escape, ensuring a perfectly flat and even base for your filling.
How can I make the custard even richer and more stable?
For a “diplomat cream” variation, you can fold a small amount of stiffly whipped heavy cream into the cooled pastry cream. This creates a lighter, fluffier texture that still holds its shape beautifully. If you need the custard to be extremely stable for an outdoor event in warm weather, you can increase the cornstarch by half a tablespoon, though this will result in a slightly firmer, more “gelled” texture.
A Final Thought on These Miniature Delights
Creating mini fruit tarts is a rewarding exercise in patience and precision. While there are several steps involved, the result is a dessert that is far greater than the sum of its parts. The contrast between the cold, creamy custard and the crisp, golden shell, topped with the bright acidity of the fruit, is a timeless combination. By following the scientific principles of pastry—keeping your fats cold, your starches cooked, and your fruit dry—you will produce a dessert that not only looks like it came from a high-end bakery but also carries the unmatched flavor of a handcrafted treat.
Nutritional Information
| Nutrient | Amount Per Serving (1 Tart) |
| Calories | 320 calories |
| Total Fat | 18 grams |
| Saturated Fat | 11 grams |
| Cholesterol | 145 milligrams |
| Sodium | 110 milligrams |
| Total Carbohydrates | 36 grams |
| Dietary Fiber | 2 grams |
| Sugars | 18 grams |
| Protein | 5 grams |
Disclaimer
The nutritional values provided are estimates based on standard ingredient data and the specific measurements used in this recipe. Actual nutritional content may vary depending on the specific brands of ingredients used and the variety of fresh fruit selected for the topping.
Mini Fruit Tarts with Vanilla Custard
Ingredients
- 225 grams all purpose flour
- 1.5 grams salt
- 80 grams powdered sugar
- 115 grams unsalted butter, cut into small cubes
- 2 egg yolks (for dough)
- 2 ml vanilla extract (for dough)
- 12 ml heavy cream
- 4 egg yolks (for custard)
- 68 grams white sugar
- 24 grams all purpose flour (for custard)
- 24 grams cornstarch
- 376 ml whole milk
- 4 ml vanilla extract (for custard)
- 1 cup assorted fresh fruit (strawberries, kiwi, blackberries)
- 2 tbsp apricot jelly
- 7.5 ml water
Instructions
- Using a stand mixer, combine flour, salt, powdered sugar, and cubed butter. Mix on low until butter is pea-sized.
- Add egg yolks, heavy cream, and vanilla. Mix until the dough resembles damp sand and holds together when pinched.
- Press 60g of dough into each 4-inch tart mold. Dock the bottoms with a fork and freeze for at least one hour.
- Preheat oven to 375 Fahrenheit. Bake frozen shells for 12 to 15 minutes until light golden brown. Cool completely.
- Whisk egg yolks and white sugar until light. Whisk in flour and cornstarch. Gradually add milk and vanilla.
- Cook custard over medium heat, whisking constantly until it thickens into a pudding consistency. Cool for 30 minutes.
- Melt apricot jelly with water. Brush the cooled shells with glaze, then fill with custard and top with sliced fruit.
- Brush the top of the fruit with remaining apricot glaze for shine and preservation. Serve or refrigerate.
Notes
Equipment
- Stand mixer with paddle attachment
- 4-inch tart molds (6 count)
- medium saucepan
- whisk
- pastry brush
- wire cooling rack