
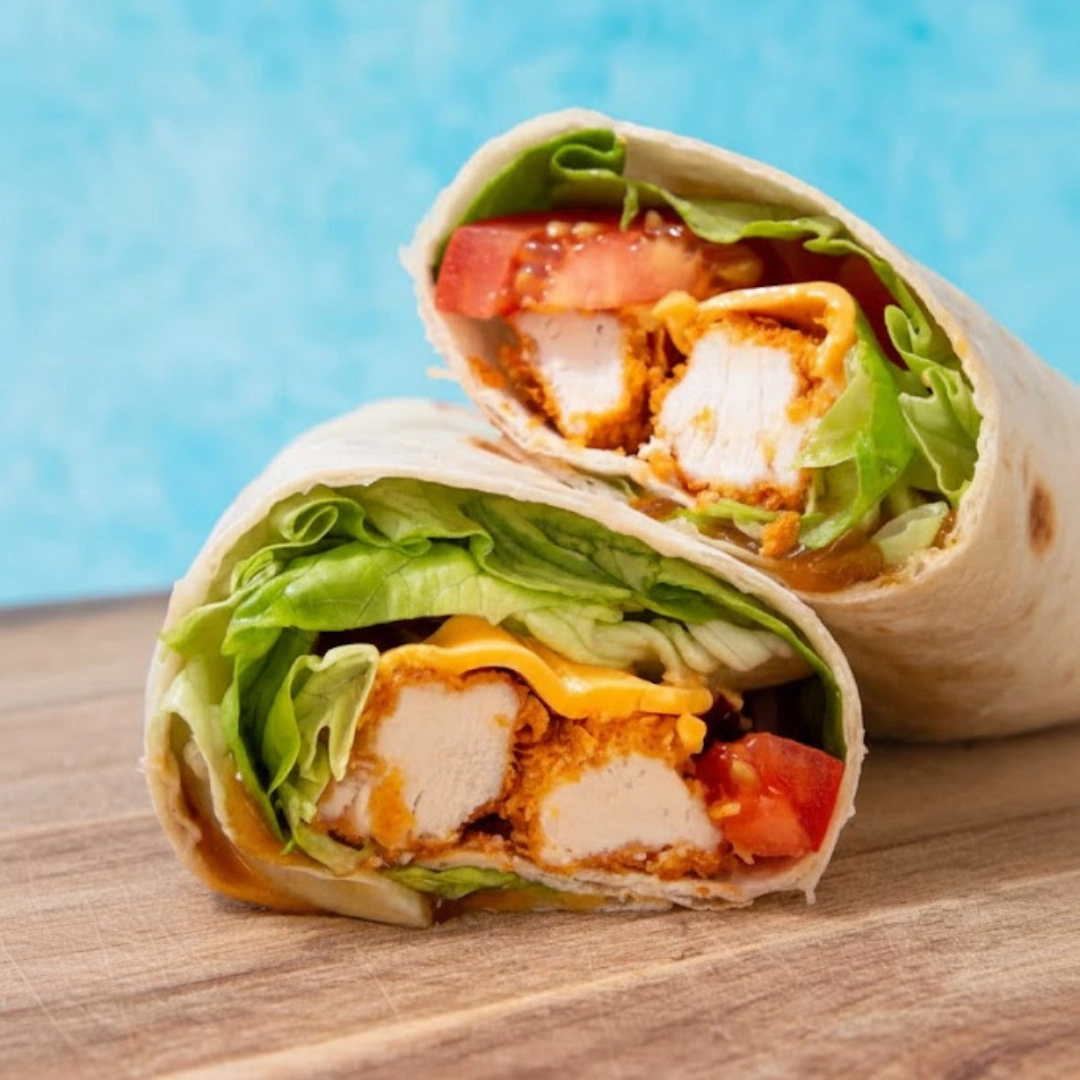
The architecture of a satisfying handheld meal rests on a perfect contrast: a soft, yielding carrier against a crisp, substantial filling. This dish—the quintessential chicken wrap—is often relegated to fast-food status, characterized by greasy textures and heavy sauces. However, when approached with precision, it transforms into an outstanding main course, offering balanced nutrition alongside dynamic flavor. Our methodology focuses on achieving genuine, shatteringly crisp chicken without the fat saturation of deep frying, resulting in a Healthy Crispy Chicken Wrap that delivers complexity and crunch. It is the ideal modern solution for lunch or a quick, protein-dense dinner, proving that convenience does not necessitate a compromise on quality or culinary enjoyment. This article serves as your guide to mastering the technical elements required to elevate this simple concept into a genuinely memorable meal.
Table of Contents
The Mise en Place: Necessary Components
The quality of the final assembly is entirely dependent on the foundational ingredients. Unlike hurried versions that rely on pre-cooked shortcuts, this recipe calls for thoughtful preparation of fresh components.
The Core Protein (Chicken Preparation)
- One and a half pounds (680 grams) boneless, skinless chicken breast, sliced into four-ounce (113 grams) cutlets or strips
- One half cup (60 grams) all-purpose flour
- Two large eggs, lightly beaten
- Two cups (150 grams) plain cornflakes, coarsely crushed
- One teaspoon smoked paprika
- One half teaspoon garlic powder
- One half teaspoon onion powder
- One quarter teaspoon fine sea salt
- One quarter teaspoon black pepper
The Assembly Agents
- Four large (ten-inch diameter) whole wheat or low-carb tortillas
- One head romaine lettuce, thinly shredded
- One cup (150 grams) thinly sliced tomato or grape tomatoes, halved
- One half cup (75 grams) thinly sliced red onion
- Four slices of reduced-fat cheddar or pepper jack cheese
The Finishing Sauces (Choose One)
- One half cup (120 milliliters) light ranch dressing
- One half cup (120 milliliters) chipotle mayonnaise or Greek yogurt aioli

Mastering the Method: A Four-Phase Process
This recipe is best executed in a systematic four-phase approach, ensuring efficient cooking and assembly.
- Preparation and Dredge Setup: Slice the chicken and arrange the three-station dredging line (flour, egg, cornflake mixture).
- Bread and Crisp: Coat the chicken thoroughly and bake or air-fry until the internal temperature reaches one hundred sixty-five Fahrenheit and the exterior crust is deep golden brown and audibly crisp.
- Filling Preparation: While the chicken cools, prepare the vegetables, shred the lettuce, and warm the tortillas.
- Final Construction: Assemble the wraps by layering the fillings, applying the sauce, and executing a tight, professional fold.

Achieving Textural Integrity: Step-by-Step Culinary Mechanics
The path to a genuinely crispy wrap involves careful attention to the breading process and a high-heat cooking environment that activates the crust without drying out the protein.
Preparing the Chicken for Optimal Adhesion
Begin by slicing the chicken breasts against the grain into uniform strips approximately three-quarters of an inch thick and four inches long. Uniformity is key for even cooking. Pat the chicken strips aggressively dry with paper towels. Any residual moisture will turn the flour layer gummy, preventing the proper adherence of the egg and the final crust.
Next, set up the standard breading station:
- Station 1 (The Dust): Flour, seasoned with salt and pepper. This layer acts as the initial binder, drying the surface further.
- Station 2 (The Glue): Beaten egg. This is the adhesive layer, crucial for securing the final crust.
- Station 3 (The Crunch): Crushed cornflakes mixed with paprika, garlic powder, and onion powder. The cornflakes should be crushed into a rough, irregular texture—not pulverized into a powder—to maximize surface area for crispness.
Using a “wet hand, dry hand” technique, move the chicken through the stations: use one hand exclusively for the flour and cornflakes (the dry hand), and the other exclusively for the egg wash (the wet hand). This prevents the dreaded “club hand” where the breading sticks to your fingers, ruining the process. Press the chicken firmly into the cornflake mixture to ensure a thick, even coat. Place the breaded strips onto a wire rack set over a baking sheet; this arrangement allows air to circulate fully around the chicken during cooking, which is essential for uniform crispness. Mist the tops of the strips lightly with a neutral cooking oil spray (such as canola or grapeseed). This minimal fat application aids in browning and accelerates the crunch factor in the oven or air fryer.
Frying to Gold Standard
For the healthiest result, we bypass the deep fryer and use high, circulating heat.
Air Fryer Method: Preheat the air fryer to four hundred Fahrenheit (204 Celsius). Place the strips in the basket in a single, non-overlapping layer. Cook for nine to ten minutes, flipping halfway through. The internal temperature must register one hundred sixty-five Fahrenheit. The crust should be a rich gold-brown.
Oven Method: Preheat the oven to four hundred twenty-five Fahrenheit (218 Celsius). Bake the strips (still on the wire rack and baking sheet) for eighteen to twenty-two minutes, flipping halfway. The high heat encourages Maillard browning and crisping.
Regardless of the method, the sensory cues are critical: the crust must be firm to the touch, and the strips should sound hollow and resonant when tapped. Immediately upon removal from the heat source, sprinkle the hot chicken generously with a pinch of flaky salt—this final seasoning step adheres best while the surface oil is hot. Let the chicken rest for five minutes to redistribute internal juices before slicing.
The Art of Assembly
Warming the tortillas is non-negotiable. A warm tortilla is pliable, less likely to tear, and contributes a comforting warmth to the final wrap. Briefly warm them on a dry skillet over medium heat for thirty seconds per side, or microwave them wrapped in a damp paper towel for ten seconds.
Lay the warmed tortilla flat. Create a foundational layer by spreading your chosen sauce (light ranch or aioli) slightly off-center. Next, layer the cheese slices. Place the freshly sliced crispy chicken strips horizontally across the center. Top the chicken with the shredded romaine lettuce, sliced tomatoes, and red onion. Do not overfill; the contents should occupy the middle third of the tortilla.
To roll professionally:
- Fold the left and right edges inward, covering about a quarter of the filling on each side.
- Bring the bottom edge (the edge closest to you) up and over the filling, tucking it tightly against the filling contents.
- Maintaining tension, roll the wrap away from you until you reach the opposite side, creating a taut, cylindrical shape. A tightly rolled wrap is structurally sound and easier to eat. Serve immediately while the chicken retains its signature crunch.
Elevation Techniques: From Basic Wrap to Culinary Highlight
Moving beyond the standard recipe requires deliberate technique adjustments that impact the final texture and flavor depth. These are the details that separate a basic meal from an expert preparation.
The Power of Pre-Chill: After breading the chicken strips but before cooking, place the entire wire rack and baking sheet into the refrigerator for twenty minutes. This chilling period allows the moist egg and flour layers to firm up and fully adhere to the protein, significantly reducing the risk of the crust shedding during the cooking process. A chilled crust adheres better and crisps more effectively.
Acid Balancing in the Sauce: The fillings are rich and the chicken is substantial. To cut through the fat and protein, ensure your chosen sauce or dressing has adequate acidity. If using a standard ranch, consider whisking in a half teaspoon of fresh lemon juice or a dash of white wine vinegar to brighten the flavor profile and provide crucial balance.
The Role of Microplaned Garlic: Instead of relying solely on garlic powder in the breading, rub the raw chicken strips with a minute amount of freshly microplaned garlic (about one quarter teaspoon for the entire batch) before the flour dredge. The fresh garlic oils will penetrate the meat, offering a deeper, more aromatic flavor that survives the high heat, adding a layer of complexity not possible with dried spices alone.
Layering for Texture Preservation: When constructing the wrap, place any dry, structural vegetables (like lettuce and cheese) directly against the tortilla, and place the crispy chicken centrally. This creates a barrier between the chicken and the sauce/tomato moisture, slowing down the inevitable process of the crust softening.
Finishing with Finesse: The final moment of service can be improved dramatically by a quick, dry sear. After the wrap is fully rolled, place it seam-side down on a hot, dry skillet for one minute. The heat will lightly toast the exterior of the tortilla and, critically, seal the seam closed, creating a professional presentation and preventing the wrap from unraveling during consumption.

Adaptive Cuisine: Ingredient Modifications and Substitutions
This recipe’s framework is inherently flexible, allowing for significant shifts in flavor profile and dietary needs without sacrificing the core concept of a satisfying, crunchy wrap. Whether you are avoiding gluten, seeking a plant-based alternative, or simply craving different spice notes, the structure remains robust enough to support modification.
Gluten-Free Crusting: Replace the all-purpose flour with a high-quality gluten-free flour blend. For the cornflake portion, ensure you use a brand certified as gluten-free, or substitute them entirely with crushed potato chips (kettle-style for extra texture) or an equal amount of panko breadcrumbs made from rice flour. The high starch content in these substitutes still ensures a remarkable crunch for your Healthy Crispy Chicken Wrap.
Vegetarian and Vegan Alternatives: The structure works perfectly for plant-based proteins. Substitute the chicken breast with pre-pressed, extra-firm tofu or seitan, cut into strips. Follow the exact same dredging method. Replace the two eggs with a commercial liquid egg replacer, or create a thin binder by whisking two tablespoons of cornstarch into four tablespoons of cold plant milk. Ensure the cheese is replaced with a high-quality vegan slice that melts well, or simply use extra avocado for creaminess.
Flavor Profile Shifts:
- Buffalo Style: Omit the paprika and onion/garlic powder from the cornflake mixture. After the chicken is cooked, toss the hot strips in a mixture of three tablespoons of hot sauce and one tablespoon of melted butter (or a neutral oil). Pair this with blue cheese dressing and celery slices inside the wrap.
- Southwest Spice: Add one teaspoon of chili powder and one half teaspoon of cumin to the cornflake mixture. Use cilantro, black beans, and a roasted corn salsa as filling elements, and substitute the ranch for chipotle ranch or lime crema.
Complete Meal Conceptualization: Ideal Pairings
While the wrap itself is a complete meal, it can be enhanced significantly by thoughtful side dishes that complement its texture and flavor without competing for attention.
- Crisp Vegetable Slaw with Citrus Vinaigrette: A light, sharp slaw made with finely shredded cabbage, carrots, and a simple dressing based on lemon juice, olive oil, and minimal sugar provides a fresh, acidic contrast to the richness and warmth of the wrap. This pairing cleanses the palate effectively.
- Oven-Baked Sweet Potato Wedges: Instead of heavy French fries, serve thick-cut sweet potato wedges baked until deeply caramelized. The earthy sweetness and soft interior of the potato is an excellent counterpoint to the salty, savory chicken crust.
- Simple Side Salad with Fresh Herbs: A minimal green salad of butter lettuce or spring mix, dressed very lightly with a drizzle of balsamic vinegar and olive oil, and heavily infused with fresh chopped herbs (parsley, chives, tarragon) adds a necessary element of freshness and aromatic complexity.
Deep Dive: Common Inquiries Answered
This section addresses specific technical questions that frequently arise when preparing crispy breaded chicken at home.
Why does my crust fall off the chicken during cooking?
The primary causes are moisture and lack of adhesion. Ensure the chicken is aggressively patted dry before the flour dredge. Additionally, you must press the cornflakes firmly onto the chicken strips and use the pre-chill technique (refrigerating for twenty minutes after breading) to set the coating before introducing it to the high heat.
Can I use breadcrumbs instead of cornflakes for the crispy chicken?
Yes, you can substitute panko breadcrumbs for the cornflakes. Panko provides a good level of crispness due to its flaky structure, though the texture will be slightly less jagged and dense than the cornflake crust. Avoid standard fine breadcrumbs, as they tend to absorb oil too quickly and become softer.
How do I prevent the wrap from getting soggy when packing it for lunch?
Never assemble the wrap fully ahead of time. Store the cooked, cooled chicken, the sauce, and the prepared vegetables in separate airtight containers. When ready to eat, reheat the chicken briefly in a toaster oven or air fryer to reactivate the crispness, then quickly assemble the wrap immediately before consumption.
What is the best way to reheat leftover crispy chicken strips?
To preserve the crisp texture, use an air fryer or a toaster oven set to three hundred seventy-five Fahrenheit (190 Celsius). Heat the strips for three to five minutes, or until fully heated through. Avoid using a microwave, which introduces steam and renders the crust soft and rubbery.
Can I use chicken thighs for this recipe?
Absolutely. Chicken thighs are moister and richer in flavor, making them extremely forgiving if slightly overcooked. They do, however, contain more fat, making the overall dish less overtly “healthy.” If using thighs, slice them into equally thick strips and add three to five minutes to the cooking time to ensure they reach the correct internal temperature of one hundred sixty-five Fahrenheit.
Nutrition Information
| Nutrient | Amount per Serving |
| Calories | 485 kcal |
| Protein | 42 g |
| Carbs | 38 g |
| Fat | 20 g |
| Fiber | 6 g |
| Sugar | 4 g |
| Sodium | 650 mg |
Estimated Nutritional Breakdown
Nutrition information is an estimate and may vary based on preparation and ingredients used.
Healthy Crispy Chicken Wrap
Ingredients
- 1.5 pounds boneless, skinless chicken breast
- 0.5 cup all-purpose flour
- 2 large eggs, lightly beaten
- 2 cups plain cornflakes, coarsely crushed
- 1 teaspoon smoked paprika
- 0.5 teaspoon garlic powder
- 0.5 teaspoon onion powder
- 0.25 teaspoon fine sea salt
- 0.25 teaspoon black pepper
- 4 large whole wheat or low-carb tortillas (10-inch)
- 1 head romaine lettuce, shredded
- 1 cup grape tomatoes, halved or sliced
- 0.5 cup thinly sliced red onion
- 4 slices reduced-fat cheddar or pepper jack cheese
- 0.5 cup light ranch dressing or chipotle aioli
Instructions
- Slice the chicken breasts into uniform strips (¾-inch thick, 4 inches long), and pat dry thoroughly with paper towels.
- Set up breading stations: 1) Flour with salt and pepper, 2) Beaten eggs, 3) Cornflakes with paprika, garlic powder, and onion powder.
- Bread chicken using wet/dry hand technique. Firmly press into cornflake mix. Place on rack over baking sheet and spray lightly with oil.
- Air Fry: 400°F for 9–10 minutes, flipping once. Oven: 425°F for 18–22 minutes, flipping halfway. Chicken must reach 165°F and be golden.
- Rest chicken 5 minutes after cooking. Sprinkle flaky salt immediately while hot to enhance flavor.
- Warm tortillas briefly in skillet or microwave. Spread sauce off-center, add cheese, chicken, then lettuce, tomato, and onion.
- Fold sides in, roll tightly away from you to form wrap. Optional: dry sear seam-side down in skillet to seal and crisp exterior.
Notes
Equipment
- Wire rack and baking sheet For air circulation during baking
- tongs To flip chicken while cooking
- mixing bowls For dredging stations
- Skillet or microwave For warming tortillas
- Air fryer or oven For cooking chicken


