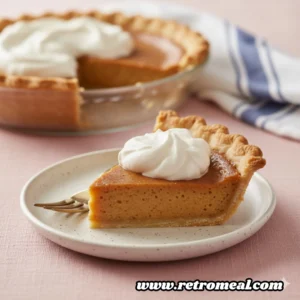
A true heirloom dessert relies on the alchemy of simple pantry staples. This Grandma’s Butterscotch Pie is a testament to the era of scratch-made custards, where patience at the stove resulted in a deep, caramelized flavor that modern pudding mixes simply cannot replicate. Built upon a foundation of dark brown sugar, whole milk, and butter, this pie offers a silky texture and a nostalgic sweetness. It is an ideal conclusion to a celebratory meal or a quiet Sunday dinner, providing a sophisticated depth of flavor through a straightforward, traditional cooking process.
Table of Contents
Ingredients
The Custard Base
- 2 cups whole milk
- 1 cup light brown sugar, firmly packed
- 1/4 cup cornstarch
- 1/2 teaspoon fine sea salt
The Enriching Elements
- 2 large egg yolks, thoroughly beaten
- 1 tablespoon unsalted butter
- 1 teaspoon pure vanilla extract
The Foundation
- 1 (9 inch) pie crust, blind-baked until golden and fully cooled

Instructions
- Organize all components and preheat your oven to four hundred Fahrenheit to prepare for the final setting of the custard.
- In the upper vessel of a double boiler set over simmering water, combine the milk, brown sugar, cornstarch, and salt.
- Whisk the mixture continuously for approximately twenty minutes or until the liquid begins to lose its translucency and starts to thicken.
- Temper the beaten egg yolks by adding a small spoonful of the hot liquid to them before whisking the yolks back into the main pot.
- Continue cooking and stirring until the custard reaches a heavy, pudding-like consistency.
- Withdraw the pot from the heat and immediately fold in the butter and vanilla extract until fully incorporated.
- Transfer the warm filling into the pre-baked pie shell, smoothing the surface with a spatula.
- Place the pie in the oven for five minutes to allow the top to develop a light golden sheen.
- Remove and allow the pie to cool completely at room temperature before transferring to the refrigerator to set for at least four hours.

Detailed Preparation and Sensory Cues
The success of this custard lies in the gentle application of heat. When you first combine the milk and brown sugar in the double boiler, the mixture will appear thin and watery. As the twenty-minute mark approaches, watch for the steam to intensify and the whisk to leave slight trails in the liquid. This signifies that the cornstarch has reached its gelatinization point.
The tempering of the eggs is a critical phase. If you add cold yolks directly to the boiling milk, they will scramble. By slowly introducing the hot liquid into the yolks first, you raise their temperature gradually, ensuring a smooth, velvet-like finish. Once the butter is added at the end, the filling should take on a glossy, reflective sheen.
As the pie undergoes its brief five-minute bake at four hundred Fahrenheit, stay close to the oven. You are looking for a subtle transformation where the very top layer of the custard forms a thin, delicate “skin” that turns a shade darker than the rest of the filling. This adds a slight textural contrast to the otherwise creamy interior.
Professional Tips for Success
- Sift the Cornstarch: To ensure there are absolutely no lumps in your custard, sift the cornstarch together with the brown sugar before adding any liquid.
- Constant Motion: Use a silicone whisk or a flat-edged wooden spoon to scrape the bottom and “corners” of your pot constantly; sugar and starch tend to settle and can scorch even in a double boiler.
- Temperature Control: Keep the water in the bottom of your double boiler at a steady simmer, not a rolling boil, to prevent the milk from curdling or the eggs from overcooking.
- Quality Vanilla: Since vanilla is a primary flavor note here, use a high-quality extract or even vanilla bean paste for those beautiful black flecks.
- The Cooling Phase: Never rush the cooling process. A butterscotch pie needs to transition from room temperature to the fridge slowly to prevent the crust from becoming soggy due to condensation.
- Whip it Cold: If serving with whipped cream, ensure the pie is thoroughly chilled so the cream doesn’t melt upon contact with the surface.
Customizing Your Pie
While the traditional version is a masterpiece of simplicity, you can adapt the profile to suit your preferences. If you prefer a deeper, more bitter edge to your butterscotch, substitute half of the light brown sugar with dark brown sugar for a higher molasses content.
For those who enjoy a bit of texture, a layer of finely chopped toasted pecans can be sprinkled into the bottom of the crust before pouring in the custard. Alternatively, a pinch of flaky sea salt scattered over the finished pie just before serving can help balance the intense sweetness of the brown sugar.

Serving and Presentation
The most classic way to present this dish is with a generous dollop of unsweetened or lightly sweetened whipped cream. The aeration of the cream cuts through the density of the butterscotch beautifully. For a more formal presentation, use a piping bag to create rosettes around the perimeter of the crust.
Slicing this pie requires a clean, sharp knife dipped in hot water and wiped dry between every single cut. This ensures that the custard edges remain sharp and the crust doesn’t crumble into the filling. Serve each slice chilled to maintain the structural integrity of the custard.
Frequently Asked Questions
Why did my custard fail to thicken?
This usually occurs if the cornstarch wasn’t cooked long enough or if the heat was too low. The starch must reach a specific temperature to activate its thickening properties. Ensure the water in your double boiler is consistently simmering.
Can I make this recipe without a double boiler?
Yes, you can use a heavy-bottomed saucepan over very low heat, but you must be extremely vigilant. The direct heat increases the risk of the milk scorching or the eggs cooking too quickly, so stir without stopping.
How do I prevent a skin from forming on the pie?
If you dislike the baked skin that forms during the five-minute oven stay, you can skip that step and instead press a piece of plastic wrap directly onto the surface of the warm custard while it cools.
How long will this pie stay fresh?
When stored in the refrigerator and covered loosely with foil or plastic, this pie will maintain its quality for about three days. Beyond that, the crust may begin to soften significantly.
Nutrition Information
| Nutrient | Amount per Serving |
| Calories | 259 kcal |
| Protein | 3 g |
| Carbs | 42 g |
| Fat | 9 g |
| Fiber | 0 g |
| Sugar | 30 g |
| Sodium | 293 mg |
Nutrition information is an estimate and may vary based on preparation and ingredients used.
Classic Grandma’s Butterscotch Pie
Ingredients
- 2 cups whole milk
- 1 cup light brown sugar, firmly packed
- 0.25 cup cornstarch
- 0.5 tsp fine sea salt
- 2 large egg yolks, thoroughly beaten
- 1 tbsp unsalted butter
- 1 tsp pure vanilla extract
- 1 9-inch pie crust, blind-baked and cooled
Instructions
- Preheat your oven to four hundred Fahrenheit to prepare for the final setting of the custard filling.
- In the upper vessel of a double boiler set over simmering water, combine the milk, light brown sugar, cornstarch, and fine sea salt.
- Whisk the mixture continuously for approximately twenty minutes. The liquid will lose its translucency and begin to thicken significantly.
- Temper the beaten egg yolks by slowly whisking in a small spoonful of the hot custard, then pour the yolk mixture back into the pot.
- Continue cooking and stirring until the filling reaches a heavy, pudding-like consistency. Remove from the heat source.
- Immediately fold in the unsalted butter and pure vanilla extract, stirring until the butter is fully melted and the custard is glossy.
- Pour the warm butterscotch filling into the pre-baked pie shell, smoothing the surface evenly with a spatula.
- Bake in the preheated oven for five minutes to set the top. Cool at room temperature before refrigerating for four hours to set.
Notes
Equipment
- Double boiler Essential for even, gentle heat
- whisk Silicone or stainless steel
- 9-inch pie plate
- measuring cups and spoons
- rubber spatula To smooth the filling