The aroma of soy sauce, ginger, and caramelized sugar has always been the smell of coming home for me. I first learned to make Teriyaki Chicken not from a recipe, but from watching my father, a retired Navy cook, expertly whisk the sauce in a small saucepan. He had a philosophy that the best food was simple, required minimal fuss, and delivered maximum flavor—a philosophy that truly shines in a great Easy Teriyaki Chicken Recipe. For years, I struggled to replicate that exact sticky, sweet, and savory balance until I finally cracked the code on the sauce’s perfect reduction. This isn’t just a recipe; it’s a tested, family-approved method that consistently delivers tender chicken and a luscious, restaurant-quality glaze, making it a perfect, stress-free weeknight dinner.
What to Expect from This Recipe:
- Speed: Ready in under 30 minutes, ideal for a busy schedule.
- Flavor: A perfectly balanced sauce that is sweet, salty, and incredibly sticky.
- Versatility: Adaptable with easy ingredient swaps for different dietary needs.
This content is for educational purposes only and does not replace professional dietary or medical advice.
Table of Contents
The Essential Ingredients for a Perfect Teriyaki Dish
The magic of this Easy Teriyaki Chicken Recipe lies in using common pantry staples and selecting the right cut of chicken.
| Ingredient | Quantity | Notes for Best Results |
| Chicken | 1.5 lbs | Boneless, skinless thighs or breasts. |
| Soy Sauce | 1/2 cup | Use low-sodium to control saltiness. |
| Water | 1/4 cup | Used for thinning the glaze base. |
| Brown Sugar | 1/4 cup | Adds depth and caramelization. |
| Honey or Maple Syrup | 2 tablespoons | Enhances the “stickiness” of the glaze. |
| Ginger | 1 tablespoon | Freshly grated is highly recommended. |
| Garlic | 2 cloves | Minced finely. |
| Cornstarch | 1 tablespoon | The thickener for the sticky sauce. |
| Oil | 1 tablespoon | Neutral oil (like canola or vegetable) for searing. |
| Garnish | Sesame seeds, chopped scallions | Optional, but adds flavor and presentation. |

Chicken: Choosing the Right Cut (Breast vs. Thighs)
Chicken Thighs: As someone who has cooked this dish for years, I highly recommend boneless, skinless chicken thighs for this recipe. They stay wonderfully juicy, even when seared, and are very forgiving.
Chicken Breasts: If you prefer chicken breast, slice it into 1-inch thick pieces to ensure faster cooking and to prevent drying out.
Mastering the Homemade Teriyaki Sauce: Key Components
The simple combination of soy sauce, sugar, ginger, and garlic is what defines teriyaki. The secret to the signature sticky texture is the cornstarch slurry (cornstarch mixed with a bit of cold water), which thickens the sauce instantly when simmered. Avoid pre-made sauces; the homemade version is always superior in freshness and allows you to adjust the sweetness level.
Step-by-Step: How to Make This Tested Easy Teriyaki Chicken Recipe
This method ensures tender chicken and a beautifully caramelized, sticky glaze.
Prepping the Chicken for Maximum Flavor
- Cut the Chicken: Cut the chicken (thighs or breasts) into uniform 1-inch bite-sized pieces. Uniformity is key for even cooking.
- Season: Lightly season the chicken pieces with a pinch of salt and pepper. Avoid over-salting, as the soy sauce is already quite salty.
- Prepare the Sauce Base: In a small bowl, whisk together the soy sauce, water, brown sugar, honey, minced garlic, and grated ginger. Set aside.
- Prepare the Slurry: In a separate, tiny bowl, mix the cornstarch with 2 tablespoons of cold water until smooth. This is your thickening agent.

Searing and Cooking the Chicken (The Sauté Method)
- Heat the Pan: Heat 1 tablespoon of neutral oil in a large skillet or frying pan over medium-high heat. The pan should be hot enough that a drop of water sizzles immediately.
- Sear: Add the seasoned chicken pieces to the hot pan in a single layer. Do not overcrowd the pan. If necessary, work in two batches to ensure the chicken sears rather than steams.
- Cook: Cook the chicken for about 3-4 minutes per side, until browned and nearly cooked through (the internal temperature should reach 165 or 74 .
The Secret to the Sticky Glaze: Achieving Perfect Reduction
- Add the Sauce: Pour the prepared sauce base directly over the chicken in the skillet.
- Bring to a Simmer: Let the mixture come to a gentle simmer, scraping up any browned bits from the bottom of the pan—this adds immense flavor.
- Thicken: Once simmering, stir the cornstarch slurry once more and pour it slowly into the sauce while stirring constantly.
- Glaze: The sauce will thicken rapidly. Reduce the heat to low and continue to stir for 1-2 minutes until the sauce has reduced to a thick, syrupy glaze that coats the back of a spoon.
- Toss and Finish: Toss the chicken pieces in the sticky glaze until every piece is beautifully coated. Remove from heat immediately and garnish with sesame seeds and scallions.
Pro Tips and Expert Substitutions
After testing this recipe multiple times, these are the expert tips and substitutions that guarantee success.
Making the Sauce Gluten-Free or Low-Sugar
- Gluten-Free: Swap traditional soy sauce for Tamari or a gluten-free soy sauce alternative. The flavor profile remains almost identical.
- Low-Sugar: Replace the brown sugar and honey/maple syrup with 2 tablespoons of a sugar substitute like erythritol or monk fruit sweetener, or simply reduce the brown sugar amount by half. Note that less sugar will result in a less glossy, but still flavorful, sauce.
Quick Swaps for Common Ingredients
- Ginger/Garlic: Use 1 teaspoon of ground ginger and 1/2 teaspoon of garlic powder if fresh ingredients are unavailable.
- Thickener: If you are out of cornstarch, you can use arrowroot powder instead, following the same slurry instructions.
Kitchen Wisdom: Ensuring Your Sauce Stays Sticky (Troubleshooting)
The most common mistake is not reducing the sauce enough. If your sauce is watery, it means you need more heat and time, or you didn’t use enough cornstarch.
- Tip 1: Always mix the cornstarch with cold water first. Adding cornstarch directly to a hot sauce will result in lumps.
- Tip 2: If the sauce is too thin after 2 minutes of simmering with the slurry, quickly make another small slurry (1/2 teaspoon cornstarch + 1 teaspoon water) and whisk it in.
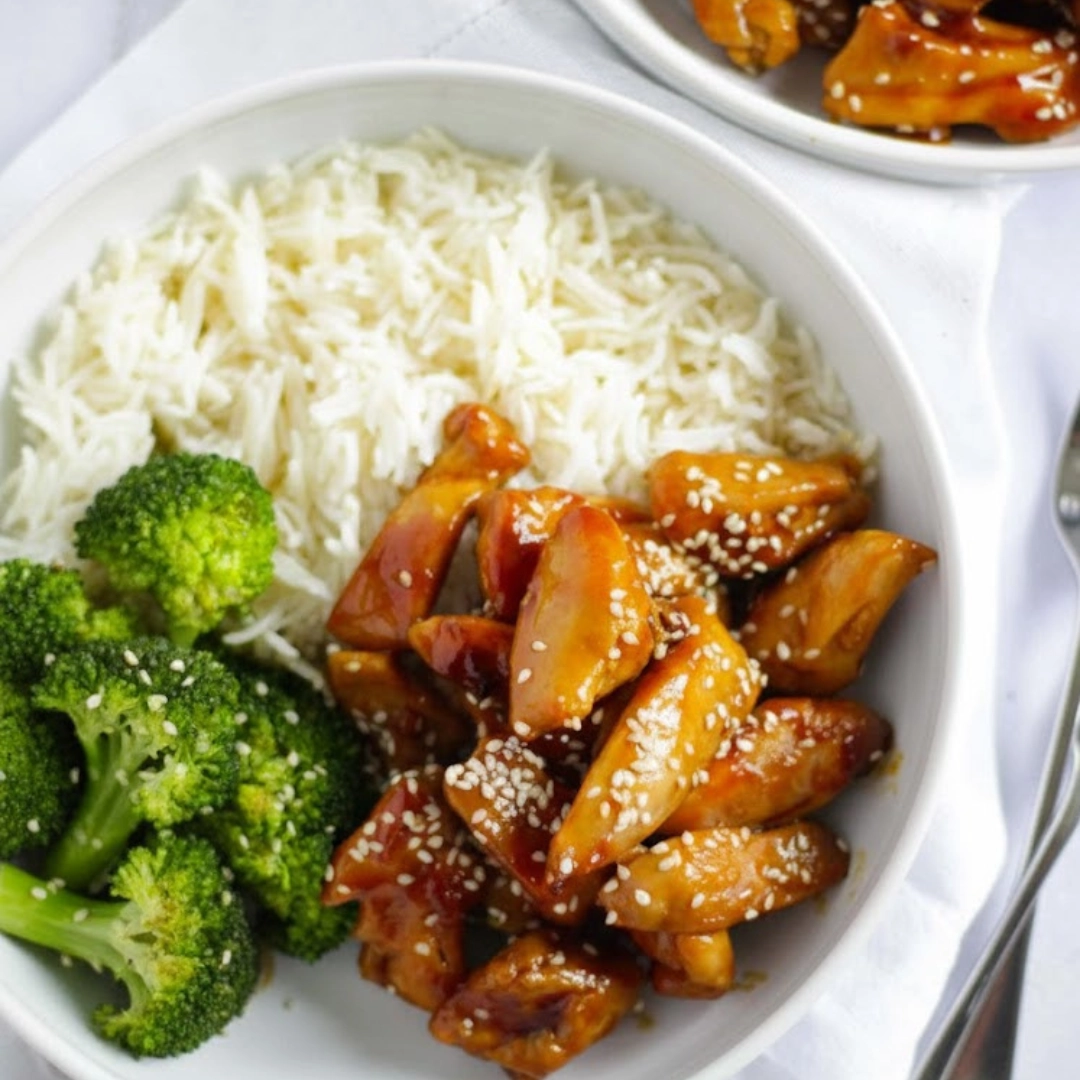
What to Serve with Your Easy Teriyaki Chicken Recipe
Teriyaki Chicken is incredibly versatile. While it’s delicious on its own, it truly shines when paired with the right sides.
Classic Sides: Rice and Steamed Vegetables
A classic pairing includes:
- Steamed White or Brown Rice: Perfect for soaking up the extra sticky teriyaki glaze.
- Steamed Broccoli or Asparagus: Provides a great textural contrast and a fresh, bright flavor. If you’re looking for another quick chicken meal idea, a dish like Green Bean Chicken also pairs perfectly with simple steamed vegetables.
Creative Pairings for Weeknight Meals
Based on my experience adjusting flavors for different palates, I recommend:
- Noodle Bowls: Serve the chicken over stir-fried lo mein or soba noodles.
- Cabbage Slaw: A simple, crunchy cabbage and carrot slaw dressed with rice vinegar and sesame oil cuts through the richness of the sticky glaze.
Using Leftovers: Beyond the Plate (Internal Link Opportunity)
Leftover teriyaki chicken is fantastic for meal prep. You can chop it up and add it cold to a salad the next day, or shred it and use it as a filling for wraps or spring rolls. For another comfort food dish that uses leftovers well, consider making a hearty Crockpot Chili, which freezes beautifully.
Storing and Reheating: Making the Most of Leftovers
Teriyaki chicken keeps very well, making it excellent for meal prepping.
- Storage: Store leftovers in an airtight container in the refrigerator for up to 3-4 days.
- Freezing: This dish can be frozen! Place the cooked and cooled chicken and sauce in a freezer-safe container. It will keep for up to 3 months. Thaw overnight in the refrigerator before reheating.
- Reheating: Reheat gently in a skillet over low heat, adding a splash of water if the sauce appears too thick after refrigeration. Alternatively, microwave in 30-second intervals until warmed through.

Nutritional Notes (Important Considerations)
While this homemade recipe is a healthier alternative to many store-bought versions, it is important to be mindful of two main components: sugar and sodium.
- Sodium: The soy sauce is the main contributor. To lower the sodium content significantly, always opt for low-sodium soy sauce.
- Sugar: The sugar and honey are necessary for the glaze’s sticky texture and flavor. If you are watching your sugar intake, reduce the brown sugar by half or use one of the sugar substitutions mentioned in the Pro Tips section.
This content is for educational purposes only and does not replace professional dietary or medical advice.
Don’t miss to follow us in Pinterest.
Frequently Asked Questions About Teriyaki Chicken
What does “Teriyaki” actually mean?
Teriyaki is a Japanese cooking method where food is broiled or grilled after being marinated or brushed with a glaze of soy sauce, sugar, and mirin. The word literally derives from teri (glaze or luster) and yaki (broil or grill).
Why do you use cornstarch and not flour?
Cornstarch is the preferred thickener for Asian-style sauces because it creates a clear, glossy, and sticky finish, which is the signature of a good teriyaki glaze. Flour often results in a cloudy, opaque sauce and is better suited for gravies.
Can I make the teriyaki sauce ahead of time?
Yes! You can mix all the sauce ingredients (excluding the cornstarch slurry) and store the base sauce in the refrigerator for up to a week. When ready to cook, bring the sauce base to a simmer and then whisk in the cornstarch slurry to thicken it right before tossing the chicken.

Easy Teriyaki Chicken
Ingredients
- 1.5 lbs boneless, skinless chicken thighs or breasts
- 0.5 cup low-sodium soy sauce
- 0.25 cup water
- 0.25 cup brown sugar
- 2 tbsp honey or maple syrup
- 1 tbsp freshly grated ginger
- 2 cloves garlic, minced
- 1 tbsp cornstarch
- 2 tbsp cold water (for slurry)
- 1 tbsp neutral oil (canola or vegetable)
- sesame seeds, for garnish (optional)
- chopped scallions, for garnish (optional)
Instructions
- Cut the chicken into 1-inch bite-sized pieces and season lightly with salt and pepper.
- In a small bowl, whisk together soy sauce, water, brown sugar, honey, garlic, and ginger. Set aside.
- In a separate bowl, stir cornstarch with 2 tbsp of cold water to make a slurry.
- Heat oil in a large skillet over medium-high heat. Add chicken in a single layer and sear for 3–4 minutes per side until browned and cooked through.
- Pour the sauce over the chicken and bring to a simmer. Scrape browned bits from the pan bottom.
- Stir the slurry again and slowly pour it into the pan while stirring. Cook 1–2 minutes until sauce thickens to a sticky glaze.
- Toss chicken in glaze to coat. Remove from heat and garnish with sesame seeds and scallions if desired.
Notes
Equipment
- cutting board
- chef’s knife
- large skillet or frying pan
- mixing bowls
- whisk
- spatula or tongs