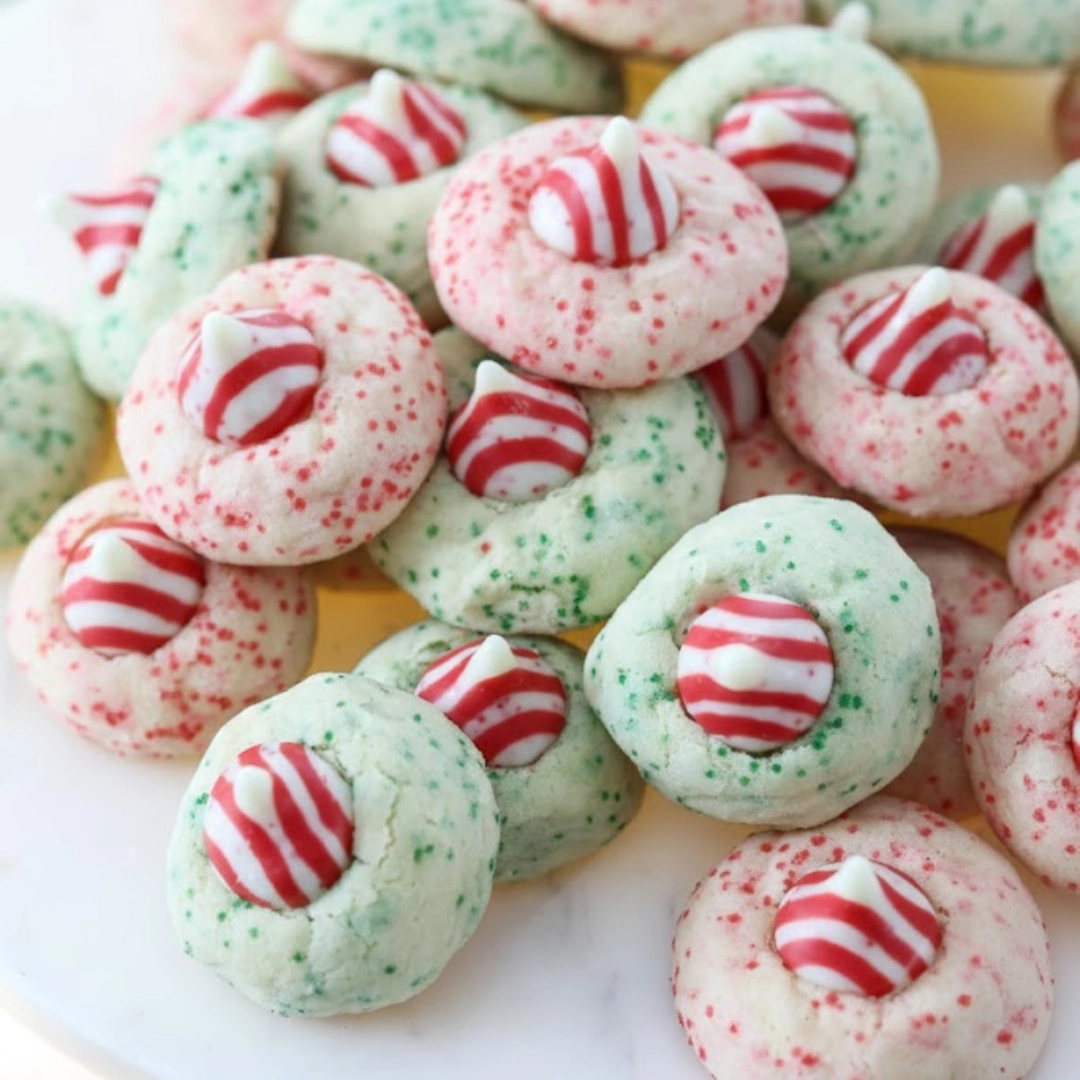
There is something inherently joyful about a cookie that delivers a playful surprise, and these Easy Peppermint Kiss Cookies do just that. They blend the familiar comfort of a rich, buttery shortbread with the bright, cooling burst of wintery peppermint. Ideal for the holiday season, these cookies are a beautiful addition to any platter, offering a lovely visual contrast between the soft white base, the vibrant red speckles of crushed candy, and the signature milk chocolate peak. They are simple to make, yet elegant enough to star at a cookie exchange or be included in a thoughtful edible gift package.
Table of Contents
What You’ll Need: The Foundation Ingredients
This recipe relies on standard pantry staples, but the quality of each ingredient will directly impact the final flavor and texture.
For the Cookie Dough:
- 1 cup (2 sticks) unsalted butter, softened
- 3/4 cup granulated sugar
- 1 large egg
- 1 teaspoon vanilla extract
- 1 teaspoon peppermint extract
- 2 1/4 cups all-purpose flour
- 1 teaspoon baking powder
- 1/4 teaspoon salt
- 1/2 cup finely crushed peppermint candies or candy canes (about four standard candy canes)
For Rolling and Finishing:
- 1/4 cup granulated sugar
- 1/4 cup finely crushed peppermint candies
- 36 milk chocolate Hershey’s Kisses, unwrapped

The Method: Step-by-Step Instructions
- Preparation and Mixing: Preheat your oven to three hundred fifty Fahrenheit. Line baking sheets with parchment paper. In a large bowl or stand mixer, beat the softened butter and three-fourths cup sugar until light and fluffy. Beat in the egg, then the vanilla and peppermint extracts.
- Dry Ingredients Integration: In a separate medium bowl, whisk together the flour, baking powder, and salt. Gradually add this mixture to the wet ingredients, mixing on low speed until just combined, being careful not to overmix. Fold in the half-cup of crushed peppermint.
- Shaping the Dough: In a small, shallow dish, combine the remaining one-fourth cup sugar and one-fourth cup crushed peppermint for rolling. Scoop the dough into one-inch balls and roll each one evenly in the sugar-peppermint mixture.
- Baking: Place the coated dough balls two inches apart on the prepared baking sheets. Bake for ten to twelve minutes, or until the edges are very lightly golden.
- The Signature “Kiss”: Immediately upon removing the cookies from the oven, gently press one unwrapped milk chocolate Kiss into the center of each warm cookie. The heat of the cookie will slightly melt the chocolate bottom.
- Setting and Cooling: Let the cookies cool completely on the baking sheet for five minutes before transferring them to a wire rack to cool fully. The chocolate needs to set up again before handling.

Detailed Execution for Optimal Texture
Achieving the perfect balance of a chewy center and a slightly crisp edge is all about timing and observation. These notes guide you through the tactile and sensory indicators at each stage.
The Creaming Process
Start with truly softened butter—it should yield easily to pressure but not be oily. The goal of creaming the butter and sugar is to incorporate air. Beat them until the mixture lightens noticeably in color (from deep yellow to pale yellow) and increases in volume. This typically takes three to five minutes with a stand mixer. This aeration is what gives the final cookie its light texture.
Mixing the Dough
When adding the dry ingredients, switch to the lowest speed on your mixer or use a spatula. Stop mixing the very moment the last streak of flour disappears. Overmixing develops the gluten, resulting in a tough, dense cookie instead of the desired meltaway crumb. The final dough will be soft and slightly sticky, which is correct.
Sensory Cues During Baking
Set your oven to three hundred fifty Fahrenheit, verified with an oven thermometer if possible. During the ten to twelve minutes of baking, you should first notice the lovely aroma of warm butter and peppermint filling your kitchen. The visual cue for doneness is subtle: the cookie will look set, no longer glossy or wet in the center, and the very edges will have taken on a faint, light golden hue. Do not wait for the entire cookie to turn brown; this will result in a dry, crunchy texture. They should appear slightly underbaked in the center when you pull them out.
Placing the Chocolate Kiss
The immediate addition of the chocolate is crucial. The residual heat from the freshly baked cookie is necessary to soften the base of the Kiss, allowing it to adhere perfectly and creating that signature, slightly smushed silhouette. If you wait too long (even a minute or two), the cookie surface will cool, and the chocolate won’t melt properly. Gently press down until you feel a slight give in the cookie beneath the chocolate. If the chocolate cracks, the cookie has cooled too much.
Elevating the Cookie: Expert Pro Tips
These specific techniques will ensure your batch of peppermint kisses is the best it can be, from crumb to crunch.
- Chill Your Tools: If your kitchen is warm, try chilling the mixing bowl and even the flour briefly before starting. Cooler ingredients help keep the butter firm, preventing the dough from becoming too soft and spreading too much during baking.
- The Powdered Candy Trick: To get very fine peppermint for the rolling mix, process the candies briefly in a food processor or mini-chopper. This prevents sharp edges from tearing the dough balls during rolling.
- Uniformity is Key: Use a small cookie scoop (about one tablespoon size) to ensure every dough ball is the same size. This guarantees even baking and a consistent look across the entire batch.
- The Sheet Pan Set-Up: Once the Kisses are pressed in, slide the entire baking sheet into the refrigerator for five to ten minutes. This rapid cooling sets the chocolate and prevents the milk chocolate from melting excessively, keeping the shape cleaner.
- Altitude Adjustment: For high-altitude baking, consider reducing the baking powder by one-fourth of a teaspoon and slightly increasing the flour (about two tablespoons more) to prevent the cookies from spreading too thinly.
- Do Not Overwork the Finish: When rolling the dough balls in the coating, use a light hand. You want the sugar and peppermint to cling to the surface, but you don’t want to compress the dough and force the air out.

Adaptations and Ingredient Swaps
While the original recipe for Easy Peppermint Kiss Cookies is a classic, you can easily tweak certain elements to suit dietary needs or preference shifts.
- Gluten-Free Flour: Swap the all-purpose flour for a good quality one-for-one gluten-free baking blend that includes xanthan gum. The cookie’s texture will be slightly more delicate, so handle the dough gently.
- Nutty Crunch: For an extra layer of flavor and texture, mix one-half cup of very finely chopped pecans or walnuts into the finished dough before chilling. The nuttiness pairs beautifully with the peppermint.
- Extract Strength: Peppermint extract can be potent. If you prefer a milder mint flavor, start with three-fourths of a teaspoon instead of a full teaspoon and taste a small portion of the dough before adding the rest.
- Chocolate Variation: If you prefer darker chocolate, swap the standard milk chocolate Kisses for Special Dark Kisses or even white chocolate chips pressed into the center for a different color profile.
- Vegan Butter: Use a high-quality vegan butter substitute (the stick variety works best) in place of dairy butter. The texture will be nearly identical, though the flavor may be slightly less rich.
Presentation and Serving Suggestions
These cookies are festive on their own, but pairing them with the right beverage or surrounding them with complementary flavors can elevate the entire experience.
- The Classic Pairing: Serve them alongside a piping hot mug of homemade hot chocolate. The richness of the chocolate drink complements the butteriness of the cookie and the cool peppermint finish.
- Holiday Platter Inclusion: Arrange these cookies next to other contrasting treats. The white and red color scheme stands out beautifully next to deeply colored items like Gingerbread Crinkles or rich Chocolate Truffles.
- Morning Coffee Dip: The slightly crisp edges make them perfect for a quick dunk in morning coffee or a strong espresso, where the subtle bitterness of the coffee cuts through the sweetness of the sugar.
- Dessert Bar Element: Present them on a tiered stand at a holiday party. Their elegant shape and color make them an appealing anchor for a dessert table, especially when surrounded by simple, white napkins.
Common Questions and Troubleshooting
Why are my cookies spreading too much and losing their shape?
This is often caused by using butter that is too soft or warm, or by not having enough flour. Make sure your butter is firm but pliable, and if you live in a hot climate, chill the formed dough balls on the baking sheet for fifteen minutes before baking. Also, verify that you are using the correct amount of flour and baking powder.
Can I make the cookie dough ahead of time?
Absolutely. Cookie dough can be made, wrapped tightly in plastic wrap, and refrigerated for up to three days. When you are ready to bake, let the dough sit at room temperature for fifteen minutes until it is just soft enough to scoop and roll. You can also freeze the dough for up to three months.
How should I store the finished cookies?
Store the completely cooled cookies in an airtight container at room temperature for up to one week. It’s best to keep them in a single layer or use parchment paper between layers to prevent the delicate chocolate Kisses from sticking to the cookies above them.
What is the best way to crush the peppermint candies?
Place the unwrapped candies in a sturdy zip-top bag and seal it, pressing out the air. Use a rolling pin or the flat side of a meat tenderizer to tap and roll over the candies until they reach the desired consistency, which should be fine crumbs with a few larger, coarse pieces for texture.
Nutritional Breakdown
| Nutrient | Amount per Serving |
| Calories | 145 kcal |
| Protein | 2 g |
| Carbs | 19 g |
| Fat | 7 g |
| Fiber | 0 g |
| Sugar | 12 g |
| Sodium | 55 mg |
Important Note
Nutrition information is an estimate and may vary based on preparation and ingredients used.

Chewy, Meltaway Easy Peppermint Kiss Cookies
Ingredients
- 1 cup unsalted butter, softened (2 sticks)
- 0.75 cup granulated sugar
- 1 large egg
- 1 tsp vanilla extract
- 1 tsp peppermint extract
- 2.25 cups all-purpose flour
- 1 tsp baking powder
- 0.25 tsp salt
- 0.5 cup finely crushed peppermint candies or candy canes
- 0.25 cup granulated sugar (for rolling)
- 0.25 cup finely crushed peppermint candies (for rolling)
- 36 milk chocolate Hershey’s Kisses, unwrapped
Instructions
- Preheat the oven to three hundred fifty Fahrenheit. Line baking sheets with parchment paper. Cream the softened butter and three-fourths cup sugar until light and fluffy. Beat in the egg, vanilla extract, and peppermint extract.
- Whisk together the flour, baking powder, and salt. Gradually add this mixture to the wet ingredients, mixing until just combined. Fold in the half-cup of crushed peppermint candies.
- Combine the remaining one-fourth cup sugar and one-fourth cup crushed peppermint in a shallow dish. Scoop the dough into one-inch balls and roll each one evenly in the sugar-peppermint mixture.
- Place the coated dough balls two inches apart on the prepared baking sheets. Bake for ten to twelve minutes, or until the edges are very lightly golden. Do not overbake.
- Immediately upon removing the cookies from the oven, gently press one unwrapped milk chocolate Kiss into the center of each warm cookie.
- Let the cookies cool completely on the baking sheet for five minutes before transferring them to a wire rack to cool fully. The chocolate needs to set up before serving.
Notes
Equipment
- stand mixer or hand mixer
- mixing bowls
- Baking sheets
- parchment paper
- wire cooling rack