

The Mediterranean kitchen is celebrated globally for its vibrant colors, powerful, fresh flavors, and inherently healthy composition. Among the quickest ways to bring this sun-drenched cuisine to your table is through the invention of the humble pita pizza. These aren’t just quick substitutes for traditional deep-dish recipes; they are a genuinely satisfying culinary concept in their own right. A crisp, chewy pita provides the perfect canvas for a tangy, herbaceous base of marinara and a scatter of classic Hellenic ingredients—salty feta, briny olives, and sweet roasted peppers. Whether you are assembling a casual lunch for one or need an effortless starter for a weekend gathering, these Easy Greek Pita Pizzas deliver maximum flavor payoff for minimal effort, marrying convenience with authentic taste.
Table of Contents
The Foundation: Essential Components
The beauty of this recipe lies in the use of high-quality, pre-prepared ingredients that require almost no time for assembly. This list is focused on creating the quintessential Greek profile; feel free to adjust the quantities of toppings to your personal preference.
For the Crust and Base:
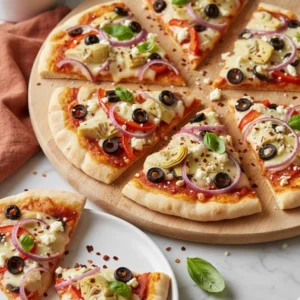
- Six pieces of thick pita bread, approximately six to eight inches in diameter.
- One cup of prepared marinara or pizza sauce (look for one with low sugar content).
- One and one half cups of whole milk low-moisture mozzarella cheese, shredded.
The Greek Toppings:
- One cup of quartered artichoke hearts, preserved in water or oil (drained and patted dry).
- One half cup of roasted red peppers from a jar, sliced into strips (drained well).
- One half cup of Kalamata olives, pitted and halved.
- One half of a small red onion, very thinly sliced.
- One half cup of crumbled feta cheese.
For Finishing:
- Two tablespoons of extra virgin olive oil.
- One half teaspoon of dried oregano.
- One quarter cup of fresh basil or parsley, roughly chopped, for garnish.

A Rapid Approach to Preparation
This process is broken down into simple steps, ensuring that you move from countertop to oven efficiently and without any guesswork. Remember to always write out the temperature and unit of measurement fully to comply with formatting requirements.
- Oven Setup: Adjust an oven rack to the center position. Preheat the oven to four hundred twenty-five Fahrenheit. If using a large baking sheet or pizza stone, place it in the oven now so it preheats along with the oven.
- Prep the Pitas: Lay the six pita breads flat on a clean surface. Lightly brush or drizzle the top surface of each pita with extra virgin olive oil.
- Sauce Application: Divide the marinara or pizza sauce evenly among the six pitas, using the back of a spoon to spread a thin, consistent layer across the surface, leaving about a half inch border for the crust.
- Mozzarella Layer: Distribute the shredded mozzarella cheese over the sauced pitas. Using the mozzarella as the initial layer helps the subsequent toppings adhere better and prevents the crust from becoming too moist.
- Topping Distribution: Systematically layer the remaining ingredients: roasted red peppers, artichoke hearts, red onion slices, and Kalamata olives. Finish by sprinkling the crumbled feta cheese over the entire surface.
- Baking: Carefully transfer the assembled pizzas to the preheated baking sheet or pizza stone. Bake for approximately eight to twelve minutes, rotating the pan halfway through if your oven heats unevenly.
- Final Touches: Remove the pizzas from the oven once the mozzarella is fully melted and bubbling and the pita edges are golden brown and crisp. Sprinkle immediately with fresh basil or parsley before slicing and serving.

Achieving Excellence: Detailed Cooking Notes
The transformation of these simple ingredients happens quickly in the oven, and paying attention to subtle cues is crucial for a perfectly executed pita pizza.
Monitoring the Preheat and Initial Crisp
The temperature of four hundred twenty-five Fahrenheit is essential for achieving that delightful crunch in the pita crust without overcooking the toppings. A preheated pan or pizza stone helps shock the base, setting the crust immediately and preventing sogginess. When placing the pita on the oil-brushed surface, listen for a slight sizzle if using a stone—this is your indicator of instantaneous crisping. If your pitas are particularly thin, consider par-baking them for two minutes before adding the sauce and toppings. This preemptive step ensures maximum structural integrity, preventing a limp center.
The Art of the Light Hand with Sauce
Unlike a deep-dish pizza, the thin surface of a pita can easily become saturated. The goal is to apply a light coating of sauce—just enough to cover the surface and provide flavor, but not so much that it pools. Too much sauce will steam the dough from the bottom up, leading to a doughy, wet result. Aim for a thickness similar to a coat of paint, allowing the texture of the pita beneath to still be vaguely visible.
Sensory Cues for Topping Doneness
The mozzarella will be your primary visual cue. It should move from distinct shreds to a cohesive, molten layer. Look for small pockets of light brown coloring, indicating caramelization and deep flavor development. The red onions, being thin-sliced, should soften slightly and become translucent at the edges, their sharpness mellowing into a sweet, earthy flavor. The pita itself should be rigid enough to hold when lifted with a spatula, with the edges exhibiting a deep golden hue. If the cheese is perfectly melted but the crust needs more browning, try lowering the pan to a lower oven rack for the final two minutes.
Finishing with Freshness
The final flourish of fresh basil or parsley is non-negotiable. Cooking the herbs into the pizza diminishes their bright, volatile oils. Instead, adding them post-bake utilizes the residual heat of the pizza to gently wilt them, releasing their essential oils while retaining their vibrant color and sharp, clean flavor. This step elevates the overall experience, providing a necessary counterpoint to the saltiness of the feta and olives.
Flavor Deep Dive: Smart Ingredient Swaps
One of the greatest joys of preparing a personal pizza is the ability to adapt the flavor profile entirely to suit your mood or dietary needs. The Greek inspiration is merely a starting point.
Crust Alternatives
If traditional white flour pitas are not preferred, excellent alternatives exist. Use whole wheat flatbreads for added fiber and a nuttier taste. Naan bread provides a softer, slightly thicker base that retains a chewy interior. For a gluten-free option, many brands offer rice- or lentil-based flatbreads that crisp up beautifully in a hot oven. Just be mindful of their baking time, as thinner, specialty crusts may require slightly less time than standard pitas.
Sauce and Base Substitutions
While marinara is classic, you can completely change the geographical theme with a different spread. A basil pesto base, swirled lightly across the pita, offers a rich, herbaceous Italian twist. A thin layer of hummus, particularly a roasted red pepper variety, provides an even creamier, nuttier foundation that leans further into Middle Eastern flavors. Alternatively, a quick homemade sun-dried tomato and olive oil paste can deliver deep umami flavor with fewer added ingredients than a jarred sauce.
Cheese and Protein Variations
For those avoiding dairy, a cashew-based mozzarella alternative can provide the necessary melt and stretch, though its browning characteristics may differ. To add heartiness, cooked, finely ground lamb or seasoned chicken breast can be scattered over the base before the vegetables. A simple way to introduce vegetarian protein is to use crumbled, firm tofu seasoned with smoked paprika and dried thyme, which mimics the texture of ground meat.
Vegetable Shifts
If the standard Greek toppings aren’t available, or if you simply prefer other flavors, consider using thin slices of zucchini, sun-dried tomatoes (packed in oil), or sauteed bell peppers. If using fresh mushrooms, they must be thinly sliced and ideally sauteed beforehand. Mushrooms contain a tremendous amount of water, and if added raw, they will release moisture during baking, making the surrounding cheese and crust soggy.

The Art of a Crisp Crust: Professional Suggestions
A successful pita pizza hinges on the texture of the base—it should be sturdy and crunchy, not floppy. Here are the secrets used by culinary professionals to guarantee a perfect crust every time.
- The High Heat Technique: Always bake at four hundred twenty-five Fahrenheit or higher. This high heat is what achieves that rapid, appealing blister on the crust and ensures the cheese melts before the toppings overcook. If your oven doesn’t reach four hundred twenty-five Fahrenheit well, try four hundred fifty Fahrenheit, but watch it closely.
- Use a Preheated Surface: As noted, baking on a baking stone or a heavy-duty, preheated metal baking sheet is the single best way to ensure the bottom crust is crisp. The instantaneous transfer of heat from the metal or stone to the dough is what creates rigidity. Never place the assembled, cold pizza directly onto a cold sheet pan before putting it in the oven.
- The Inverse Topping Method: While traditional pizza usually calls for cheese on top of the sauce, consider putting a very thin layer of mozzarella directly on the sauce, followed by the heartier vegetables, and then a final scatter of feta. This creates a barrier, preventing wet toppings (like the artichokes or peppers) from sitting directly on the pita and turning it into mush.
- Manage Moisture Control: Patting down ingredients like jarred artichokes, roasted red peppers, and sliced olives is crucial. Excess moisture is the enemy of a crisp crust. Use paper towels to gently blot any jarred or pickled ingredients before they touch the pizza.
- Don’t Overcrowd the Pan: Give each pita breathing room. If you crowd the baking sheet, the steam released from the ingredients gets trapped, which lowers the temperature around the crust and inhibits browning and crisping. Bake in batches if necessary, or use two separate baking sheets placed on different racks.
- The Cooling Rack Trick: Immediately upon removing the finished pizza from the oven, slide it onto a wire cooling rack. This allows air to circulate underneath the crust, preventing steam from condensing between the hot pizza base and the cutting board or plate, which would otherwise lead to a soggy bottom.
Rounding Out the Meal: Pairing Ideas
These Greek-inspired pizzas are substantial enough for a light main course, but pairing them with the right side dish can turn them into a complete and balanced dinner experience.
- A Simple Green Salad: The quintessential accompaniment. Dress a mix of crisp romaine, thinly sliced cucumber, and cherry tomatoes with a sharp lemon-oregano vinaigrette. The brightness and acidity of the salad cuts through the richness of the cheese and the earthiness of the olives, preparing the palate for the next bite of the Easy Greek Pita Pizzas.
- Tzatziki Dip: Offer a small bowl of thick, homemade tzatziki (Greek yogurt, grated cucumber, garlic, and dill) on the side. This provides a cool, creamy dipping sauce that can be used for the crust edges or even drizzled lightly over the finished product for an extra layer of cooling freshness.
- Whipped Feta Spread: For a more decadent starter, serve the pita pizzas alongside a whipped feta dip blended with a little cream cheese and olive oil. The soft texture and extra saltiness complement the crispness of the pita crust wonderfully.
- Simple Tomato Soup: In cooler months, a cup of velvety, slow-simmered tomato basil soup provides a comforting warmth that contrasts beautifully with the Mediterranean flavors of the pizza.
Common Inquiries About Assembly
Addressing a few common questions can help ensure a smooth preparation process, even for novice cooks.
Q: Why did my pita crust come out soggy in the center?
This is usually due to one of three issues: the heat was too low, you used too much sauce, or your toppings were too wet. To fix this, always preheat your baking surface, use a thin layer of sauce, and make sure any jarred or canned toppings (like artichokes or peppers) are completely drained and patted dry before use.
Q: Can I prepare these ahead of time?
You can prep the toppings (slice the onions, chop the peppers, drain the olives) and store them separately for up to three days. However, you should not assemble the pizzas until just before baking. Once the sauce hits the pita, the bread starts absorbing moisture, and the structural integrity will be compromised, leading to a very difficult time transferring them and an assuredly soggy crust.
Q: What is the best way to reheat leftovers?
The microwave is strictly prohibited if you want to maintain a crisp crust. The best way to reheat a pita pizza is using a toaster oven or a standard oven set to three hundred fifty Fahrenheit. Place the pizza directly on the rack (or a lightly oiled pan) and bake for five to eight minutes until the cheese is bubbling again. Alternatively, reheat them quickly on a hot, dry skillet over medium-high heat.
Q: Is there a specific type of pita bread I should look for?
Look for pitas that are thicker than flat, paper-thin varieties, but still relatively pliable. They are often labeled “pocketless” or “grilling” pitas. The extra thickness provides the necessary barrier between the wet sauce and the heat source, creating a pizza-like crust texture rather than a chip-like one.
Q: Can I use fresh, uncooked vegetables like bell peppers?
Yes, but only if they are cut extremely thin. If using thick or fibrous vegetables, they must be pre-cooked (roasted or sautéed) before being placed on the pizza. If you add chunks of raw, hard vegetables, they will not cook through completely in the short ten-minute baking window and will likely release moisture onto the crust.
Nutritional Snapshot
This information is provided for reference based on an estimate for one individual six-inch pita pizza serving.
| Nutrient | Amount per Serving |
| Calories | 215 kcal |
| Protein | 12 g |
| Carbs | 30 g |
| Fat | 5 g |
| Fiber | 2 g |
| Sugar | 3 g |
| Sodium | 380 mg |
Disclaimer
Nutrition information is an estimate and may vary based on preparation and ingredients used.
Easy Greek Pita Pizzas
Ingredients
- 6 thick pita breads (6–8 inches diameter)
- 1 cup prepared marinara or pizza sauce (low sugar preferred)
- 1 1/2 cups whole milk low-moisture mozzarella cheese, shredded
- 1 cup quartered artichoke hearts, drained and patted dry
- 1/2 cup roasted red peppers, sliced into strips and drained
- 1/2 cup Kalamata olives, pitted and halved
- 1/2 small red onion, very thinly sliced
- 1/2 cup feta cheese, crumbled
- 2 tbsp extra virgin olive oil
- 1/2 tsp dried oregano
- 1/4 cup fresh basil or parsley, roughly chopped (for garnish)
Instructions
- Adjust an oven rack to the center position. Preheat the oven to 425°F. If using a baking sheet or pizza stone, place it in the oven now to preheat.
- Lay the pita breads flat. Brush the top of each pita with olive oil.
- Spread marinara sauce evenly across each pita, leaving a 1/2-inch border.
- Distribute shredded mozzarella cheese over each pita.
- Layer roasted red peppers, artichokes, onions, and olives on top of the mozzarella. Finish with crumbled feta.
- Place the pitas on the preheated surface. Bake for 8–12 minutes until cheese bubbles and edges are golden brown.
- Remove from oven. Sprinkle with fresh basil or parsley. Slice and serve immediately.
Notes
Equipment
- oven
- baking sheet or pizza stone
- pastry brush
- Spoon for spreading sauce
- knife for slicing toppings
- cutting board


