
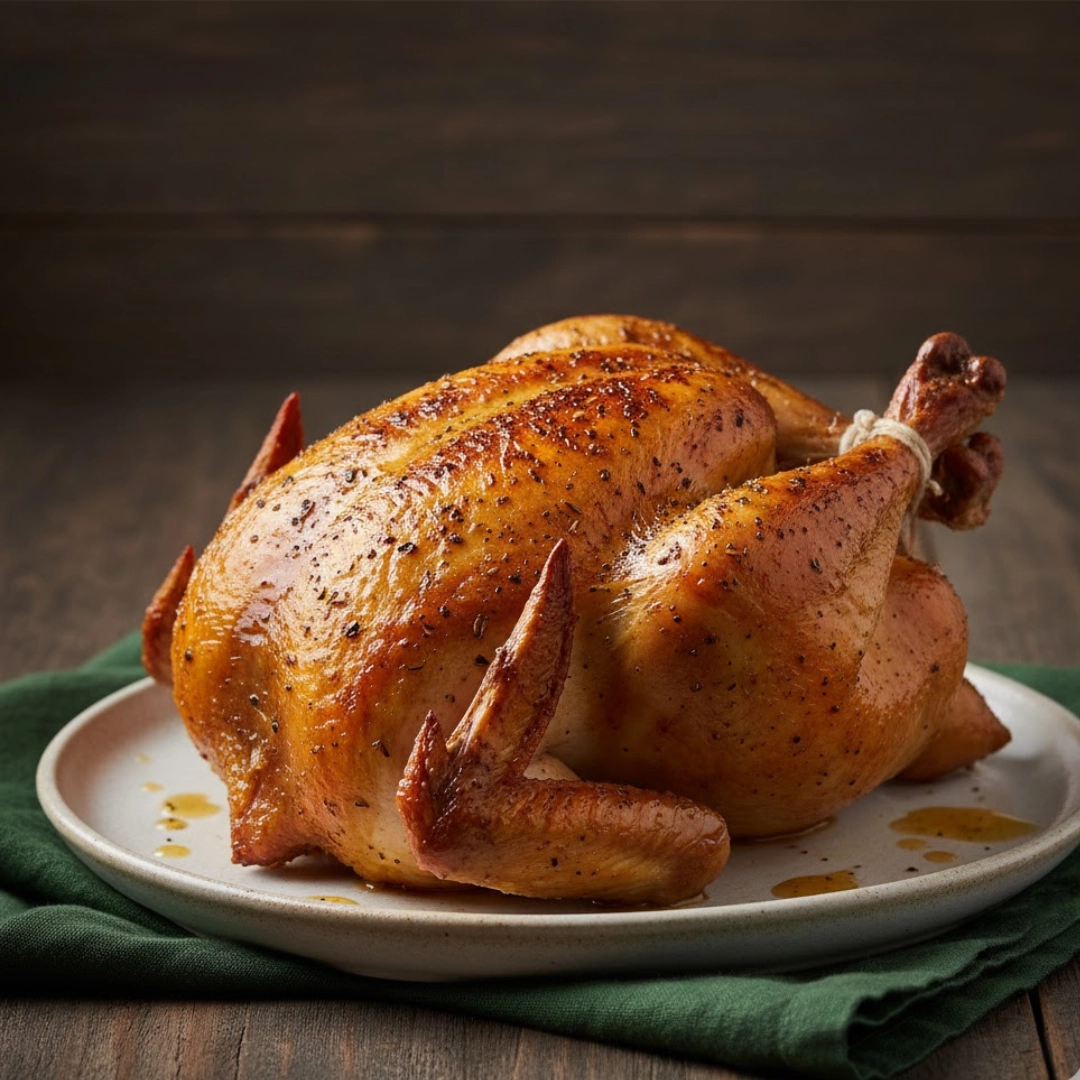
The notion of a perfect whole roasted chicken often conjures images of a Sunday afternoon—hours spent basting, rotating, and managing oven space. It’s a labor of love, but hardly an option for a busy Tuesday. This is where the air fryer fundamentally changes the culinary equation. By harnessing rapid, high-intensity convection heat, this appliance delivers everything you want in a roast: profoundly crispy skin and unbelievably juicy meat, but in a fraction of the traditional time. The convenience of preparing an Easy Air Fryer Whole Chicken means this foundational centerpiece can become a regular fixture in your home, moving it from special occasion fare to weeknight routine.
Table of Contents
The Components of a Great Roast
Achieving a superior roasted chicken is about more than just cooking; it’s about seasoning and preparation. The ingredients listed below are for a standard three to four-pound bird, which fits comfortably in most basket-style air fryers. Adjust quantities slightly for larger chickens, but be mindful of the maximum capacity of your specific air fryer model.
For the Chicken:
- One whole chicken, approximately 3 to 4 pounds (1.4 to 1.8 kilograms)
- 2 tablespoons olive oil or melted unsalted butter
- 1 teaspoon fine sea salt
- 1 teaspoon black pepper, freshly ground
The Aromatic Rub:
- 1 tablespoon smoked paprika
- 1 tablespoon garlic powder
- 1 teaspoon dried thyme
- 1 teaspoon dried rosemary, finely crushed
- 1/2 teaspoon cayenne pepper (optional, for a touch of heat)
Optional Cavity Aromatics:
- 1 lemon, halved
- 4 cloves garlic, smashed
- 2 sprigs fresh rosemary

Preparing the Bird: Dry Brining and Trussing
This recipe relies on a simple yet effective technique that prepares the chicken for the air fryer’s intense heat. Do not skip the prep steps; they are the foundation of flavor and texture.
- Pat the Chicken Dry: Remove the chicken from its packaging. Take out the giblets and neck from the cavity. Use paper towels to thoroughly pat the entire surface of the chicken dry, inside and out. This step is critical for achieving truly crispy skin.
- Apply Seasoning: In a small bowl, whisk together the sea salt, pepper, paprika, garlic powder, thyme, rosemary, and cayenne (if using).
- Rub and Rest: Drizzle the oil or melted butter over the chicken, then rub the seasoning mixture evenly across the entire surface. If time allows, place the chicken uncovered in the refrigerator for at least one hour, or ideally up to twenty-four hours, for a “dry brine.” This concentrates the flavor and dries the skin even further.
- Insert Aromatics: Just before cooking, stuff the cavity loosely with the halved lemon, smashed garlic, and rosemary sprigs.
- Truss the Bird: Using kitchen twine, tie the legs together to create a compact, uniform shape. This ensures even cooking in the air fryer, preventing the legs from cooking too quickly while the breast catches up.
- Preheat the Air Fryer: Set the air fryer to four hundred Fahrenheit and allow it to preheat for five minutes. This initial high temperature is crucial for setting the crispness of the skin.
- Initial Cook Phase: Place the chicken breast-side down in the air fryer basket. Cook for fifteen minutes.
- Second Cook Phase and Temperature Adjustment: After fifteen minutes, carefully flip the chicken using tongs so the breast is facing up. Reduce the air fryer temperature to three hundred sixty Fahrenheit and cook for an additional forty to fifty minutes.
- Check for Doneness and Rest: The chicken is done when an instant-read thermometer inserted into the thickest part of the thigh, avoiding the bone, registers one hundred sixty-five Fahrenheit. Remove the chicken from the air fryer and let it rest on a cutting board, tented loosely with foil, for ten minutes before carving.

Critical Stages: Checking for Doneness and Resting
The power of the air fryer means the chicken cooks quickly, but this speed requires diligent attention to internal temperature. The secret to success lies not in the clock, but in the thermometer.
The Sensory Check for Skin Crispness
After the initial fifteen-minute blast at four hundred Fahrenheit, the skin should have already begun its transformation. It should be visibly taut, a deep mahogany color, and if you gently tap it, it should sound firm and hollow. If the skin is already approaching your desired color before the fifty-minute mark, you may need to reduce the temperature slightly further, perhaps to three hundred fifty Fahrenheit, for the remainder of the cook time to prevent burning. Remember, the skin continues to darken rapidly in the final ten to fifteen minutes.
Mastering Internal Temperature
An instant-read thermometer is your single most important tool. Do not rely on visual cues like the color of the juices. The target temperature is one hundred sixty-five Fahrenheit.
- Placement: Insert the thermometer into the deepest part of the thigh muscle, right where it meets the body of the bird. Ensure the probe does not touch the bone, as the bone’s temperature will be higher than the meat, providing a false reading.
- Sequential Testing: Check the temperature in both thighs and the thickest part of the breast. The breast meat can sometimes lag slightly. If the breast is only at one hundred fifty-five Fahrenheit but the thighs are at one hundred sixty-five Fahrenheit, continue cooking and check again in five-minute intervals. The lower temperature setting (three hundred sixty Fahrenheit) helps the bird cook through without desiccating the breast.
The Essential Rest Period
Once the chicken hits the target internal temperature, remove it immediately. The residual heat trapped inside the muscle fibers will cause the temperature to climb a few more degrees (known as carry-over cooking).
Why Rest is Non-Negotiable: During cooking, the muscle fibers contract, squeezing the internal moisture towards the center and surface. Cutting the chicken immediately allows these precious juices, which are essentially dissolved flavor compounds, to run out onto the cutting board. By resting for a full ten minutes, you allow the muscle fibers to relax and reabsorb that moisture, resulting in chicken that is unequivocally tender and succulent. Tent it loosely with foil—too tight, and you risk steaming the skin, ruining the crisp exterior you worked hard to create.
Mastering the Crispy Skin and Juicy Interior
The air fryer is exceptional at delivering moisture and crunch, but a few professional habits ensure perfection every time.
- Know Your Air Fryer’s Hot Spots: Air fryers, like all ovens, can have hot spots. When you flip the chicken halfway through, take note of which side seems to be browning faster. For the remaining cook time, position the darker side facing the cooler section of the basket to even out the color.
- Minimize the Opening: Every time you open the basket, you lose a significant amount of heat, which extends the cooking time and potentially compromises the skin. Rely on the digital timer and the thermometer. Only open the fryer for the required flip and the final temperature check.
- The Baking Powder Boost (Expert Trick): For truly extreme skin crispness, mix half a teaspoon of baking powder (not baking soda) into the dry seasoning rub. The alkaline properties of the baking powder raise the skin’s pH, which speeds up the Maillard reaction, resulting in an unparalleled crunch.
- Dealing with Smoke: Because the air fryer heats fats so rapidly, especially from a whole chicken, smoke can sometimes be an issue. Place a small slice of bread or a splash of water (about a tablespoon) under the air fryer basket in the drip pan (if your model has one). This will catch the dripping fat and prevent it from immediately smoking.
- Small Bird Advantage: Resist the urge to cram a very large chicken (over five pounds) into a standard air fryer. The lack of air circulation around the bird will negate the appliance’s primary advantage. If you must cook a larger chicken, consider spatchcocking (butterflying) it first so it lays flat and maximizes exposure to the airflow.
- Don’t Toss the Drippings: The small amount of fat and juice collected at the bottom of the air fryer, if not burnt, is potent. You can pour this savory liquid into a small saucepan, add a tablespoon of flour, and a cup of chicken broth to whisk together a quick, rich pan sauce to drizzle over the carved meat.
Flavor Profiles: Alternative Rubs and Marinades
While the paprika-thyme rub is a classic, the versatility of air-fried chicken allows for easy global flavor shifts.
- Herbes de Provence: Substitute the smoked paprika and garlic powder with 2 tablespoons of herbes de Provence and the zest of one whole orange. The floral, anise-like qualities of the French herb mix combine beautifully with the citrus for a bright, aromatic roast.
- Spicy Korean Gochujang: For a sweeter, spicier take, create a paste using 2 tablespoons of gochujang (Korean chili paste), 1 tablespoon of soy sauce, 1 tablespoon of brown sugar, and a teaspoon of fresh grated ginger. Brush this on the chicken after the initial fifteen-minute high-heat phase. This prevents the sugars in the paste from burning too early.
- Garlic Butter and Lemon: Simplify the rub entirely and use only salt and pepper. Whisk together 4 tablespoons of melted butter with 6 cloves of minced fresh garlic, the juice of one lemon, and a handful of chopped fresh parsley. Baste the chicken with this mixture at the start and once more halfway through the cook time.

Building the Plate: Recommended Sides
A whole roasted chicken, whether cooked in the air fryer or oven, demands sides that complement its richness and provide contrast in texture.
- Creamy Polenta: A bowl of slow-cooked polenta provides a comforting, silky base. The starches soak up any residual chicken juices, and its mild flavor provides the perfect canvas for the savory seasonings of the bird.
- Simple Asparagus with Sherry Vinegar: To cut through the richness of the chicken skin, roast or steam fresh asparagus and toss it with a light drizzle of good-quality sherry vinegar and a pinch of flaky salt. The acidity cleanses the palate wonderfully.
- Roasted Root Vegetables: Chopped carrots, parsnips, and potatoes tossed in the same seasoning blend as the chicken can be cooked alongside (if your air fryer is large enough) or roasted in a conventional oven. They absorb the chicken’s aromatics and become tender and slightly caramelized.
Kitchen Q&A: Your Whole Chicken Concerns Addressed
How do I prevent the breast from drying out?
The key is to apply some sort of fat (oil or butter) to the breast skin and to employ the two-stage cooking temperature: high heat initially (four hundred Fahrenheit) to crisp the skin, followed by a lower temperature (three hundred sixty Fahrenheit) to finish cooking without drying the delicate white meat. Tenting the breast area loosely with foil for the last twenty minutes can also protect it if you notice it browning too quickly.
Can I cook a frozen chicken in the air fryer?
No, you should never cook a frozen whole chicken, or any other large cut of poultry, in an air fryer or any other appliance. The exterior will cook long before the interior thaws, creating an ideal environment for bacteria growth in the temperature danger zone. Always ensure the chicken is completely thawed in the refrigerator before preparing and cooking.
What size air fryer do I need for a whole chicken?
To successfully execute an Easy Air Fryer Whole Chicken, you generally need an air fryer with at least a 5.8-quart capacity, or a large oven-style model. The basket must be large enough to hold a three to four-pound bird without it touching the heating element and, critically, allow for sufficient air circulation all around the chicken. If the chicken is wedged in tightly, the air fryer will essentially steam the parts that are not directly exposed to the flow.
What is the maximum safe cooking time for chicken drippings in the air fryer?
If you are collecting drippings for a sauce, you want to ensure they don’t burn. Generally, fat drippings are safe for the duration of the cooking time, approximately 55 to 65 minutes total, as long as the cooking temperature is kept below four hundred Fahrenheit. If you smell a strong, acrid odor, it means the drippings are burning, and you should halt cooking immediately and clean the collection tray before resuming.
How do I store leftovers and reheat the chicken?
Leftover cooked chicken should be cooled quickly and stored in an airtight container in the refrigerator for up to three days. To reheat, carve the remaining chicken and place the pieces back in the air fryer basket at three hundred twenty-five Fahrenheit for about four to five minutes. This method helps the skin retain its crispness far better than a microwave.
A Look at the Nutritional Breakdown
The following is an estimation based on a three and a half pound roasted chicken, served with skin, and divided into eight portions. Actual figures will vary greatly depending on the size of the bird and the amount of oil used.
| Nutrient | Amount per Serving |
| Calories | 380 kcal |
| Protein | 45 g |
| Carbs | 1 g |
| Fat | 22 g |
| Fiber | 0 g |
| Sugar | 0 g |
| Sodium | 450 mg |
Important Disclosure
Nutrition information is an estimate and may vary based on preparation and ingredients used.

Easy Air Fryer Whole Chicken
Ingredients
- 1 whole chicken (3 to 4 pounds / 1.4–1.8 kg)
- 2 tbsp olive oil or melted unsalted butter
- 1 tsp fine sea salt
- 1 tsp freshly ground black pepper
- 1 tbsp smoked paprika
- 1 tbsp garlic powder
- 1 tsp dried thyme
- 1 tsp dried rosemary, finely crushed
- 0.5 tsp cayenne pepper (optional)
- 1 lemon, halved (optional)
- 4 cloves garlic, smashed (optional)
- 2 sprigs fresh rosemary (optional)
Instructions
- Remove the chicken from its packaging, discard giblets, and pat dry thoroughly with paper towels.
- Mix sea salt, pepper, paprika, garlic powder, thyme, rosemary, and cayenne in a small bowl.
- Rub the chicken all over with olive oil or melted butter, then coat evenly with the seasoning mix.
- Optional: For best flavor, refrigerate the seasoned chicken uncovered for 1 to 24 hours.
- Just before cooking, loosely stuff the cavity with halved lemon, smashed garlic, and rosemary sprigs (if using).
- Tie the legs together with kitchen twine to ensure even cooking.
- Preheat the air fryer to 400°F (204°C) for 5 minutes.
- Place chicken breast-side down in the basket and cook for 15 minutes at 400°F.
- Carefully flip chicken breast-side up. Reduce temperature to 360°F (182°C) and cook for another 40–50 minutes.
- Check internal temperature in the thickest part of the thigh; it should read 165°F (74°C).
- Remove chicken and let rest for 10 minutes, tented with foil before carving.
Notes
Equipment
- air fryer
- kitchen twine
- mixing bowl
- measuring spoons
- Instant-read thermometer
- cutting board
- tongs
- aluminum foil


