

There are some dishes that transcend mere sustenance and become an emotional touchstone—a reason to gather, a comfort against the chill, or a simple, profound pleasure after a long day. This rendition of Creamy White Chicken Chili is precisely that kind of recipe. It takes the familiar warmth of traditional chili, strips away the heavy tomato base, and rebuilds it with rich, nuanced layers of gentle spice, tender chicken, and earthy beans, all swaddled in a velvety, luxurious sauce. It is hearty enough for a main course on a blustery weekend, yet surprisingly sophisticated in its flavor profile, making it a stellar centerpiece for casual entertaining. Forget the complicated prep; this recipe relies on simple, quality ingredients and a straightforward method that maximizes depth of flavor without demanding hours in the kitchen.
Table of Contents
Essential Ingredients and Preparation Notes
Achieving the perfect texture and flavor in this chili starts with understanding the role each component plays. While the process is forgiving, using the right proportions of dairy and starch is critical to maintaining a soup-like richness without becoming overly thick or greasy.
For the Chili Base:
- 2 tablespoons olive oil or avocado oil
- 1 large yellow onion, finely diced (about one and one half cups)
- 1 medium green bell pepper, diced
- 1 small jalapeño, finely minced (seeds removed for less heat, or left in for a spicy kick)
- 4 cloves garlic, minced
- 1 teaspoon ground cumin
- 1 teaspoon dried oregano
- One half teaspoon smoked paprika
- One half teaspoon chili powder (use a mild ancho or New Mexico variety)
- 6 cups low-sodium chicken broth
- 1 (15-ounce) can Great Northern beans, rinsed and drained
- 1 (15-ounce) can cannellini beans, rinsed and drained
- 1 cup fire-roasted corn (frozen or canned, drained)
- 1 teaspoon sea salt (plus more to taste)
- One half teaspoon fresh cracked black pepper
For the Protein and Creaminess:
- 2 cups cooked chicken, shredded or diced (rotisserie chicken works perfectly)
- 8 ounces full-fat cream cheese, cut into cubes
- One half cup heavy cream (or whole milk for a lighter version)
- 1 tablespoon fresh lime juice
- One half cup fresh cilantro, roughly chopped (for garnish and flavor)

Recipe Overview: The Quick Steps
This overview provides the high-level roadmap. Refer to the next section for detailed technique and sensory cues.
- Sauté the Aromatics: In a large Dutch oven or pot, heat the oil, then add the onion, bell pepper, and jalapeño. Cook until softened.
- Bloom the Spices: Stir in the garlic and the dry spices (cumin, oregano, smoked paprika, chili powder). Cook briefly until fragrant.
- Build the Broth: Pour in the chicken broth, scraping up any browned bits from the bottom of the pot. Bring the liquid to a simmer.
- Simmer the Base: Add the rinsed beans, corn, salt, and pepper. Let the mixture simmer gently for at least fifteen minutes to allow the flavors to marry.
- Add the Chicken and Creaminess: Reduce the heat to low. Stir in the shredded chicken, followed by the cubed cream cheese. Stir constantly until the cream cheese is fully melted and integrated into the broth.
- Finish the Chili: Stir in the heavy cream and lime juice. Heat through gently, being careful not to bring it to a rolling boil once the dairy is added. Adjust seasonings, then garnish with fresh cilantro before serving.

Building Depth: A Technical Walkthrough of the Chili Base
The secret to moving this dish from simple soup territory to truly exceptional chili lies in the intentional development of flavor, primarily through heat management and timing.
We begin with the aromatics. Heat your cooking oil—preferably avocado or olive oil for their neutral flavor profile—over medium heat. When the oil shimmers slightly, introduce the diced onion, bell pepper, and jalapeño. The goal here is not to brown the vegetables, but to soften them deeply. This process is called sweating, and it is vital because it releases the natural sugars in the onions, which contribute to the ultimate sweetness and complexity of the finished chili. Cook, stirring occasionally, for seven to nine minutes. The onions should become translucent and pliable.
Next, the spice blooming. Once the aromatics are soft, create a small clearing in the center of the pot and add the minced garlic and all the dry spices. Let the spices toast in the residual oil for about sixty seconds before stirring them into the rest of the vegetables. The slight heat of the oil activates the volatile oils in the cumin, oregano, paprika, and chili powder. This process, known as blooming, dramatically intensifies their flavor, giving the chili a pronounced, savory depth that you cannot achieve by simply dumping the spices into the liquid later. Pay close attention to the aroma; it should smell deeply fragrant and toasty, not burnt.
Once the spices are bloomed, the pot is ready for the liquid. Slowly pour in the chicken broth. This step often causes a satisfying hiss as the liquid hits the hot pot. Immediately take a wooden spoon or spatula and scrape the bottom of the pot vigorously. Those browned bits stuck to the bottom, called fond, are concentrated flavor bombs. Integrating them back into the liquid ensures that every drop of flavor developed in the initial steps is utilized. Bring the broth to a gentle simmer.
Now, introduce the Great Northern beans and cannellini beans, along with the fire-roasted corn. The reason for using two types of white beans is texture variation; the Great Northern beans tend to be slightly firmer, holding their shape well, while the cannellini beans are creamier and break down slightly during simmering, naturally contributing to the thickness of the base. Simmering the beans for fifteen to twenty minutes is non-negotiable. This duration allows the starches from the beans to leach into the broth and, more importantly, gives the broth time to infuse the beans with the bloomed spice flavors. The aroma emanating from the pot at this stage should be richly savory and complex.
Mastering the Creaminess: Texture and Consistency Checks
The transition from a highly seasoned broth to a luscious, Creamy White Chicken Chili is managed by the addition of the dairy elements. Precision is key here to avoid curdling or achieving an overly thin texture.
Before adding any dairy, ensure your shredded or diced chicken is incorporated first. This allows the chicken to warm through in the spiced broth. If you are using freshly cooked chicken, this only takes a few minutes. If you are using frozen pre-cooked chicken, give it closer to ten minutes.
Now, focus on the cream cheese. The heat should be reduced to the absolute lowest setting—a gentle warming, not a bubbling simmer. Introduce the cubed, room-temperature cream cheese slowly, piece by piece, while continuously stirring the chili base. The key to preventing lumps is twofold: using softened, full-fat cream cheese, and constant, gentle agitation. As the cream cheese melts, it releases fat and emulsifiers that thicken the chili, transforming the liquid into a creamy, opaque base. Keep stirring until no visible streaks of cream cheese remain. The texture should feel rich and coating on the spoon.
Once the cream cheese is fully incorporated, gently stir in the heavy cream. The addition of cream serves two purposes: it further mellows the spices and adds a final, silken texture to the chili. After adding the cream, do not allow the chili to come back up to a hard boil. High heat applied directly after dairy incorporation, especially with starch (from the beans) and acidity (which will be added next), increases the risk of the fats separating or the cream curdling. Maintain a gentle, barely simmering temperature for five minutes to heat the cream through.
The final stage of flavor adjustment involves the fresh lime juice. Acidity is essential in rich, creamy dishes because it provides a counterpoint, cutting through the heavy fat and brightening all the underlying savory notes. Stir in the lime juice right at the end. Taste the chili immediately. If it seems flat, add a small pinch more salt. If it seems too heavy, add a touch more lime. The chili is complete when it tastes balanced: spicy but not fiery, savory, rich, and slightly bright.

Pro Chef Adjustments for Flavor Layering
Truly expert cooking often involves small, intentional steps that layer flavors beyond the standard ingredient list. Applying these concepts elevates this white chili into restaurant-quality territory.
- Roast the Vegetables: For a slightly smoky, sweeter depth, consider roasting the bell pepper and jalapeño prior to chopping and adding them to the pot. Cut them in half, rub them lightly with oil, and roast them at three hundred fifty Fahrenheit until slightly blistered. Peel, chop, and proceed with the recipe. This adds a subtle, caramelized complexity.
- Searing the Chicken: If you are not using rotisserie chicken, season raw chicken pieces aggressively with salt, pepper, and a small amount of the chili powder mixture. Sear the chicken in the pot first until deeply golden on all sides, then remove it before sweating the aromatics. This builds an extra layer of fond that enhances the overall savoriness of the broth. Shred or dice the chicken once it’s cooled and cooked through, and add it back at the proper stage.
- Use a Mace and Nutmeg Blend: A secret weapon in creamy dishes is a minuscule pinch of freshly ground nutmeg and mace (the outer husk of the nutmeg seed). This blend, added during the spice blooming phase, doesn’t make the chili taste sweet; rather, it amplifies the warmth of the cumin and supports the creaminess of the dairy, lending an almost savory earthiness. Use sparingly—no more than one eighth of a teaspoon total.
- Emulsify a Portion of the Beans: For an even silkier texture without excessive fat, reserve one cup of the cooked beans before adding the cream cheese. Blend them with about one cup of the hot chili broth using an immersion blender or standard blender until completely smooth. Stir this bean puree back into the pot alongside the cream cheese. This acts as a natural thickener, binding the liquid and creating a more stable, velvety emulsion.
Creative Variations and Protein Swaps
The beauty of a base recipe like this is its flexibility. While the classic Creamy White Chicken Chili is perfect as is, you can tailor it to dietary needs, seasonal availability, or simply your personal flavor preferences.
- Turkey or Pork Base: Instead of chicken, use shredded leftover Thanksgiving turkey or cook and shred a pork tenderloin. The subtle sweetness of pork works particularly well with the smoked paprika and cumin. If using turkey, ensure you use dark meat for the best moisture retention.
- Vegetarian Version with Potato: Eliminate the chicken entirely. To maintain the heartiness, cube and roast two medium Yukon Gold potatoes and add them during the main simmering phase. Increase the bean puree technique (see Pro Tips) by blending two full cups of the beans to ensure a thick, substantial base. Use vegetable broth instead of chicken broth.
- Spicy Green Chili Version: Swap the green bell pepper for fire-roasted Hatch or Anaheim green chiles (about one half cup, diced). Omit the smoked paprika and chili powder, and replace them with one tablespoon of ground coriander. Finish the dish with a generous garnish of crumbled cotija cheese and a drizzle of hot sauce for an authentic Southwestern twist.
- Instant Pot Method: The entire cooking process can be streamlined using a pressure cooker. Sauté the aromatics on the Sauté function. Add all liquid, beans, corn, spices, and raw chicken (diced or whole breasts). Close the lid and cook on High Pressure for ten minutes. Quick release, remove and shred the chicken, return it to the pot, and then stir in the cream cheese, heavy cream, and lime juice.
Complementary Sides and Garnishes
Serving this chili is a chance to elevate the meal through contrast in texture and temperature. A well-chosen accompaniment enhances the richness of the main dish.
Essential Toppings Bar
The best chili experience is personalized. Create a small topping bar that allows diners to adjust the heat, texture, and freshness.
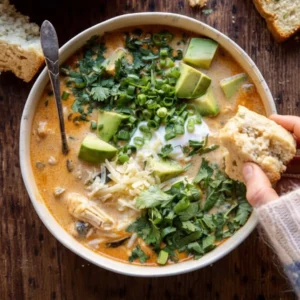
- Avocado or Guacamole: The creamy, cool fat of avocado offers a wonderful textural contrast to the hot chili. Dice it finely or serve a scoop of fresh guacamole on the side.
- Crisp Tortilla Strips: Avoid soft tortillas. Use thick, fried, or baked strips for maximum crunch. The sound of the crunch against the soft chili is part of the pleasure.
- Finely Diced Red Onion: A small sprinkle of raw red onion provides a sharp, piquant bite that cuts through the chili’s richness.
- Shredded Cheese Blend: A mix of Monterey Jack and pepper jack or a sharp white cheddar provides a final melt that further deepens the creamy texture.
- Sour Cream or Greek Yogurt: A dollop of cool sour cream melts slowly into the hot chili, tempering the spice and adding a tang.
Serving Ideas
- Chili and Cornbread: A classic pairing. Serve the chili alongside small squares of slightly sweet, crumbly cornbread. The porous texture of the cornbread is ideal for soaking up the creamy broth.
- Chili Bowls with Rice: For a heartier meal, serve the chili over a small bed of fluffy cilantro-lime rice. The rice adds body and turns the dish into a complete, filling main course.
- Chili Nachos: Leftovers can be repurposed beautifully. Ladle the chili over a bed of sturdy tortilla chips and top with plenty of shredded cheese, then bake until bubbling. Garnish with pickled jalapeños and sour cream.
Troubleshooting and Frequently Asked Questions
Even seasoned cooks run into issues. These common questions cover the main troubleshooting points for making white chili.
Why did my chili separate or curdle?
Separation or curdling usually happens when dairy is added at too high a heat, or if the acid (lime juice) is added too early. Ensure the heat is at its lowest setting when the cream cheese and heavy cream go in, and always stir the dairy in slowly and completely. Only add the lime juice right at the very end of the cooking process.
My chili is too thin. How can I thicken it without adding flour?
The best way to thicken this chili without changing the flavor profile is by using the beans themselves. Use an immersion blender to blend one to two cups of the beans directly into the chili base. The starch released will naturally and seamlessly thicken the liquid. If you do not have a blender, you can smash a few scoops of beans against the side of the pot with a wooden spoon.
Can I make this recipe in advance?
Absolutely. Chili is often better the day after it is made, as the flavors have more time to fully meld. Prepare the chili completely, let it cool, and store it in an airtight container in the refrigerator for up to four days. Reheat it gently on the stovetop over low heat. If it thickens too much upon standing, thin it with a small amount of chicken broth or milk while reheating.
What kind of chicken is best for shredding?
Cooked chicken thighs are the best option for chili because their higher fat content keeps them moist and tender even after extended simmering. If using chicken breasts, be careful not to overcook them; shred them right after they are cooked and add them back to the chili at the final stage. Rotisserie chicken is the best, easiest shortcut.
How do I adjust the heat level?
To reduce the heat, remove all seeds and membranes from the jalapeño before mincing. To increase the heat, leave the seeds in, or add a pinch of cayenne pepper during the spice blooming step. You can also finish the chili with a few dashes of hot sauce, which allows individuals to customize their bowls.
Nutritional Breakdown
| Nutrient | Amount per Serving |
| Calories | 485 kcal |
| Protein | 35 g |
| Carbs | 38 g |
| Fat | 22 g |
| Fiber | 10 g |
| Sugar | 6 g |
| Sodium | 850 mg |
Important Health and Dietary Note
Nutrition information is an estimate and may vary based on preparation and ingredients used.
Creamy White Chicken Chili
Ingredients
- 2 tbsp olive oil or avocado oil
- 1 large yellow onion, finely diced
- 1 medium green bell pepper, diced
- 1 small jalapeño, minced (seeds removed or kept for more heat)
- 4 cloves garlic, minced
- 1 tsp ground cumin
- 1 tsp dried oregano
- 0.5 tsp smoked paprika
- 0.5 tsp chili powder (mild)
- 6 cups low-sodium chicken broth
- 15 oz Great Northern beans, rinsed and drained
- 15 oz cannellini beans, rinsed and drained
- 1 cup fire-roasted corn (frozen or canned)
- 1 tsp sea salt
- 0.5 tsp fresh cracked black pepper
- 2 cups cooked chicken, shredded or diced
- 8 oz cream cheese, full-fat, cubed
- 0.5 cup heavy cream or whole milk
- 1 tbsp fresh lime juice
- 0.5 cup fresh cilantro, roughly chopped
Instructions
- In a large Dutch oven, heat oil over medium heat. Add onion, green bell pepper, and jalapeño. Sauté until softened, about 7–9 minutes.
- Add garlic, cumin, oregano, smoked paprika, and chili powder. Cook for 1 minute, stirring, until fragrant.
- Pour in the chicken broth and scrape up any browned bits. Bring to a gentle simmer.
- Add Great Northern beans, cannellini beans, corn, salt, and pepper. Simmer uncovered for 15–20 minutes.
- Reduce heat to low. Add cooked chicken and stir. Let it heat through for 5–10 minutes.
- Add cubed cream cheese slowly, stirring constantly until fully melted and no lumps remain.
- Stir in heavy cream and lime juice. Heat gently (do not boil). Adjust seasoning to taste.
- Serve hot, garnished with chopped cilantro and optional toppings like avocado or tortilla strips.
Notes
Equipment
- Dutch oven or large pot
- wooden spoon or spatula
- measuring cups and spoons
- knife and cutting board


