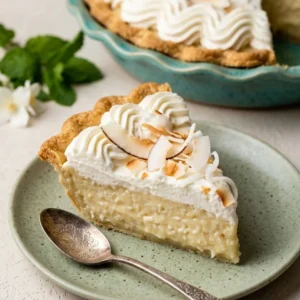
Transport your senses to a sun-drenched island with a slice of the absolute best coconut cream pie you will ever encounter. This isn’t just a simple pudding in a shell; it is a meticulously crafted dessert featuring a buttery, flaky crust, a dense and velvety coconut custard, and a cloud-like mountain of fresh whipped cream. Whether you are hosting a summer garden party or looking for a comforting weekend project, this recipe delivers a professional-grade result that balances creamy textures with the distinct, nutty crunch of toasted coconut.
Table of Contents
Ingredients
The Foundation: Pie Crust
- 1 unbaked flaky Pie Crust or All Butter Pie Crust
- Flour for dusting the work surface
The Heart: Coconut Filling
- 4 large egg yolks
- 1/4 cup cornstarch
- 1 can full fat coconut milk (14 ounces)
- 1 cup half-and-half
- 2/3 cup granulated sugar
- 1/4 teaspoon salt
- 1 cup sweetened shredded coconut
- 2 tablespoons unsalted butter, softened to room temperature
- 1 teaspoon pure vanilla extract
- 1/2 teaspoon coconut extract (optional)
The Finish: Whipped Topping & Garnish
- 1 and 1/2 cups cold heavy cream or heavy whipping cream
- 3 tablespoons confectioners sugar or granulated sugar
- 3/4 teaspoon pure vanilla extract
- Unsweetened coconut shavings, coconut chips, or extra sweetened shredded coconut for garnish (optional)

Instructions
- Prepare and Blind Bake the Crust: Preheat your oven to 375 Fahrenheit. Roll out your chilled pie dough and fit it into a 9-inch pie dish. Crimp the edges as desired. Line the crust with parchment paper and fill with pie weights. Bake according to blind baking instructions (usually 15 minutes with weights, then remove weights and bake for another 8 to 10 minutes until golden). Allow the crust to cool completely.
- Whisk the Thickening Base: In a medium bowl, whisk the 4 egg yolks and 1/4 cup of cornstarch together until the mixture is smooth and pale. Set this aside.
- Heat the Dairy: In a medium saucepan set over medium heat, combine the full fat coconut milk, 1 cup of half-and-half, 2/3 cup of granulated sugar, and 1/4 teaspoon of salt. Whisk occasionally and bring the mixture to a boil.
- Temper the Eggs: Once the dairy mixture is boiling, let it boil for 2 minutes, then reduce the heat to medium-low. Remove about 1/2 cup of the hot liquid and, in a slow and steady stream, whisk it into the egg yolk and cornstarch mixture to temper the eggs.
- Thicken the Custard: Slowly pour the tempered egg mixture back into the saucepan while whisking constantly. The pudding will begin to bubble and thicken immediately. Cook and whisk for 1 minute and 30 seconds.
- Flavor Infusion: Remove the pan from the heat. Stir in the 1 cup of sweetened shredded coconut, 2 tablespoons of softened butter, 1 teaspoon of vanilla extract, and the optional 1/2 teaspoon of coconut extract.
- Chill and Set: Pour the warm filling into the cooled pie crust. Press a piece of plastic wrap directly onto the surface of the pudding to prevent a skin from forming. Refrigerate for at least 3 hours, or ideally overnight, until the filling is chilled and firm.
- Prepare the Topping: Using a mixer fitted with a whisk attachment, whip the 1 and 1/2 cups of heavy cream, sugar, and 3/4 teaspoon of vanilla extract on medium-high speed until medium peaks form (about 3 to 4 minutes).
- Final Assembly: Pipe or spread the whipped cream over the chilled pie. Garnish with additional coconut shavings or toasted coconut. Serve immediately or keep refrigerated.

Achieving the Ultimate Creamy Consistency
The secret to a world-class coconut cream pie lies in the architecture of the custard. Unlike a standard vanilla pudding, this recipe utilizes full-fat canned coconut milk, which provides a higher lipid content and a more robust mouthfeel. When you combine this with half-and-half, you create a liquid base that is thick enough to hold its shape when sliced but fluid enough to melt on the tongue.
The thickening process is a delicate dance between the cornstarch and the egg yolks. Cornstarch provides a clean, gel-like structure, while the fat from the yolks adds richness and a golden hue. The key to avoiding a “rubbery” texture is the 90-second boil after the eggs are incorporated. This short window is essential for the cornstarch to fully hydrate and for the proteins in the yolks to set without curdling. If you find your filling is too loose, it likely didn’t reach a sufficient temperature to activate the starch fully. Conversely, overcooking can cause the eggs to “weep” or release moisture later.
Unique Culinary Insights
To elevate your pie from “good” to “extraordinary,” consider the role of temperature. Many home bakers make the mistake of using cold eggs or cold butter. For this recipe, having your butter softened at room temperature ensures it emulsifies instantly into the hot custard, creating a glossy, professional finish.
Another insight involves the “skin” that forms on puddings. This skin is caused by evaporation at the surface. By pressing the plastic wrap directly onto the warm custard, you eliminate the air gap, ensuring every bite of the pie is as smooth as the center. Furthermore, if you want a deeper flavor profile, try toasting the shredded coconut that goes inside the filling. While the original recipe calls for untoasted coconut in the custard for a softer bite, toasting it for just 5 minutes at 325 Fahrenheit can add a smoky, nutty dimension that cuts through the sugar.
Accompaniments and Serving Suggestions
While a slice of this pie is a powerhouse on its own, the presentation and side pairings can enhance the experience. To serve, use a sharp, thin-bladed knife dipped in hot water and wiped dry between each cut. This technique ensures clean, restaurant-quality slices where the layers remain distinct.
For an added touch of elegance, serve each slice with a few fresh raspberries or sliced mango. The acidity of the fruit provides a beautiful counterpoint to the rich, fatty nature of the coconut and cream. If you are serving this at a dinner party, a glass of chilled dessert wine or even a crisp Prosecco can elevate the tropical notes. For a non-alcoholic pairing, a cold brew coffee with a splash of macadamia nut milk echoes the nuttiness of the toasted coconut garnish beautifully.
Modifications and Substitutions
While the integrity of the recipe relies on the specified dairy and fat ratios, there are ways to adapt it to your pantry. If you cannot find half-and-half, you can create a substitute by mixing equal parts whole milk and heavy cream. However, do not substitute the canned coconut milk with the refrigerated “coconut milk beverage” found in cartons. The carton version is mostly water and will result in a soupy, unstable filling.
For those who prefer a different textural base, the flaky pastry crust can be swapped for a graham cracker crust or even a crushed vanilla wafer crust. If you go this route, ensure you bake the crumb crust for at least 10 minutes to set the butter, preventing the bottom from becoming soggy once the heavy custard is added. For a gluten-free version, simply utilize your favorite gluten-free pie crust recipe or a nut-based crust made from ground almonds and butter.
Step-by-Step Details for Success
When you begin the process of making the filling, the most critical moment is the tempering of the eggs. If you dump cold egg yolks directly into a boiling pot of coconut milk, you will end up with sweet scrambled eggs. By slowly drizzling the hot liquid into the whisked yolks while stirring vigorously, you gradually raise the temperature of the eggs. This “warms them up” to the idea of being cooked, allowing them to integrate into the custard smoothly.
As the mixture returns to the heat, you will notice a dramatic change. Within seconds, the liquid will transition from a thin soup to a thick, heavy lava. This is the cornstarch and egg yolks working in tandem. Do not be afraid of the “bursting bubbles” mentioned in the instructions; this is a sign that the mixture has reached the necessary temperature to set. Once the butter and vanilla are stirred in at the end, the custard will take on a beautiful sheen. This is the moment to taste—be careful, it’s hot!—to ensure the salt level is sufficient to balance the sweetness of the shredded coconut.
Deep-Dive FAQ
Why did my coconut cream pie turn out runny?
A runny pie usually stems from one of two issues: either the cornstarch wasn’t cooked long enough to activate its thickening properties, or the pie didn’t chill for a sufficient amount of time. The starch requires a full boil (about 212 Fahrenheit) followed by a short simmer to create a stable bond. Additionally, the filling needs at least 3 to 6 hours in the refrigerator to reach its final firm state. If you cut it too early, the residual heat will prevent it from holding its shape.
Can I make this pie a day in advance?
Absolutely. In fact, this pie is an excellent candidate for advance preparation. The custard filling actually benefits from a long, slow chill in the refrigerator, which allows the coconut flavors to meld and deepen. You can bake the crust and fill it up to 24 hours before you plan to serve. However, it is best to add the fresh whipped cream topping on the day of serving to ensure it remains airy and doesn’t weep into the custard.
What is the difference between coconut milk and cream of coconut?
This is a vital distinction for this recipe. Canned coconut milk is the unsweetened liquid extracted from coconut meat, whereas “cream of coconut” (like Coco Lopez) is a very thick, syrupy product loaded with added sugar. This recipe specifically calls for full-fat canned coconut milk. Using cream of coconut would make the pie cloyingly sweet and would likely prevent the custard from setting correctly due to the different fat-to-sugar ratio.
How do I prevent the pie crust from shrinking during blind baking?
Shrinking occurs when the gluten in the dough hasn’t had enough time to relax or when the dough is too warm when it enters the oven. To prevent this, make sure your dough stays cold. After you crimp the edges, place the pie shell in the freezer for 10 to 15 minutes before baking. Additionally, ensure your pie weights go all the way up the sides of the crust to physically hold the dough in place as the initial structure sets.
The Perfect Tropical Ending
Mastering the coconut cream pie is a rite of passage for any serious home baker. It requires patience, a bit of science, and a love for deep, indulgent flavors. Once you pull that first clean slice from the pan, revealing the layers of golden crust, ivory custard, and snowy whipped cream, you will realize why this dessert remains a timeless classic. It is a celebration of texture and tropical flair that turns any meal into a special occasion. Take your time with the tempering, don’t skimp on the chilling, and enjoy the praise that is sure to follow.
Nutrition Table
| Nutrient | Amount Per Serving |
| Calories | 485 |
| Total Fat | 34 grams |
| Saturated Fat | 22 grams |
| Cholesterol | 145 milligrams |
| Sodium | 210 milligrams |
| Total Carbohydrates | 42 grams |
| Dietary Fiber | 2 grams |
| Sugars | 28 grams |
| Protein | 6 grams |
Disclaimer
The nutritional information provided is an estimate based on standard ingredients. Actual values may vary depending on specific brands used and individual preparation methods. Consult a professional nutritionist for precise dietary calculations.
Homemade Coconut Cream Pie
Ingredients
- 1 9-inch unbaked flaky pie crust
- 4 large egg yolks
- 0.25 cup cornstarch
- 14 ounces full fat canned coconut milk
- 1 cup half-and-half
- 0.66 cup granulated white sugar
- 0.25 tsp fine sea salt
- 1 cup sweetened shredded coconut
- 2 tbsp unsalted butter, softened
- 1 tsp pure vanilla extract
- 0.5 tsp coconut extract (optional)
- 1.5 cups heavy whipping cream, cold
- 3 tbsp confectioners sugar
- 0.75 tsp pure vanilla extract (for topping)
- 0.25 cup toasted coconut shavings for garnish
Instructions
- Preheat oven to 375 Fahrenheit. Roll dough into a 9-inch dish, blind bake with weights for 15 minutes, then without for 8-10 minutes. Cool completely.
- Whisk egg yolks and cornstarch in a medium bowl until smooth. Set aside.
- In a saucepan, bring coconut milk, half-and-half, sugar, and salt to a boil over medium heat for 2 minutes.
- Slowly whisk 1/2 cup of the hot liquid into the egg mixture to temper, then pour everything back into the pan.
- Whisk constantly over medium-low heat for 90 seconds until thick and bubbly.
- Remove from heat. Stir in shredded coconut, butter, vanilla, and coconut extract.
- Pour into crust, cover with plastic wrap touching the surface, and refrigerate for at least 3 hours.
- Whip heavy cream, sugar, and vanilla to medium peaks. Spread over pie and garnish with toasted coconut.
Notes
Equipment
- 9-inch pie dish
- medium saucepan
- whisk
- stand mixer or hand mixer
- pie weights or dried beans