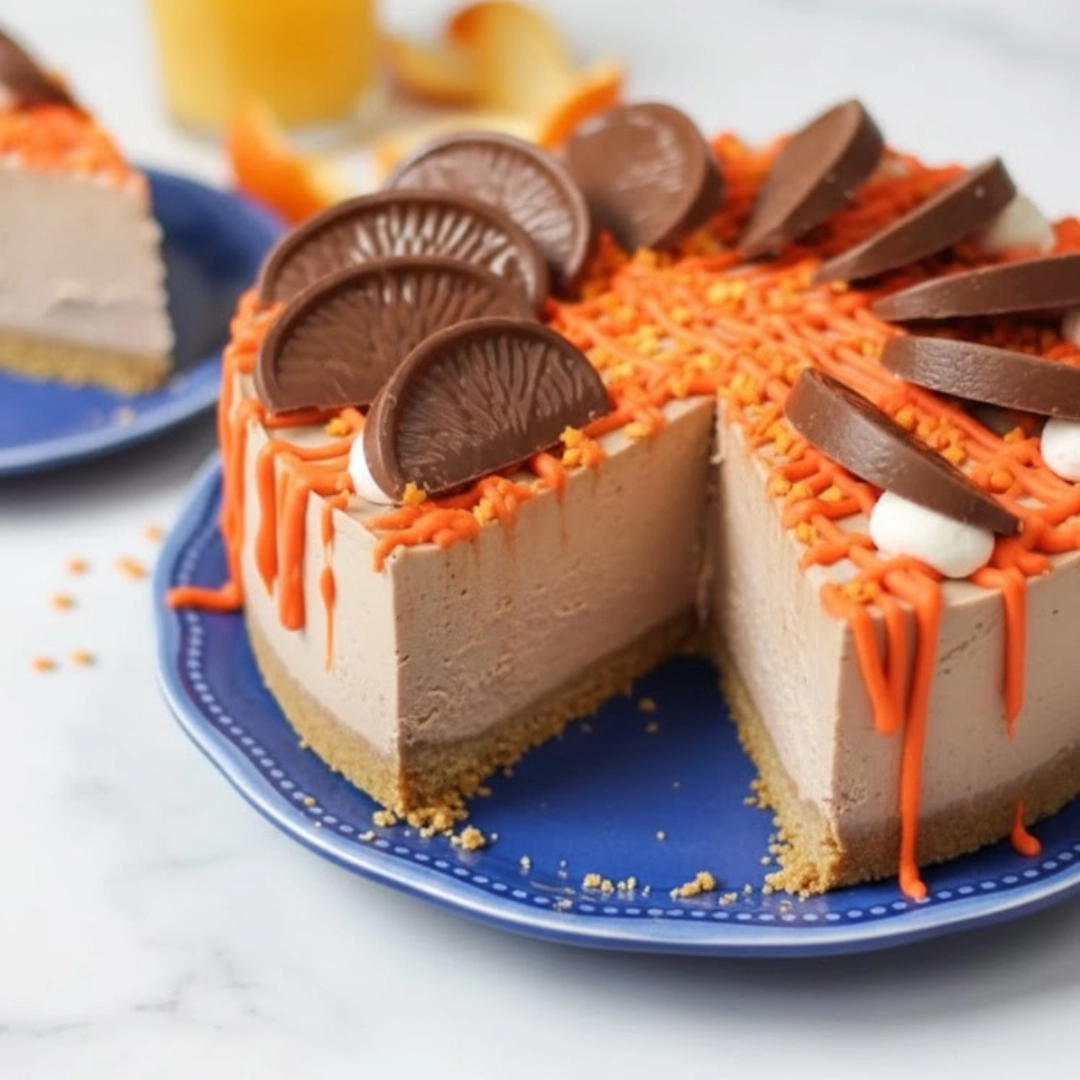
The combination of deep, rich chocolate and bright, zesty orange is one of those timeless pairings, especially around the holidays. I first learned to make a traditional baked cheesecake from my father, but it was years later, after receiving a disappointing gluten-free version at a bakery, that I was inspired to create my own. I wanted a show-stopping dessert that everyone could enjoy, regardless of dietary restrictions.
This Chocolate Orange Cheesecake is the result of countless trials, ensuring the gluten-free crust is sturdy yet tender, and the filling is perfectly smooth—no cracks, no sad, sunken centers. As someone who has cooked this dish for years, I’ve perfected the balance between the tartness of the cream cheese and the sweetness of the chocolate, infusing it all with fresh orange zest and juice for an intense, natural flavor. This is more than just a recipe; it’s a tested method for creating a truly decadent, creamy, and reliable Chocolate Orange Cheesecake that will become a new family tradition.
Table of Contents
Essential Components for the Perfect Cheesecake Texture
Achieving that signature silky-smooth, creamy texture in a baked cheesecake requires attention to a few simple, yet critical, steps.
The Secret to a Stable Gluten-Free Crust
The foundation of any great cheesecake is a crust that holds up to the creamy filling without tasting dry or gritty. Since we are focused on a gluten-free recipe, using a high-quality gluten-free wafer or graham cracker alternative is essential.
- Bind with Butter: Ensure your crumbs are fully saturated with melted, unsalted butter. The mixture should hold together easily when squeezed.
- Pre-Baking for Sturdiness: A short pre-bake firms up the crust and prevents it from crumbling when slicing. Always cool the crust completely before adding the filling.
Understanding the Water Bath Technique (Baking Science)
The water bath, or bain-marie, is a non-negotiable technique for a perfect baked cheesecake. It insulates the delicate cream cheese mixture from the oven’s direct heat.
- Even Cooking: It ensures the cheesecake cooks evenly from the edges to the center, preventing the edges from drying out and cracking before the middle is set.
- Moisture: The steam created by the hot water adds crucial moisture to the oven environment, preventing the top surface from drying and cracking.
Simple Ingredients for Your Tested Chocolate Orange Cheesecake
Using room-temperature ingredients is key to preventing lumps and achieving that smooth, velvety filling.
For the Gluten-Free Crust (The Foundation)
| Ingredient | Measurement | Notes |
| Gluten-Free Graham Crackers/Wafers | 10 oz (about 2 cups crumbs) | Finely ground |
| Unsalted Butter | 6 Tbsp | Melted |
| Granulated Sugar | 2 Tbsp | Optional, for added sweetness |
For the Rich Chocolate Orange Filling
| Ingredient | Measurement | Notes |
| Cream Cheese, full fat | 3 (8 oz) blocks | Room Temperature |
| Granulated Sugar | 1 cup | |
| Sour Cream | 1/2 cup | Room Temperature; adds tang and moisture |
| Fresh Orange Zest | Zest of 2 large oranges | Use an extra-fine zester |
| Fresh Orange Juice | 1 tsp | For concentrated orange flavor |
| Pure Vanilla Extract | 1 tsp | |
| Large Eggs | 3 | Room Temperature |
| High-Quality Dark Chocolate | 4 oz | Melted and slightly cooled |

For the Orange Glaze and Garnish
| Ingredient | Measurement | Notes |
| Powdered Sugar | 1 cup | |
| Fresh Orange Juice | 2-3 Tbsp | Adjust for desired thickness |
| Chocolate Shavings/Orange Segments | For garnish |
Step-by-Step: Crafting Your Decadent Homemade Dessert
Follow these steps precisely for a perfect, crack-free Chocolate Orange Cheesecake.
Part I: Preparing the Springform Pan and Crust
- Preheat and Prep: Preheat your oven to $350^\circ \text{F}$ ($175^\circ \text{C}$). Wrap the bottom and sides of a 9-inch springform pan tightly with heavy-duty aluminum foil to prevent water from the water bath from seeping in.
- Make the Crust: In a medium bowl, combine the gluten-free crumbs, melted butter, and sugar. Press the mixture firmly into the bottom and 1 inch up the sides of the prepared pan.
- Pre-Bake: Bake the crust for 8-10 minutes. Remove and set aside to cool while preparing the filling. Reduce the oven temperature to $325^\circ \text{F}$ ($160^\circ \text{C}$).
Part II: Mixing and Baking the Silky Filling
- Melt the Chocolate: Gently melt the dark chocolate in a double boiler or in the microwave in 30-second intervals until smooth. Let it cool slightly.
- Cream the Base: In a large bowl, using an electric mixer, beat the room-temperature cream cheese until completely smooth. This is vital; any lumps here will result in a lumpy final product.
- Add Wet Ingredients: Beat in the sugar, sour cream, orange zest, orange juice, and vanilla extract until just combined.
- Incorporate Chocolate: Pour the slightly cooled melted chocolate into the cream cheese mixture and mix on low speed until the batter is a uniform chocolate color.
- Add Eggs (Gently!): Beat in the eggs one at a time, mixing only until each is just incorporated. Overmixing the eggs adds too much air, which causes the cheesecake to rise rapidly and then crack when cooling.
- Bake with Water Bath: Pour the filling into the cooled crust. Place the foil-wrapped springform pan into a larger baking pan. Carefully pour hot water into the larger pan until it reaches halfway up the side of the springform pan.
- Bake: Bake for 60–75 minutes. The center should still look slightly wobbly (like firm jelly) when gently shaken.
- Cool Down: Turn the oven off, prop the door open slightly, and leave the cheesecake inside the water bath for 1 hour. This slow cooling prevents cracking. Remove the cheesecake from the oven, remove the foil, and cool completely on a wire rack.

Part III: The Essential Chill and Glaze
- Chill: Once cool, cover the cheesecake with plastic wrap (ensure it doesn’t touch the surface) and refrigerate for a minimum of 6 hours, but preferably overnight. This sets the internal structure.
- Glaze and Garnish: Whisk together the powdered sugar and enough orange juice to create a thick, pourable glaze. Drizzle over the chilled cheesecake just before serving. Garnish with chocolate shavings or fresh orange segments.
Chef’s Tips and Ingredient Swaps for Success
After testing this recipe multiple times, I’ve gathered a few key insights to guarantee your success.
Troubleshooting Common Cheesecake Issues
- Cracking: Almost always caused by one of two things: overmixing the eggs, or cooling the cheesecake too quickly. Always use the water bath and the slow oven cool-down method.
- Runny Filling: Check your cream cheese. Ensure you use full-fat cream cheese and that you don’t over-moisten the filling with too much liquid. If the filling seems too thin before baking, ensure you beat the cream cheese fully at the start.
- Crumbly Crust: You likely needed more melted butter in your gluten-free crumb mixture.
Dairy-Free and Other Ingredient Substitutions
For those seeking a fully plant-based or dairy-free alternative to this Chocolate Orange Cheesecake, substitutions are possible, though they may slightly alter the final texture:
- Cream Cheese: Use firm, plant-based cream cheese alternatives. Ensure they have a neutral flavor profile.
- Sour Cream: Substitute with full-fat, unsweetened plant-based yogurt (like coconut or soy) that has been strained to remove excess moisture.
- Crust: Use gluten-free digestive biscuits or a simple almond meal crust.
- Eggs: The role of the egg in this baked cheesecake is structural. I do not recommend a direct substitution here, but a no-bake version would be better suited for egg-free diets.
If you are looking for other unique dessert ideas, you might enjoy this Churro Cheesecake recipe, which uses a different, cinnamon-sugar approach.

Storing, Freezing, and Making Ahead
This Chocolate Orange Cheesecake is an excellent make-ahead dessert, which is perfect for entertaining.
- Storage: The finished cheesecake will last well-covered in the refrigerator for up to 5 days. For the best flavor and texture, I suggest consuming it within 3 days.
- Freezing: For long-term storage, cool the cheesecake completely, but do not add the glaze. Wrap it tightly in several layers of plastic wrap, then a final layer of foil. Freeze for up to 1 month. Thaw overnight in the refrigerator before glazing and serving.
- Serving Temperature: The perfect slice is achieved when the cheesecake is fully chilled.
Don’t miss to follow us in Pinterest.
FAQs About This Chocolate Orange Cheesecake
1. Can I use pre-made chocolate or orange extract instead of fresh zest?
While you technically can, I strongly advise against it for this Chocolate Orange Cheesecake recipe. Extracts provide a one-dimensional, sometimes artificial, flavor. Fresh orange zest contains aromatic oils that give the dish a bright, complex, and natural citrus lift that cannot be replicated.
2. Why do you use sour cream in the filling?
Sour cream, or full-fat Greek yogurt, is essential. It adds a pleasant, subtle tang that cuts through the richness of the cream cheese and chocolate. More importantly, it adds moisture and fat, contributing to the cheesecake’s famous smooth texture and helping to prevent cracking.
3. I have a question about baking science. How does this compare to making bread?
That’s a great question about the science of cooking! Unlike making a structured loaf with yeast, such as an easy sourdough bread recipe where you need strong gluten development, this recipe aims for the opposite. We want minimal structure and maximum smoothness, which is why we handle the batter so gently.
Chocolate Orange Cheesecake (Gluten-Free)
Ingredients
- 10 oz gluten-free graham crackers or wafers, finely ground
- 6 tbsp unsalted butter, melted
- 2 tbsp granulated sugar (optional)
- 24 oz cream cheese, full-fat, room temperature
- 1 cup granulated sugar
- 1/2 cup sour cream, room temperature
- zest of 2 large oranges
- 1 tsp fresh orange juice
- 1 tsp pure vanilla extract
- 3 large eggs, room temperature
- 4 oz dark chocolate, melted and slightly cooled
- 1 cup powdered sugar
- 2-3 tbsp fresh orange juice (for glaze)
- chocolate shavings or orange segments (for garnish)
Instructions
- Preheat oven to 350°F (175°C). Wrap the outside of a 9-inch springform pan with heavy-duty foil.
- Mix graham crumbs, melted butter, and sugar. Press into the bottom and 1 inch up the sides of pan.
- Bake crust for 8–10 minutes. Remove and cool. Reduce oven temp to 325°F (160°C).
- Melt dark chocolate and set aside to cool slightly.
- Beat cream cheese until smooth. Add sugar, sour cream, orange zest, juice, and vanilla. Mix well.
- Add melted chocolate to mixture and beat until combined.
- Add eggs one at a time, mixing gently after each. Do not overmix.
- Pour filling into cooled crust. Place springform in a larger pan and fill with hot water halfway up the sides.
- Bake 60–75 minutes, until edges are set but center jiggles slightly. Turn off oven, crack door, and let sit for 1 hour.
- Remove from oven and foil. Cool completely on a wire rack.
- Chill covered in fridge for at least 6 hours or overnight.
- Whisk powdered sugar with orange juice to make glaze. Drizzle over cheesecake and garnish with chocolate or orange segments before serving.
Notes
Equipment
- 9-inch springform pan
- mixing bowls
- electric mixer
- foil
- zester or microplane
- baking dish (for water bath)
- wire rack