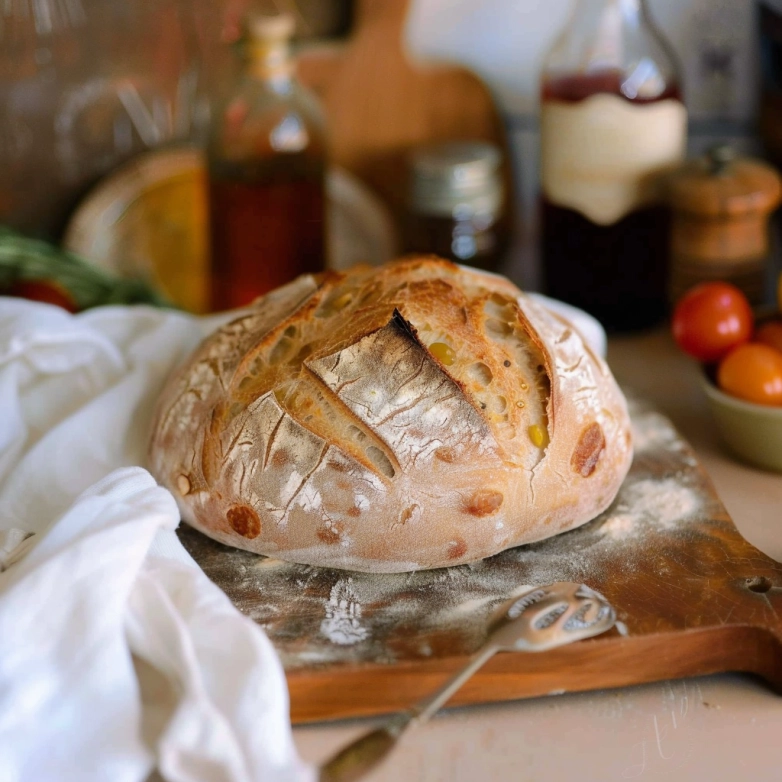
I still remember the first time I pulled a sourdough loaf from my oven. The crust was cracked and uneven, and the crumb was far from perfect, but the smell filled my kitchen with pure comfort. That moment began my long love for sourdough baking, a craft that feels both ancient and deeply personal. Over the years, after dozens of trials and adjustments, I learned that making great sourdough isn’t about perfection. It’s about patience, intuition, and trusting a process that has fed generations.
This sourdough bread recipe is one I’ve tested many times to make sure it’s simple enough for beginners yet flavorful enough to impress anyone. With only four ingredients—flour, water, salt, and starter—you can create bread with a golden crust, soft open crumb, and a tangy aroma that no store-bought loaf can match. The slow fermentation helps your body digest the grains more easily and enhances the bread’s natural flavor.
If you’ve ever wanted to bake your own sourdough but felt intimidated, this guide will walk you through every step clearly. You’ll learn how to care for your starter, master the stretch-and-fold technique, and bake a loaf that looks as beautiful as it tastes.
Table of Contents
What Makes This Sourdough Bread Recipe Unique
After testing countless loaves, I designed this sourdough bread recipe to be both beginner-friendly and reliable. Many first-time bakers think sourdough requires professional tools or secret techniques, but the truth is that success depends on understanding timing, texture, and temperature. Once you get those right, the process becomes second nature.
Here’s what sets this recipe apart:
1. Simple ingredients, no special flour needed
You can make this bread using regular all-purpose flour. It’s forgiving, widely available, and creates a soft crumb with just the right amount of chew.
2. Long, slow fermentation for flavor and health
Letting the dough rest for an extended time allows natural fermentation to work its magic. The result is a tangy flavor, better texture, and a loaf that’s easier to digest.
3. Foolproof stretch-and-fold method
Instead of kneading, this recipe uses gentle folds that strengthen the dough without overworking it. This technique helps develop an airy crumb and a beautiful rise.
4. Adaptable for your schedule
You can ferment the dough overnight in the fridge or bake the same day if you start early. Either way, the method is flexible and fits easily into your routine.
5. Tested for consistency
As someone who has baked this sourdough dozens of times, I’ve fine-tuned every step to work in a home kitchen. You’ll get clear, measurable results every time you follow the guide.
This combination of flavor, simplicity, and reliability makes this sourdough bread recipe one you’ll return to again and again.
What Is Sourdough Bread and Why It Matters
Sourdough bread is one of the oldest and most natural forms of bread. Instead of using commercial yeast, it relies on a living culture called a sourdough starter — a mixture of flour and water that naturally captures wild yeast and friendly bacteria from the air. These microorganisms ferment the dough, giving sourdough its signature tangy flavor and chewy texture.
What makes sourdough special isn’t just the taste, but the process itself. The slow fermentation breaks down complex starches and gluten, making the bread easier to digest and more nutritious. It also extends the shelf life naturally, without preservatives.
When you bake with a healthy starter, you’re not just making bread — you’re cultivating a living tradition that connects you to centuries of bakers who relied on the same simple ingredients. Every loaf you make carries its own personality, shaped by your kitchen’s temperature, your timing, and even your touch.
In this sourdough bread recipe, you’ll experience how natural fermentation transforms a basic dough into something rich in flavor, texture, and history.
Health Benefits of Sourdough Bread
Many people fall in love with sourdough for its taste, but its health benefits are just as impressive. The fermentation process makes this sourdough bread recipe naturally more digestible and nourishing compared to breads made with commercial yeast.
1. Easier to digest
During fermentation, wild yeast and lactic acid bacteria break down gluten and starches. This makes the bread gentler on the digestive system, especially for those who are sensitive to gluten (though it’s not suitable for people with celiac disease).
2. Better nutrient absorption
The natural bacteria help reduce phytic acid, a compound that can block the absorption of minerals like iron and zinc. With phytic acid broken down, your body can absorb more nutrients from the grains.
3. Lower glycemic response
Sourdough bread tends to raise blood sugar more slowly than conventional white bread, keeping you fuller for longer and supporting balanced energy levels.
4. Rich in natural flavor and probiotics
While baking kills most live cultures, the fermentation process still leaves behind beneficial acids and compounds that can support gut health indirectly and enhance the bread’s complex, tangy flavor.
Sourdough Starter Basics
Every great sourdough bread recipe begins with a strong, active starter. Your sourdough starter is the living heart of your bread — a blend of flour and water that ferments naturally, filled with wild yeast and good bacteria. Once mature, it’s what gives your dough the rise, aroma, and unique flavor that define true sourdough.
What Is a Starter?
A starter is a fermented mixture that traps wild yeast from the environment. When it’s fed regularly with fresh flour and water, it stays active and ready to use for baking. You’ll know it’s healthy when it becomes bubbly, doubles in size within a few hours of feeding, and passes the “float test” (a small spoonful floats in water).
How to Feed and Maintain It
- Discard about half of your starter.
- Feed it with equal parts flour and water by weight (for example, 100 grams each).
- Stir until smooth, then cover loosely.
- Rest at room temperature for 4–12 hours, until active and bubbly.
Repeat this process daily if kept at room temperature, or weekly if stored in the refrigerator. A consistent feeding routine keeps your starter lively and dependable.
Troubleshooting Tips
- Smells sour or vinegary: This is normal. It’s just active fermentation.
- Black liquid on top: It’s called “hooch” and means your starter is hungry. Pour it off and feed again.
- No bubbles after several days: Try keeping it warmer (around 75°F) and feed with whole wheat flour for a few feedings.
- Mold or pink streaks: Discard and start fresh — that’s a sign of contamination.
Once you’ve nurtured a strong starter, you’re ready to bake. It’s the key to developing the perfect crust, rise, and flavor in your homemade sourdough bread.
Ingredients You’ll Need
This sourdough bread recipe keeps things simple. With only a few pantry staples and an active starter, you’ll create a bakery-quality loaf at home. Using a kitchen scale gives the most accurate results, but cup measurements are also included for convenience.
Basic Ingredients
- 475 grams (3 ½ cups) all-purpose flour
A versatile choice that creates a tender, chewy crumb. You can substitute part of it with bread flour for extra structure or with whole wheat for a nuttier flavor. - 325 grams (1 ⅓ cups) water
Use filtered or dechlorinated water if possible. Chlorine can inhibit fermentation. - 100 grams (½ cup) active sourdough starter
Feed your starter 4–12 hours before mixing the dough. It should be bubbly, airy, and pass the float test. - 10 grams (2 teaspoons) sea salt
Salt enhances flavor and helps strengthen the gluten network during fermentation.

Optional Add-Ins for Flavor
Once you’re comfortable with the basic loaf, try adding:
- 1 tablespoon honey for a slightly sweeter, golden crust
- 2 teaspoons olive oil for a softer crumb
- A handful of seeds or oats on top for texture and visual appeal
Ingredient Notes
- Avoid using cold water straight from the fridge — lukewarm water (around 80°F) helps your dough rise consistently.
- If using whole wheat flour, you may need to add a few extra teaspoons of water to maintain hydration.
- For a rustic taste, try mixing 20% rye flour into the total flour weight.
Each of these ingredients plays a specific role, and learning how they interact is the first step toward mastering sourdough.
Tools for Success
While you don’t need a professional bakery setup to make this sourdough bread recipe, having the right tools will make your baking easier and more consistent. Most of these items are likely already in your kitchen, and the few specialized ones are worthwhile investments for any bread lover.
Essential Tools
1. Large mixing bowl
Use a deep bowl with enough space for your dough to expand during fermentation. Glass, ceramic, or stainless steel bowls all work well.
2. Kitchen scale
Precision matters in sourdough baking. Measuring by weight ensures consistent hydration and texture every time.
3. Plastic wrap, lid, or damp towel
These help keep moisture in and prevent your dough from drying out during resting and fermentation.
4. Dutch oven
A heavy cast iron Dutch oven traps steam, creating that crisp, golden crust that makes sourdough irresistible. If you don’t have one, use a baking sheet and place a shallow tray of water in the oven to generate steam.
5. Parchment paper
Makes transferring the dough into the hot Dutch oven safe and mess-free.
6. Bench scraper
Helpful for shaping, dividing, and cleaning your work surface with ease.
7. Lame or sharp razor
Used for scoring the dough before baking, which controls expansion and adds beautiful designs.
Optional but Helpful
- Banneton basket or towel-lined bowl: Encourages an even shape and lovely pattern on the crust.
- Digital thermometer: Lets you check dough temperature for consistent fermentation.
- Spray bottle: Useful for adding moisture to the oven for a crisp crust.
Pro Tip
Keep your tools clean and dry between uses. Any leftover moisture or residue can affect future doughs and even harm your starter over time.
Step-by-Step Guide — How to Make Sourdough Bread
This part walks you through the full process of making this sourdough bread recipe from start to finish. Every stage plays a role in building flavor, texture, and structure. Be patient, observe your dough, and let time do most of the work.
Step 1. Feed Your Starter
Feed your sourdough starter 4–12 hours before mixing the dough. It’s ready when it has doubled in size, looks airy, and passes the float test (a small spoonful floats in water).
Step 2. Mix the Dough
In a large mixing bowl, combine:
- 325 grams water
- 100 grams active starter
- 10 grams salt
- 475 grams flour
Mix with a spoon or your hands until no dry flour remains. The dough will look rough and shaggy at this stage — that’s perfectly fine.
Step 3. Autolyse (Rest the Dough)
Cover the bowl with plastic wrap or a lid and let it rest for 30 minutes. This resting period allows the flour to fully hydrate, helping gluten begin to form naturally.
Step 4. Stretch and Fold
Instead of kneading, use the stretch-and-fold method to strengthen the dough.
- Wet your hand slightly to prevent sticking.
- Grab one edge of the dough, stretch it upward, and fold it back toward the center.
- Turn the bowl a quarter turn and repeat until all sides have been stretched and folded once.

This counts as one round. Do three total rounds, spaced 30 minutes apart.
Step 5. Bulk Fermentation
After the final stretch and fold, cover the bowl again and let the dough rise until it doubles in size. Depending on room temperature and starter strength, this can take 6 to 12 hours.
- At around 75°F, expect 6–8 hours.
- In a cooler kitchen, it may take longer.
If the dough becomes soupy or collapses, it’s likely over-proofed — next time, shorten the fermentation.
Step 6. Shape the Dough
Once doubled, gently transfer the dough to a lightly floured surface.
- Fold it onto itself a few times to build tension.
- Shape it into a tight round or oval by pulling it gently toward you.
- Let it rest uncovered for 15–20 minutes so the surface can dry slightly.
For the final shaping, fold the sides inward, pinch the seams together, and place the dough seam-side up into a floured banneton or towel-lined bowl.
Step 7. Overnight Proof
Cover the dough with plastic or a large bag and refrigerate for 12–15 hours. This slow, cold fermentation deepens flavor and makes scoring easier.
If you prefer to bake the same day, you can proof at room temperature for 3–4 hours instead.
Step 8. Bake
- Preheat your Dutch oven to 500°F (260°C) for one hour.
- Remove your dough from the fridge, gently flip it onto parchment paper, and dust the top with flour.
- Score with a razor or lame to control the oven spring and create decorative designs.
- Carefully place the dough and parchment into the hot Dutch oven, cover with the lid, and bake for 20 minutes.
- Remove the lid, reduce the oven to 475°F (245°C), and bake another 15–25 minutes until the crust is deep golden brown.
Let the loaf cool completely on a wire rack before slicing. Cutting too early can make the interior gummy.
Pro Tips for Perfect Crumb and Crust
Even though this sourdough bread recipe is designed for beginners, mastering a few small details will take your loaf from good to bakery-quality. These tips come from years of testing, baking in different climates, and fine-tuning timing and texture.
1. Watch the Dough, Not the Clock
Fermentation time can vary depending on temperature, flour type, and starter strength. Instead of relying only on hours, look for signs: the dough should feel airy, slightly jiggly, and about doubled in size.
2. Temperature Is Everything
Sourdough thrives around 75°F (24°C). If your kitchen is cooler, place the dough inside an unheated oven with the light on. Too much heat, however, can cause over-proofing and collapse.
3. Handle Gently
Overworking the dough can deflate the air pockets that give sourdough its signature open crumb. Use gentle folds and minimal handling when shaping.
4. Use Steam for a Crisp Crust
If you don’t own a Dutch oven, spray the loaf with water before baking and place a small dish of water on the lower rack. Steam keeps the crust flexible during the first few minutes of baking, allowing for a higher rise.

5. Let It Cool Completely
Resist cutting into the bread right out of the oven. Allow at least one hour of cooling to set the crumb and finish the baking process internally.
6. Practice Makes Perfect
Your first few loaves might not look picture-perfect, but each bake teaches you something new. Note details like room temperature, rise time, and dough texture so you can adjust next time.
Perfect sourdough isn’t about strict rules — it’s about learning how your dough behaves in your kitchen. Once you tune into those small cues, every loaf will feel like second nature.
Flavor Variations to Try
Once you’ve mastered the classic sourdough bread recipe, you can start experimenting with different flavors. Each variation brings a new personality to the loaf, whether it’s aromatic, hearty, or slightly sweet. Here are a few of my favorite ways to customize sourdough while keeping the base method the same.
1. Rosemary and Sea Salt Sourdough
Add 1 tablespoon of chopped fresh rosemary and a sprinkle of flaky sea salt just before shaping. This variation pairs beautifully with soups, stews, and roasted meats.
2. Whole Wheat Sourdough
Substitute up to 30% of the all-purpose flour with whole wheat flour. The result is a loaf that’s slightly denser with a nutty, earthy flavor. You may need to add a touch more water to maintain hydration.
3. Garlic and Herb Sourdough
Mix in 2 cloves of roasted garlic and 1 teaspoon each of dried oregano and thyme during the final stretch and fold. This version makes an incredible base for sandwiches or toast.
4. Seeded Sourdough
Roll the shaped dough in a mix of sesame, flax, or sunflower seeds for added crunch and nutrition. Toasting the seeds lightly beforehand enhances the aroma.
5. Cinnamon Raisin Sourdough
For a gentle sweetness, add ½ cup raisins and 1 teaspoon cinnamon after the first stretch and fold. It’s ideal for breakfast with butter or alongside a warm drink.
6. Crust Finish Options
Before baking, brush the loaf with olive oil for a deep golden crust or dust it with flour for a rustic farmhouse look.
Experimenting with these variations is part of the fun of sourdough baking. Once you understand how your dough behaves, you can confidently create new versions that fit your own taste and style.

Serving and Storage Tips
After all the effort that goes into this sourdough bread recipe, it deserves to be served and stored properly so you can enjoy every slice at its best.
Serving Suggestions
- Fresh and warm: Slice the loaf once it has cooled for at least an hour. Spread with salted butter or drizzle with olive oil for a simple, satisfying bite.
- Breakfast idea: Toast a slice and top with honey, jam, or avocado. It also pairs perfectly with sweet treats like Churro Cheesecake for a brunch spread.
- Dinner pairing: Serve alongside soups, stews, or roasted vegetables. Try it as a side for dessert nights featuring Dubai Chocolate Bar Recipe for a balanced menu.
- Dessert twist: A thin toasted slice with a scoop of Piñon Ice Cream Recipe creates a wonderful contrast of warm and cold textures.
Storage Tips
1. Room temperature:
Wrap the cooled loaf in a clean cotton towel or store it cut-side down on a wooden board. This helps maintain a crisp crust for 1 to 2 days. Avoid sealing it completely in plastic — that traps moisture and softens the crust.
2. Freezing:
Slice the bread before freezing so you can thaw only what you need. Wrap slices tightly in parchment and place in a freezer-safe bag. They’ll stay fresh for up to 3 months.
3. Reheating:
Warm slices in a 350°F (175°C) oven for 10 minutes or pop them in the toaster. This revives the crust and brings back that freshly baked aroma.
Pro Tip
Avoid refrigerating sourdough bread. The cold temperature speeds up staling. Freezing is a much better option for longer storage.
Proper serving and storage ensure that every loaf you bake tastes just as good the next day — maybe even better.
Common Mistakes and Fixes
Even experienced bakers occasionally run into issues with sourdough. The good news is that most problems have simple solutions. Here are the most common mistakes I’ve seen while testing this sourdough bread recipe, along with easy ways to fix them next time.
1. Dough Didn’t Rise Enough
Cause: Starter not active, or dough too cold during fermentation.
Fix: Make sure your starter doubles in size before use and passes the float test. Keep your dough in a warm spot (around 75°F) during the bulk rise.
2. Bread Is Too Dense
Cause: Overworked dough or under-proofing.
Fix: Handle gently during shaping and allow enough time for fermentation. The dough should feel light, airy, and jiggly before baking.
3. Crust Too Hard or Thick
Cause: No steam or overbaking.
Fix: If not using a Dutch oven, add a pan of hot water in the oven to create steam. Cover the bread during the first half of baking, then uncover to finish browning.
4. Dough Too Wet or Sticky
Cause: Overhydration or humid environment.
Fix: Use slightly less water next time or add a few extra folds to strengthen the dough. Flour your hands and surface lightly while shaping.
5. Loaf Spread Too Much During Baking
Cause: Shaping without enough tension or dough over-proofed.
Fix: Tighten the surface during shaping to build strength. If the dough feels overly soft or collapses easily, shorten proofing time next bake.
6. Overly Sour Flavor
Cause: Starter over-fermented or dough left too long in the fridge.
Fix: Feed your starter more frequently and reduce cold proofing time by a few hours.
7. Uneven Scoring or Poor Oven Spring
Cause: Dull blade or cold dough too firm to expand.
Fix: Use a sharp razor and make a deep expansion score about ½ inch thick. If the dough feels too stiff, let it sit at room temperature for 20 minutes before baking.
Remember, every “imperfect” loaf still teaches you something valuable. The beauty of sourdough lies in its variability — no two loaves are ever exactly the same.
Nutrition Information
This sourdough bread recipe offers a wholesome balance of carbohydrates, protein, and fiber — with fewer additives and better digestibility than most commercial loaves. The long fermentation process improves flavor while reducing gluten and phytic acid content, making each slice satisfying and nourishing.
Here’s an approximate nutrition breakdown per serving (based on 1 of 12 slices):
| Nutrient | Amount per Serving |
|---|---|
| Calories | 152 kcal |
| Carbohydrates | 32 g |
| Protein | 4 g |
| Fat | 0.4 g |
| Saturated Fat | 0.1 g |
| Fiber | 1 g |
| Sodium | 325 mg |
| Potassium | 42 mg |
| Calcium | 7 mg |
| Iron | 2 mg |
Note: Nutritional values are estimates and can vary depending on the flour and starter used. This content is for educational purposes only and does not replace professional dietary or medical advice.
A slice of homemade sourdough pairs beautifully with butter, olive oil, or even a drizzle of honey — all while giving you the satisfaction of knowing every ingredient was chosen by you.
Follow us in Pinterest.
FAQs About Sourdough Bread Recipe
Here are some of the most common questions readers ask when baking this sourdough bread recipe, along with practical, experience-tested answers to help you troubleshoot and improve every loaf.
1. How do I know when my sourdough starter is ready to use?
Your starter is ready when it doubles in size within 4–8 hours after feeding, looks bubbly and airy, and passes the float test (a small spoonful floats in water). Using an underfed starter is one of the main reasons for dense or flat bread.
2. Can I make sourdough bread with whole wheat or rye flour?
Yes. You can replace up to 30% of the white flour with whole wheat or rye flour for more flavor and nutrition. These flours absorb more water, so you may need to slightly increase hydration by a few tablespoons.
3. Why did my dough turn sticky and hard to handle?
Sticky dough usually means it’s overhydrated or the gluten isn’t fully developed yet. Try giving it a few extra rounds of stretch and folds to strengthen it. Lightly wetting your hands instead of flouring them can also help you handle it more easily.
4. Can I skip the overnight proof?
You can, but the long cold proof in the refrigerator improves flavor and makes scoring easier. If you’re short on time, a room temperature proof of 3–4 hours will still give good results.
5. How do I keep sourdough bread fresh longer?
Let the bread cool completely, then store it cut-side down on a wooden board or wrapped in a linen towel. Avoid plastic bags at room temperature — they soften the crust. For long-term storage, freeze slices and reheat in the oven or toaster.
6. What’s the best temperature to bake sourdough?
Start high — about 500°F (260°C) — to help the dough expand quickly, then reduce to 475°F (245°C) once you remove the lid or steam source. This combination gives you a deep, crisp crust and a well-developed interior.
7. Can I use sourdough discard in this recipe?
No. Discard doesn’t have enough strength to leaven bread. However, you can use it in pancakes, waffles, crackers, or muffins instead.
8. Why is my sourdough loaf too sour?
An overly tangy flavor can come from over-fermentation or an old starter. Feed your starter more often, and shorten fermentation times to keep the flavor balanced and mild.
9. How can I make my sourdough crust softer?
Brush the crust lightly with olive oil or butter right after baking, and store the cooled loaf wrapped in a towel overnight. This helps soften the outer layer while keeping the inside moist.
10. What’s the best way to slice sourdough?
Wait until the loaf has completely cooled, then use a serrated bread knife. Cutting too soon can make the crumb gummy and uneven.
Beginner Sourdough Bread
Ingredients
- 475 g all-purpose flour
- 325 g water (lukewarm, ~80°F)
- 100 g active sourdough starter
- 10 g sea salt
Instructions
- Feed your sourdough starter 4–12 hours before mixing. It should double in size, appear bubbly, and pass the float test.
- In a large bowl, mix the water, active starter, salt, and flour until fully combined. Dough will look shaggy.
- Cover and let the dough rest (autolyse) for 30 minutes. This helps hydrate the flour and starts gluten development.
- Perform 3 rounds of stretch-and-fold, spaced 30 minutes apart. Grab, stretch, and fold the dough over itself on all sides.
- Cover and let rise at room temp until doubled. This bulk fermentation takes 6–12 hours depending on temp.
- Transfer dough to a floured surface, pre-shape, rest 15–20 minutes, then shape into a round or oval.
- Place dough seam-side up in a floured banneton or towel-lined bowl. Cover and refrigerate 12–15 hours (or proof 3–4 hrs at room temp).
- Preheat Dutch oven to 500°F (260°C) for 1 hour. Turn out dough onto parchment, score, and bake covered for 20 minutes.
- Uncover, reduce oven to 475°F (245°C), and bake 15–25 more minutes until golden brown. Cool on rack before slicing.
Notes
Equipment
- large mixing bowl
- kitchen scale
- plastic wrap or lid
- Dutch oven
- parchment paper
- bench scraper
- razor or lame
- banneton or towel-lined bowl
- cooling rack